Muffled sound is a function of inadequate high-mid and high-frequency sound output (3kHz and above). The speakers sound as if they are in a closed box.
This can be due to one of several reasons;
Obstructed sound waves
Improper audio or EQ settings limiting high-frequency extension
Low treble gain
Mismatched speaker polarity
A blown tweeter/high-frequency driver
A bad capacitor in the high pass filter crossover
If the muffling is due to a software issue, apply the correct setting to fix the problem. Conversely, a blown high-frequency driver or bad cap needs replacing by you or anyone technically gifted.
Regardless, here is how to pinpoint why your speaker is muffled.
1. Obstructed soundwaves
High-frequency sounds have short wavelengths that are easily absorbed or attenuated (lose energy) due to obstruction and distance making the response muffled.
This can be due to;
Improper speaker placement
Blockage of the speaker grill by debris, gunk, hairs, and so on.
For optimal performance, high-mid and high-frequency drivers are placed at about ear level with a direct line of sight between the listener and the speaker. This could be a soundbar, surround speakers in an Atmos setup, or any other speaker.
Don’t place the speaker in an enclosed space. As such, to place speakers behind a projector screen, ensure it’s acoustically transparent.
If your AirPods, headphones, smartphone, tablet, laptop, or TV speakers sound muffled, check for dirt and debris blocking the sound waves. Clear any blockage using a toothbrush and isopropyl alcohol if you are comfortable doing it yourself or get professional help.
2. Improper Audio & EQ settings
With improper audio settings on your source such as AV receiver, tablet, PC, and so on, the output may sound muffled.
Check the playback setting to ensure the treble gain is not set too low which can muffle the acoustic response. For an audio sink with a gain knob, turn it up by a few clicks to around 0 o’clock (midpoint) or higher.
Additionally, use a higher-quality audio format/codec or turn off EQ to see if the problem goes away. You might also need to recalibrate your receiver to level-match your speakers.
3. Mismatched polarity
Mismatched polarity reverses the phase of a speaker to the rest and cancels out certain harmonics. Some output is lost making the sound dull.
Ensure the +tive and -tive terminals at the output and speaker inputs are well connected.
4. Faulty hardware
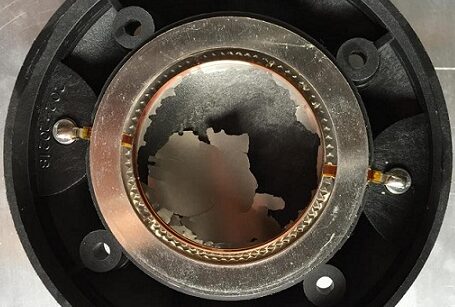
If the high-frequency driver is blown, your speakers will sound muffled. Damage to the driver may be due to mechanical or thermal stress (heat) tearing the cone suspension or damaging the voice coil.
On a multi-way speaker, ensure all drivers are working as intended by closely listening to each or waving your hand in front of each to listen for variation in the output levels.
If a driver is blown get it replaced by a professional. DIY if you are good with solder and can get your hands on a replacement driver.
Blown tweeter
If the high-frequency driver has output but is low, a bad capacitor on the tweeter’s high pass filter (crossover circuit) may be degrading the signals before playback.
Some signs of a bad capacitor are;
Leaking electrolyte,
Bulging,
Browning and corrosion.
The capacitor should be tested for damage and replaced with a capacitor of a similar microfarad value (µF) but can have a higher voltage value.
To Wrap up
Assuming this problem is not limited to a single soundtrack/source, the above steps should get to the root of the problem for fixing.
This may be as simple as cleaning gunk and debris off the device or replacing damaged hardware, usually the driver or a crossover’s capacitor.
We hope this was helpful!
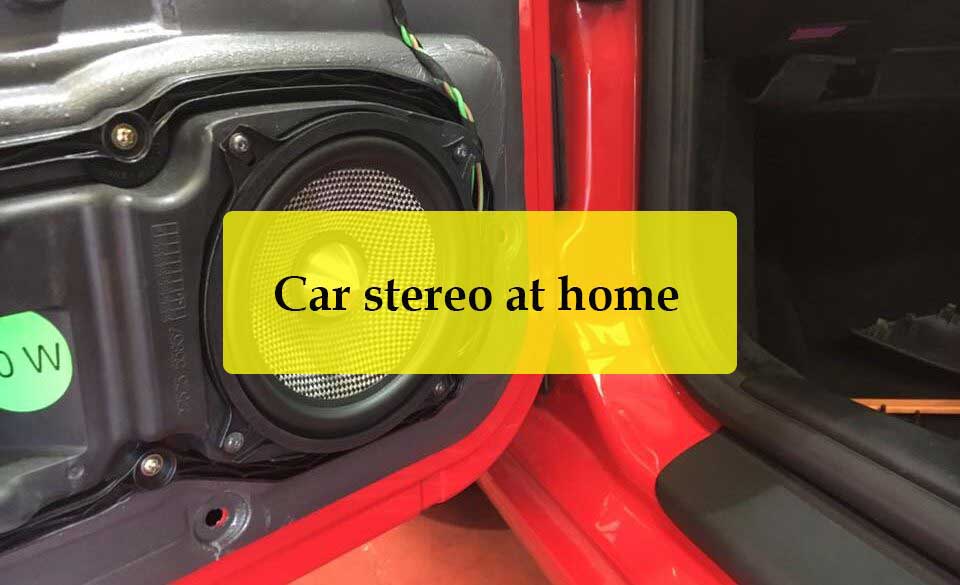
Turn car speakers into Home speakers (Car stereo at home)
Car speakers can be used as home speakers. However, because they are driven at a lower impedance than conventional HT speakers, they are easier to drive and should be impedance-matched to your AVR/Amp. An enclosure is also required for the speaker drivers.
In theory, this should work but due to their sonic characterisctics, car speakers may fit a home setting. Nonetheless, this is still a great budget alternative for casual listening if done right.
In this guide, I will compare the differences between car and home speakers and explain how to convert car speakers for home use.
Home vs car speakers compared
Although both car and home speakers playback audio there are 2 main differences between them;
Design
Impedance rating/Power ratings
Our homes don’t have the same room gain effect as vehicles’ cabins (cabin gain). Thus, speakers designed for a car may not perform that well in a house/garage. This is on account of car cabins being smaller than most rooms.
Car cabins are easier to pressurize when compared to a house meaning the bass in a car is deeper. The smaller the volume, the higher the gain which boosts the perceived bass level (natural bass reinforcement).
Additionally, speaker placement in a car takes into account the seating positions which usually don’t change.
Design
Car speakers are designed to fill smaller and harsher environments with constant temperature fluctuations, moisture, and so on. Thus, quality car speaker cones are often made of polypropylene (PP) resin sheet material that is weather-resistant and has low distortion.
Meanwhile, home theater speakers are not built for rugged conditions.
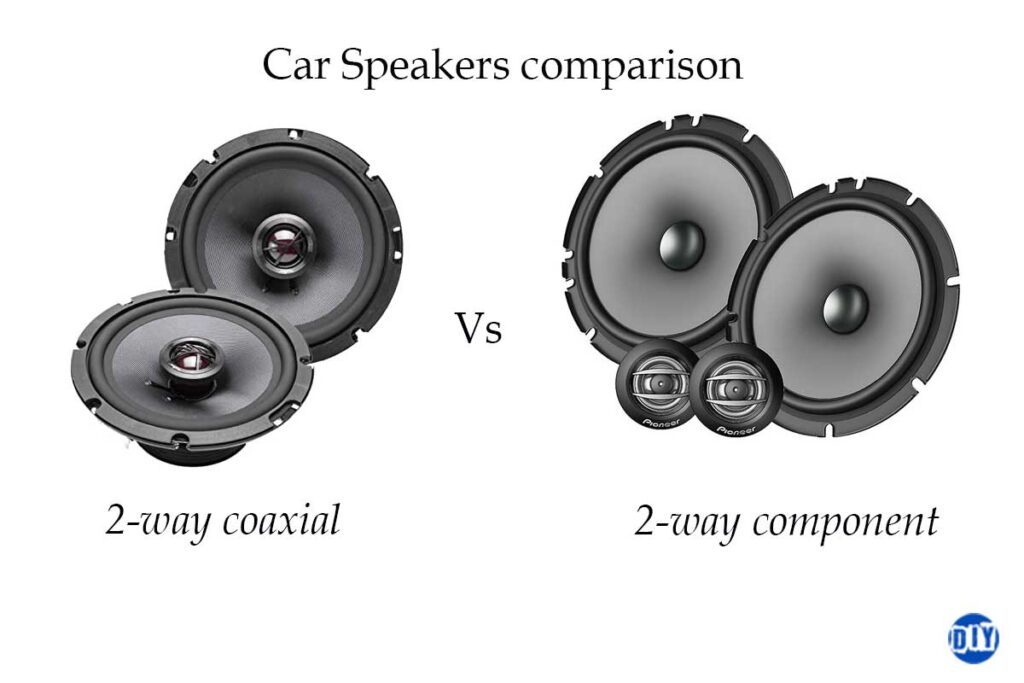
Most car speakers are coaxial/full-range speakers (2-way or 3-way). A 2-way speaker driver has both a woofer and a tweeter. 3-way drivers have a bass and midrange woofer and a tweeter.
Coaxial drivers are not ideal for home sound systems. However, some car speakers are component split and have different drivers for different frequency ranges.
Also, when using car speakers at home you may experience comb filtering which is interference and delay that occurs at the crossover point as audio signals are amplified.
coaxial-vs-component-car-speakers
Impedance
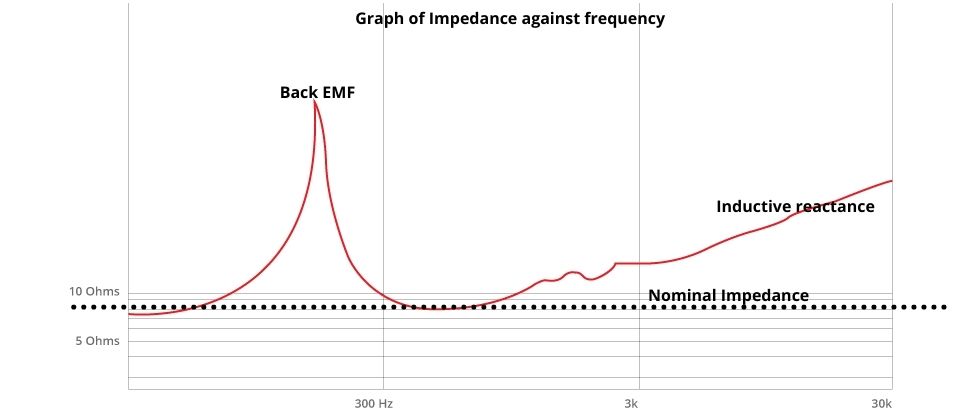
Impedance (measured in Ohms) is the resistance to current flow in a speaker circuitry.
Typically, home speakers have an impedance of 6 or 8 ohms while car speakers only handle smaller loads of around 4 ohms.
This is because a car’s battery outputs 12 to 14 volts while most home outlets output ~110 volts. Therefore, a car’s amp draws a lower voltage and outputs a higher current (amperage) hence low-impedance speakers are required.
A home theater’s amp, on the other hand, should take in a higher voltage and output a lower current. In this case, speakers with a higher impedance are required.
The speakers’ impedance should match that of an amplifier. Car stereo amps have a nominal impedance of about 4 ohms to match the speakers.
An amplifier that outputs 60 watts with 8-ohm home speakers, would need to output 80-120 watts on a 4-ohm load with car speakers for the same SPL level (“volume”).
Impedance-against-frequency-response
With that in mind, let’s look at how to use car speakers at home.
How to use Car speakers at home
Car stereo systems are fairly inexpensive when compared to home audio equipment of the same quality. With a reasonable budget, you can get a decent-sounding system.
Granted, converting a car system for home use is quite technical but here are basic steps on how to do it.
Get materials for the build.
Impedance-match the car speakers to your receiver/amp/integrated amp.
Get an amp for the car sub(s) and or speakers.
Connect the amp/head unit to a home outlet.
Wire the system.
Buy or build a speaker cabinet/enclosure.
1. Get materials for the build
What you need;
Car speakers and subwoofer in an enclosure
A car amp(s)
A +12V DC power supply unit (PSU).
Insulation tape/Heat shrink
Wire stripper
Speaker wire. 12 or 16-gauge for the speakers and 12 or 14-gauge for the sub. Look for the manufacturer’s recommendations.
A car amplifier and RCA cables.
A Bluetooth to RCA adapter or 3.5 mm to RCA adapter
A switch
Spade or ring terminal
A crimping tool
2. Match the impedance
As mentioned earlier, your speakers’ nominal impedance should match or exceed the output impedance of a receiver, integrated, or amplifier to maximize power output.
Speakers don’t have a flat impedance. The impedance value changes with the frequency and is highest at the driver’s resonant or the highest frequencies. For example, a speaker with a nominal impedance of 4 ohms could reach as high as 40 Ohms at the speaker’s resonant frequency. It could also drop to as low as 2.5 ohms.
Nominal impedance is an average of where the impedance value will mostly sit at.
Failing to match the impedance may damage your amplification gear. Alternatively, you could use a head unit with a built-in amp or a car amp rated for the speakers.
You can also match the impedance by connecting the speakers in series. For a receiver or amplifier rated for an 8-ohms load, wire two 4-ohms speakers in series for 8 ohms. To do this, use a speaker wire to connect the positive terminal on one speaker to the positive terminal on the other. Do the same for the negative terminals.
However, this may not give you the highest SPL and sound quality as speakers wired in series draw more power to reach a higher SPL.
Some receivers and integrated amps have an impedance switch to change the impedance (usually, 4 /8 ohms). This is because some home speakers are rated at 4 ohms (nominal impedance).
However, when using a pre-owned receiver, integrated, or amplifier, ensure it can power the speakers.
3. Get a car amplifier
If you are using a stereo head unit without a built-in amp, you will need an amp for the speakers and sub.
This will also apply if your current gear cannot power the speakers depending on their ratings. Most car subs are passive and will need a dedicated amp.
The amp should be powerful enough for the speakers at a lower impedance. More current is drawn as the impedance lowers.
I would recommend a class D amp for the sub and a class AB amplifier for the mids and highs. Class AB amps have better sonic characteristics (will depend) while class D amps are more efficient and cheaper.
4. Connect the car amp to a wall plug
If you are using a car amp to power your system, you will need to connect it to a power source.
Most home power outlets output ~110V AC while car amps require at least +12V DC to turn their circuitries on. You will need a way to convert the AC from your outlet to at least 12V DC. To do this you need a rectifier.
A power supply unit (PSU) is a great example of a rectifier and should be great for this.
If you have an old power supply lying around or plan on buying one, ensure it can power the amp. The PSU should sustain the amp’s current draw.
Since power=Voltage *current (V*I), the current draw will be equal to the amp’s maximum power draw divided by the voltage (power/voltage).
So, if the amp is rated at 400 watts, the PSU should output around 34 amps as 400/12 is 33.33…
This will depend on the class of amp you are using (class A/B or D). A class A/B amp is around 60% efficient meaning 40% of the power drawn is lost as heat. Meanwhile, class D amp can peak at 90% efficiency or more, thus only around 10% of the power is lost as heat.
What’s more, you should account for losses by the amp as a less efficient amp draws more power to reach the same volume level. Class AB amps draw around 1.4 times the rated power while class D amps draw 1.2 times the rated power.
To estimate the maximum power draw, simply multiply the amp power rating by 1.4 for a class AB amp and 1.2 for a class D amp. If both are rated at 400 watts, the class AB amp will draw 560 watts while the class D amp will draw around 480 watts.
From this, we can estimate the current draw by our hypothetical amps. This will be around 47 amps for the A/B amp and 40 amps for the class D amp.
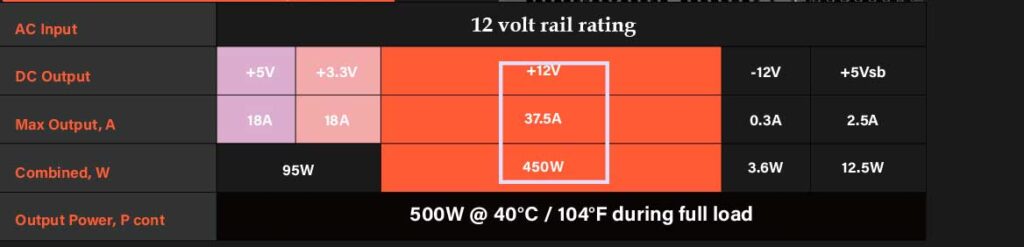
Power supplies vary in rating depending on the manufacturer and type of power supply. Since power supplies usually have more than one voltage rail, we are only interested in the 12v rail.
Most modern power supplies output at least 18 amps on the 12-volt rail which should be enough for casual listening needs. High-end PSUs which are costly can output as much as 34 amps on the 12-volt rail.
12v rail rating example
How to connect a power supply for a car amp in house
Connecting a power supply to a car amplifier should be fairly easy.
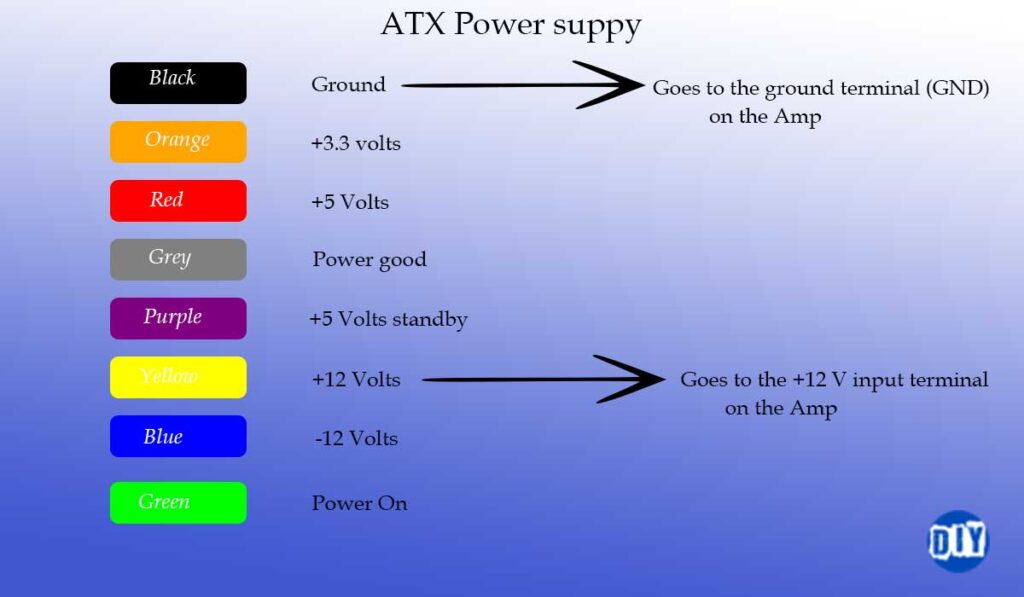
Since most power supplies have several output wires, we will only work with the black and yellow on the PSU. The black wires are used for grounding while the yellow wires supply the 12 volts to the amp.
ATX-power-supply-for-car-amp-at-home
Before doing any connections, ensure the PSU is not connected to a power outlet and that its capacitors have fully discharged to prevent electrocution then follow these steps;
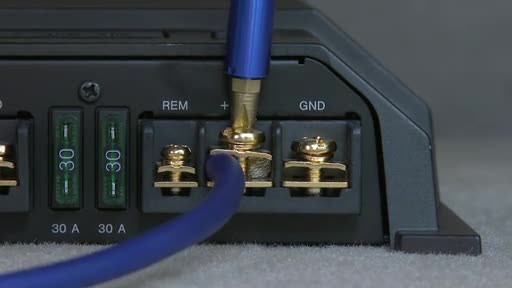
Unsrew the REM, +12V and ground terminals on your amp.
Strip the black wires and twist the ends together. Crimp the black wire with a spade or ring terminal. Insulate the terminal connection with insulation tape or heat shrink and hook the terminal to the GND (ground) on the amp.
Do the same for the yellow wires and connect them to the +12V input on the amp.
Cut a piece of 2-inch speaker wire and use it to jump the REM (Remote) and +12V terminals. This will allow the amp’s circuitry to automatically turn on when it detects a 12-volt+ input from the power supply.
You also have the option of wiring a switch between the REM and +12V terminals.
Plug in the PSU to the power outlet to see if the amp turns on.
X-box power brick for car stereo
As with any power supply, keep in mind the amount of current (amperes/amps) drawn by your amplifier. An X-box power brick will supply around 16 amps.
However, for casual listening, an X-box power supply should power your system.
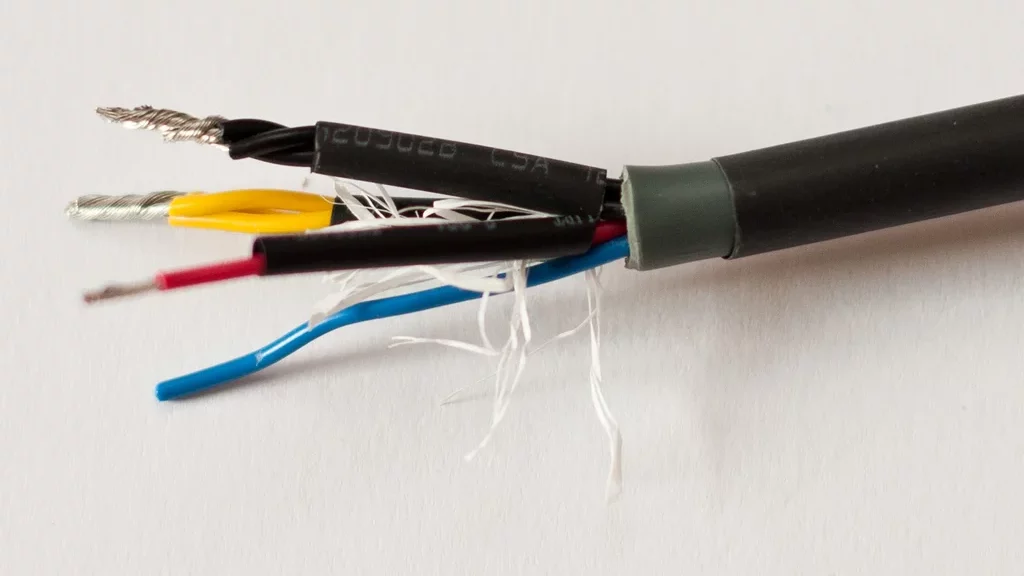
To use an X-box power brick for car audio at home, cut the end of the power brick wire. Cut back the insulation to expose the yellow, black, red, and blue wires. Strip these wires to around 1 inch.
Twist the yellow wires together and do the same to the black wires. If possible add crimp terminals to the ends of these wires.
The yellow wires will run to the +12V input on the amp and the black to the ground. Use a piece of 2-inch wire to jump the REM and +12V terminals.
Short the blue and red wires to ensure the power supply is always turned on (Green LED turns on when connected to a power outlet). Use electrical tape or heat shrink to insulate this connection. You can also add a switch between the connection to manually turn the power brick ON/OFF.
You can then hook up the brick to a power outlet.
X-box-power-brick-with-cut-ends
5. Wire the system
Speaker and sub wiring
When wiring speakers to a receiver or amplifier, ensure you match the polarity by connecting + to + and – to – outputs and inputs. The subwoofer should be connected to the sub-output on the receiver or amp.
You will need 2 front and 2 rear speakers for a quadraphonic stereo system (4.0 surround sound).
Use the wire gauge specified by the speakers’ manufacturer.
How to connect a car head unit to speakers
When using a head unit as your audio processor, the red wire on it is used as the switch ignition while the yellow wire is a battery lead. Solder them together and connect them to the yellow wire on your 12-volt power supply.
For grounding, strip the black wire and connect it to the black wire on the power supply.
Connect your speakers to the head unit’s speaker outputs using the white and gray wires for the front left and right speakers. The green and purple wires will run to the rear left and right speakers.
Ensure you match the polarity. The wires on the head unit with stripes will be negative while those with a solid color are positive terminals.
Use heat shrink tubing/electrical tape to insulate the soldered wire points.
How to connect a receiver to a car amp
To connect a receiver to a car amp it should have front, rear, and sub preouts. These preouts will then be connected to the respective line-level inputs on the amplifiers using RCA cables.
Some receivers will automatically detect when the preout section is in use but you may need to assign the preouts manually on others.
For a receiver without a preout section, use speakers wire to RCA adapter cables or an RCA converter to connect to your amp’s input.
You will also need to match the gain on the amplifier to that of the receiver’s output.
How to connect a car amp to your phone
There are 2 main ways you can connect your phone/tablet/Pc etc to a car amp;
Using a Bluetooth to RCA adapter
Using a headphone jack (3.5mm) to RCA adapter
Both of these should work if the amp does not have a 3.5 input or support Bluetooth.
6. Buy or build a speaker enclosure
An enclosure is essential as it ensures that the rear and front soundwaves don’t interact and cancel each other out as they are out of phase. It also absorbs vibration by the drivers, especially at the lower frequencies.
The enclosure baffle should be made of thick material such as MDF (at least 0.75 inches) to absorb vibrations by the driver.
You are better off buying a prefab enclosure that suits your needs as building one is complex but here are the basics.
There are 2 main enclosure types you can use for car speakers;
Sealed enclosures
Ported enclosures
To find out which enclosure type is best suited for your project, calculate the EBP (Efficiency Bandwidth Product). To do this, divide the driver’s free-air resonant frequency (Fs) by its electrical Q (Qes) rating (Fs/Qes). This should give you a number between 0 to 100 plus.
For an EBP value of 50 or less, you need a sealed enclosure, for a value of more than 100, a ported enclosure, and a value of between 50 and 100, either a sealed or ported enclosure.
Sealed/acoustic suspension enclosures
This is the easiest enclosure to build as it gives some room for volume errors.
In a sealed enclosure the air inside the sealed box acts as a spring as it does not escape the box as the cone moves.
The “air spring” helps control cone movement to achieve a great transient response (increased accuracy). A great transient response ensures that the driver starts and stops when it is required to.
To build/buy a sealed enclosure, you need to calculate the net internal volume (Vc) beforehand. For this, you need the driver’s T/S (Thiele/Small) parameters.
T/S parameters
T/S parameters compare a driver’s performance and are used to predict the optimal conditions for the enclosure build. These parameters are manipulated by the speaker manufacturers for customizations depending on the driver’s desired characteristics.
Qts (total Q) used to determine enclosure type and size is the most essential parameter.
Total Q describes the electrical and mechanical parts of the driver. Qts is a sum of mechanical Q (Qms) and Electrical Q (Qes).
Qts= Qes + Qms
Q is used to describe the damping of the driver. Damping helps keep vibrations at the resonant frequency at bay.
Thus, mechanical Q (Qms) is damping by the driver’s suspension (surround and spider) while electrical Q (Qes) is damping by the coil and magnet assembly. The current produced by the movement of the coil in the magnetic circuit gap opposes the movement of the driver (damping).
Meanwhile, Qtc describes total Q. As the volume in the enclosure increases Qtc goes down and as volume decreases Qtc goes up.
Qtc=Qts*(Vas/Vc +1)1/2, where Vas is the compliance of air in the enclosure and Vc is the designed box volume or net volume.
Using an inverse relationship, we can reverse this formula to calculate the net volume (Vc). This net volume is what we are most interested in as it takes into account the air displaced by materials in the box including the driver, bracing, and dampening materials (added to deal with standing waves in the box).
Thus:
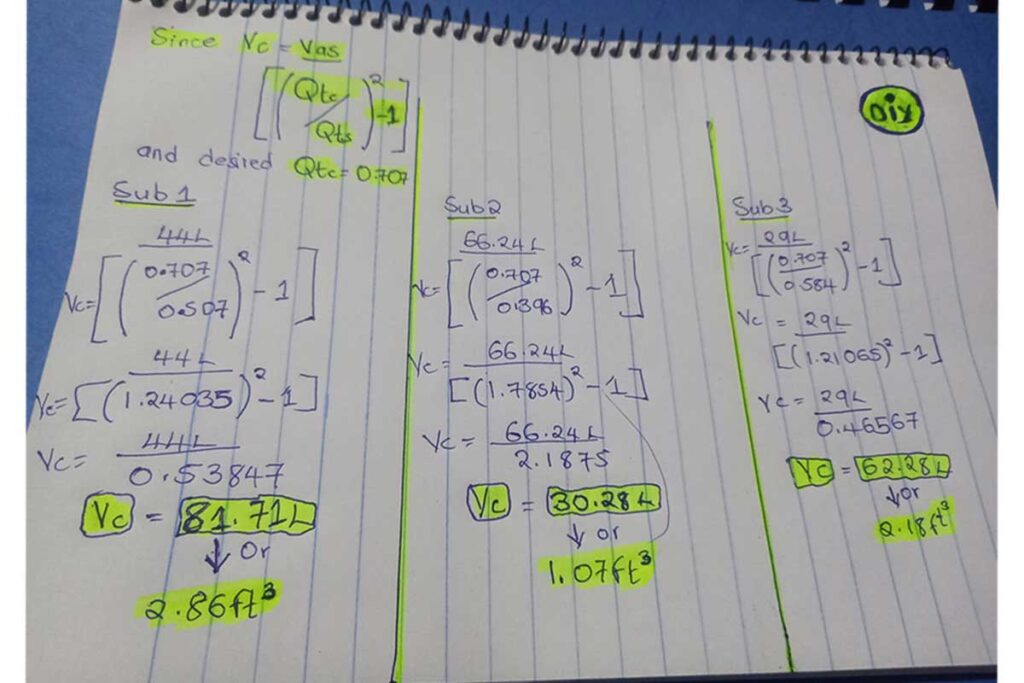
Vc = Vas / [(Qtc / Qts)2 -1]
Usually, a Qtc value of 0.707 is desired as this is where the best transients and a flat response will be achieved. There are exceptions of course.
With this Qtc value, you can use it to calculate the net volume of the box. Alternatively, you could use an online calculator to find the volume depending on your desired Qtc value (0.5, 0.707, 1.2, etc).
Here are some examples with subwoofer drivers specs I found online;
Sub 1=(Fs=34Hz), (Vas=44L), (Qes=0.60), (Qts=0.57), (Xmax=15mm)
Sub 2=(Fs=26Hz), (Vas=66.24L), (Qes=0.437), (Qts=0.396), (Xmax=12mm)
Sub 3=(Fs=37Hz), (Vas=29L), (Qes=0.662), (Qts=0.584), (Xmax=12.5mm)
With our desired Qtc of 0.707 we can calculate the sealed enclosures’ net volume (Vc) for the subs above as seen in the image below;
Sealed-enclosure-net-volume-calculation
With the net volume, you can determine the internal dimensions and shape of your sealed box depending on the driver’s design.
Ported/Bass reflex enclosures
With an EBP value of 100+ or a driver with a Qts value of 0.4, you need a bass reflex enclosure. Usually, this enclosure is used for bass drivers (woofers and subwoofers).
A Bass reflex enclosure is just like a sealed enclosure but with a vent/port. This vent allows air to circulate in and out of the enclosure. It also allows you to tune the enclosure to a certain frequency (fb).
This vent acts as a Helmholtz resonator meaning that the back soundwaves reverse-phase to stay in phase with the front waves from the speaker. This ensures that the back (through the vent) and front soundwaves do not cancel each other.
However, there is little room for error when designing a ported enclosure.
Adding a port to an enclosure results in a lower bass extension (deeper bass) boosts the SPL at the resonant frequency by about 3db, and makes the driver more efficient above the resonant frequency resulting in less distortion.
The port also brings a host of issues, especially when poorly designed such as chuffing, a steeper roll-off (24db/octave), and less control of the driver below the tuning frequency which can lead to over-excursion and damage the driver.
Tuning a bass reflex, especially for beginners is incredibly complex and beyond the scope of this article. I will thus skip it for this time as there are different types of ported enclosures you can build. There are also several online guides you can learn from if this is something that tickles your fancy. I might also prepare a dedicated article for this, so be on the lookout for it.
To sum up
For quality sound, you are better off using home speakers in your house other than car speakers as it is more difficult getting a great in-room response when using a car stereo at home.
However, high-quality home theater speakers are not cheap but decent car speakers and subwoofers can be used as a budget alternative.
Also, if possible get the speakers in an enclosure as building one can be a hassle if you have not done it before. Alternatively, get a prefab enclosure that will be best suited for your drivers.
PMPO is a spec acronym that can mean 2 things, Peak Music Power Output in speakers or Peak Momentary Power Output in amplifiers. PMPO is written as watts and it is the maximum power that an amp can output or that a speaker can handle over short bursts, usually milliseconds.
The two cannot be used interchangerbly as they have different meanings.
There is no standard definition for PMPO and due to this, the PMPO value can be taken from one maximum power burst/peak or the average of the highest power bursts. It all depends on what the manufacturer specifies it to be.
Is PMPO reliable?
The short answer is, NO.
PMPO ratings are basically marketing ploys. Manufacturers do this to make their product seem more powerful than they are and, in most cases, these measurements are taken in perfect and controlled conditions to achieve the highest possible value.
This is done in an attempt to make their products look more powerful than their competitors’ in the hopes that you will buy their products based on big wattage numbers alone (more=better analogy).
You will often see speakers rated as “600W PMPO” or “1000W PMPO” but in reality, this is not sustainable. It also does not take into account that the speakers have electrical, thermal, and mechanical limits. Most power drawn by the speaker is converted into heat other than sound.
Even amplifiers cannot sustain their peak momentary power output rating over long periods without damage. This power can only be maintained over a very short period of time, probably a few milliseconds.
But the worst bit of this is that some consumers may fall for this advertising strategy as the thought of having a very powerful speaker or amplifier for “earth-shattering sound” may be too good to let go of. This will, however, add no value to your home theater’s audio.
RMS vs PMPO
RMS stands for Root Mean Square and is a more mathematically accurate measurement of wattage in amplifiers and speakers. It is used to show how much power a product can output without clipping or failure by plotting different points of a sine wave over a longer period.
This is different from PMPO which is sometimes calculated by taking the real power value and multiplying it by a certain number. In simple terms, real power * X where X can be a random number.
To get the root mean square, all the plotted values are squared, then the mean of the squared values is calculated after which the square root of the mean is found. The testing methods can vary from one manufacturer to another.
In some cases, a manufacturer can find the PMPO value by taking the supply voltage and multiplying it by peak instantaneous Short-circuit current. Both calculations are absurd, exaggerated, and will not give you an accurate representation of a product’s power.
Notably, the PMPO value can be 3 to 10 times bigger than the RMS value and therefore, RMS is a better way to judge the quality of audio equipment for your home theater.
How to convert RMS value to watts
1 watt is equal to 0.707 RMS and this would mean that 1 RMS is equal to 1.414 watts. Therefore, if your equipment is rated as 50 RMS, you would take the RMS value, in this case, 50 and multiply it by 1.414 watts which would give you continuous power of 70.72 watts.
This would mean that the product can output 70 watts continuously over an extended period without failure/damage or causing distortion. Therefore, the continous power rating, in this case, will be 70 Watts.
But you should keep in mind there is no such thing as “RMS power.”
Final thoughts
You cannot judge the power and quality of an amplifier or speaker by using the PMPO rating as this is a complete marketing gimmick to make the products more powerful. This rating is often associated with low-quality audio equipment.
PMPO will tell you nothing about the sound quality and is a value rarely used by serious Hi-Fi systems manufacturers.
Soundbar buying guide- specs explained (wattage, channels, frequency range…)
When buying a soundbar to improve your TV’s sound, it’s essential to balance between cost and performance.
However, this can be difficult considering how many features most soundbars are crammed with today.
Some specs may also be misleading to the average consumer, hence the need to better understand the features on soundbar spec sheets to better inform our buying decisions.
Some of these features include;
Wattage (sensitivity)
Frequency range
Number of channels (2.1, 5.1, 7.1, etc)
Supported video and audio formats (4k passthrough, DTS-X, Atmos, etc)
Connectivity (Bluetooth, HDMI, etc)
Dimensions
Soundbar wattage
A soundbar’s wattage is the measure of how much power the soundbar’s in-built amp can supply which in turn affects how loud we perceive a soundbar to be (SPL or sound pressure level).
SPL is a complex topic that is discussed in depth in this guide. But on a basic level, is the measure of sound pressure level (“loudness”) on a logarithmic scale and denoted in Db (decibel).
For some soundbars, it can be difficult if not impossible to find the correct power ratings (wattage) that should preferably be in RMS watts.
When measured correctly, RMS ratings give us a more accurate picture of what a soundbar is capable of.
Unfortunately, some soundbars have inflated power figures that don’t equate to real-world performance or superior sound quality. This should not be a problem for most listeners but at higher levels (higher volume) the soundbar’s performance may be underwhelming, especially struggling with bass output.
As a general rule of thumb, a surround soundbar with a total power of around 400 watts RMS should properly fill most average-sized rooms with sound.
A more powerful soundbar such as the Nakamichi Shockwave 9.2.4 soundbar will be required for a larger room. Soundbars that can output a total of 200 watts RMS should be great for small rooms.
Consequently, avoid soundbars with PMPO or unclear power ratings.
Do more research on the soundbar’s capabilities and read reviews to see other people’s experiences with the product. Be aware of fake reviews too.
Note: Not all soundbars have built-in amps and those without are known as Passive soundbars. A soundbar with a built-in amp is known as an Active soundbar. Passive soundbars require external amplification for sound reproduction.
This brings me to my next topic “soundbar sensitivity” which is another way to predict how loud a soundbar can get.
What is soundbar sensitivity?
Sensitivity is the measure of how loud (SPL) a soundbar gets with 1 watt of power at 1 meter from the soundbar and is denoted in dB/W/M.
Each time you increase your soundbar’s volume, the wattage is increased increasing the decibel level. However, keep in mind that an SPL increase of 3db will require a doubling of the power output from the amp.
A higher sensitivity rating does not necessarily equate to good sound quality. With that in mind, I would recommend a soundbar with a sensitivity rating of between 85-88dB for a medium-sized room.
Sensitivity rating
85 dB/W/M
91 dB/W/M
Number of watts
Loudness in decibels
Loudness in decibels
1
85
91
2
88
94
4
91
97
8
94
100
16
97
103
32
100
106
64
103
109
128
106
112
256
109
115
512
112
118
If you are after high listening levels, get a soundbar with a sensitivity rating of 85 decibels or above.
How loud is a soundbar at 85 decibels?
To get an idea of how loud a soundbar is at 85 dB, let’s compare different decibel levels to some real-world examples.
Decibel level
Loudness level(real-world examples)
10dB
Normal breathing or rustling leaves
30dB
Whisper
40dB
Light rain or refrigerator hum
50dB
Quiet office
60dB
Normal conversation
70dB
Toilet flushing or dishwasher
80dB
A leaf blower or heavy traffic
90dB
Welder
100dB
Handheld drill
120dB
Siren
130dB
Live rock band
140dB
Fireworks
160dB
Shotgun blast
180dB
Rocker blast
Decibel levels vs real-world examples
Frequency range
A soundbar’s frequency range is a measure of how wide a soundbar can play on the frequency spectrum.
Ideally, a soundbar should have a frequency range of between 20 Hz and 20 kHz (20,000 Hz) which is within the range of human hearing. However, this would require a dedicated subwoofer capable of reaching as low as 20 Hz.
20 Hertz to 80 Hertz represents the sub-bass frequencies usually reproduced by a sub-woofer.
80 Hertz to 200 Hertz represents the upper-bass frequencies usually reproduced by a woofer
200 Hertz to 2,000 Hertz (2kHz) represents the mid-range frequencies (mids). Reproduced by mid-range speakers or woofers.
2,000 Hertz (2kHz) to 20,000 Hertz (20kHz) represents the high frequencies (highs/treble). Reproduced by the tweeters.
Most soundbars will have mid-sized woofers plus a subwoofer to play the full audible frequency range. Some may also have tweeters or small woofers for the highs/trebles.
Other soundbars such as the Sennheiser Ambeo may not come with a dedicated sub but have an LFE output that allows you to add your sub for additional “Oomph” to your sound.
Soundbar channels
Contrary to popular belief, channels are not the number of “speakers” (drivers) in a soundbar. In actuality, a channel is an independent audio signal path (circuitry) that can be reproduced by one or multiple soundbar drivers (“speakers“).
Most soundbars on the market today will have at least 2 channels (stereo) and an additional LFE channel for the sub for a 2.1 system. Other common “soundbar channel types” are 5.1, 5.1.2, and 7.1.2.
A 5.1 channel soundbar will have 3 front audio channels (left, center, and right), 2 surround channels (right and left surround), and one subwoofer channel. When you add 2 height channels to a 5.1 soundbar you end up with a 5.1.2 soundbar.
The height elements can be reproduced by height speakers or up-firing speakers mounted on the soundbar. Height elements are used to convey the feeling of a 3D sound space with formats such as Dolby Atmos and DTS-X.
Alternatively, a 7.1.2 channel soundbar will be akin to a 5.1.2 soundbar but with two extra rare channel speakers. A great example would be the Sony HT-A7000.
Some soundbar systems may also have 4 height channels for more immersion.
Soundbar audio and video formats
4k passthrough soundbar explained
Not many soundbars will be capable of processing video signals before transmission to a TV but a good number will have support for 4k passthrough over HDMI.
4k passthrough is a feature on some soundbars that allows for high-bandwidth 4k content to pass through from the source to the soundbar and reach the display unprocessed over an HDMI chain. Thus, the 4k video signals exit the soundbar as they entered.
But to stay up to date with everything tech, get a soundbar with support for 4k and HDR 10/Dolby Vision pass such as the Vizio Elevate 5.1.4 soundbar.
However, video support is not a necessity on a soundbar as you could easily connect your video sources to your TV and send the audio signals to your soundbar.
Soundbar audio formats explained
Most soundbars on the market today will have support for the following audio formats;
Dolby Atmos and DTS-X are object-based sound formats and are not channel-based. By being object-based formats, they enhance a sense of space and make objects feel like they are moving around us. These sound formats should be supported by soundbars with Atmos and/or DTS-X processors.
Dolby True HD and DTS HD and two similar lossless surround sound audio formats that will mainly be supported by some surround sound soundbars.
PCM and LPCM are uncompressed sound formats. However, PCM is a stereo audio format (2.1 channel) while LPCM is a surround sound format.
Dolby Digital (DD) and Dolby Digital Plus (DD+) are surround sound formats supported by some soundbars. DD is a 5.1 channel format while DD+ is a 7.1 channel format.
Your ideal soundbar may not have support for all these audio formats but I recommend one that supports Dolby Atmos and at least 2 other options such as PCM and DTS-X or Dolby Digital Plus and DTS-X. But to learn more about these surround sound formats visit this guide.
Connectivity
Signals to and from a soundbar can be transmitted either wirelessly or through wired connections.
Wireless connections
Bluetooth is mainly used to connect a soundbar to a Bluetooth source (phone, tablet, PC, etc.). What’s more, it can also be used to connect the soundbar to a supported wireless sub.
Wi-Fi is a wireless connection that can be used to transmit signals to a soundbar or from a soundbar to other speakers in a surround or multi-room setup.
Airplay– A Soundbar with support for Airplay will allow you to send audio signals from an Apple device to the soundbar.
Chromecast– Soundbars with Chromecast built-in will allow you to connect a source to the soundbar for audio playback.
Wired Soundbar Connections
HDMI– Most mid-range and high-end soundbars will have HDMI sockets as input and/or outputs. Some HDMI sockets will support ARC and eARC (Audio Return Channel and enhanced Audio Return Channel). Support for ARC/eARC will allow you to use your TV as the source for the transmission of audio signals to and from the soundbar.
An Optical connection will allow transmission of audio signals of up to 8 channels (7.1 surround sound) but cannot support 3D formats such as Atmos.
A USB connection will mainly be used for firmware updates which are increasingly being done as software updates. However, it can also be used as media playback on some soundbars.
Analog 3.5/Auxilliary (AUX) -This 3.5 mm analog connection, transmits analog audio signals to the soundbar from a variety of sources.
Soundbar Dimensions
The dimensions on a soundbar’s spec sheet are usually written as H*W*D (Height, width, depth). Height is how tall the soundbar is, width is its length while depth is the distance between the front and rear of the soundbar.
Soundbars come in different sizes from 12 inches long to 60 inches long. In most cases, bigger soundbars will have bigger drivers that can reach higher levels with ease but bigger is not always better.
You will need to consider placement and your Tv’s size before deciding which soundbar size is right for you.
Ideally, the soundbars should be around 2/3 the length of the TV for aesthetics. Although this is not an established rule, the soundbar should not be longer than your TV.
Also, consider where your TV’s IR receiver (remote receiver) is located to avoid buying a soundbar that will block the TV’s remote signals if it is placed on platforms such as a credenza or any other stand. This should not be a problem if your TV is mounted.
To sum up
It’s impossible to judge the quality of a soundbar based on the specs alone but it’s crucial to understand some terminologies that you may encounter.
If you are buying your soundbar from a physical store, I would recommend listening to different soundbars to judge by ear. However, if you are shopping online, read and watch different reviews to get an idea of what to expect.
“Auto“, “PCM“, and “Bitstream/passthrough” are the 3 main digital audio output settings. They define how a source outputs audio information for processing and playback.
In Bitstream, the audio processor at the source is bypassed and compressed audio data is transmitted unaltered to a connected audio sink (receiver, soundbar, etc). Alternatively, in PCM, compressed audio data is decoded at the source before transmission.
The mode you choose primarily depends on your audio system’s configuration and the quality of audio processors in your components.
To take advantage of superior audio processing on a soundbar, AVR, or preamp with a high-quality DSP (Digital Signal Processor), use Bitstream. As a result, encoded audio information is transmitted with all its functionalities intact.
However, to use your source for playback or a basic stereo setup (2 channels), choose PCM.
On Auto, the audio source will detect the format that the subsequent component can support and auto-select the output mode depending on it.
But to fully understand these output formats, let’s take a deeper look at what they entail.
Bitstream Vs PCM: In a Nutshell
Bitstream
PCM
Audio processing is done by the audio sink connected to the source (Soundbar, Preamp, AVR, DAC)
Audio processing is done at the source (Blu-ray, TV, Streaming Box, CD player, DVD, Gaming console, etc.)
Audio information is transmitted in its compressed codec
Audio information is transmitted in an uncompressed format
Is used for digital stereo (2.1 channel) and surround formats such as Dolby TrueHD
Is used for digital or analog uncompressed stereo and surround sound
Can be done on both a wired or wireless connection
Requires a wired connection
Uses a limited amount of bandwidth
Uses a lot of bandwidth over HDMI, optical or coaxial connection
Transmits surround sound for up to 5.1 channels over an optical or coaxial connection and even more channels over HDMI
Only transmit 2.1 channels over a coaxial or optical connection and multiple channels over HDMI
PCM vs Bitstream comparison table
Both PCM and Bitstream are supported on most sources and have no audible differences.
What’s more, the audio information is converted to PCM data at the decoder before processing for playback. This is because PCM is used as the underlying data on most music and surround sound codecs (If DSD is not used).
Audio decoding
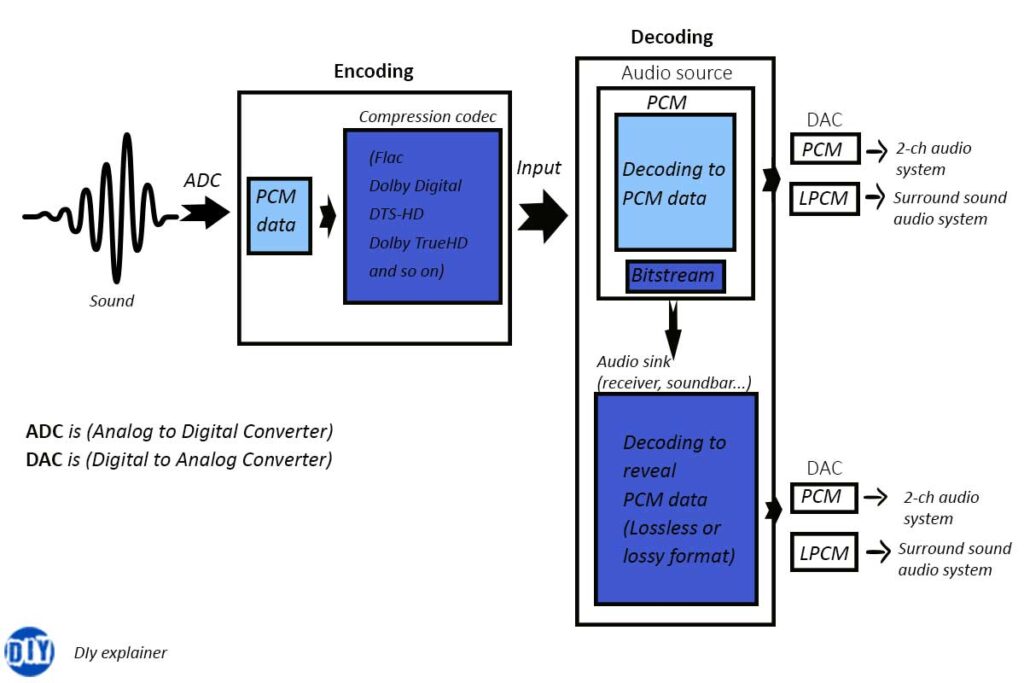
I keep mentioning “audio decoding”, but what does it mean? For this, we should differentiate between encoding and decoding.
Encoding is the compression of a digital audio file for broadcast or storage on a CD, Blu-ray, media server, and so on. The compression codec can either be lossy or lossless. On the other hand, decoding is the unpacking and transformation of encoded audio information to PCM data.
PCM or pulse-code modulation is an algorithm that determines how sound signals are sampled at regular intervals and converted to digital signals.
This algorithm underpins most stereo and surrounds sound formats and is supported by all modern AV gear (Blu-rays, projectors, TV, consoles..).
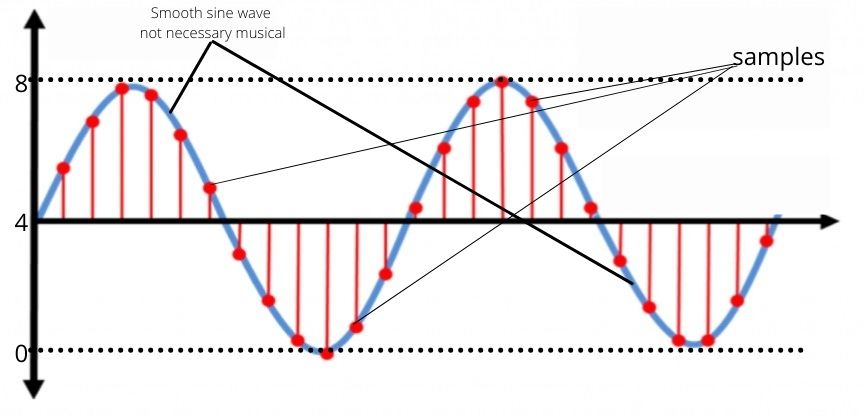
As you can see from the sine wave below, it is sampled at regular intervals and converted to a series of 1s and 0s (digital bits) for manipulation and storage. This is known as analog to digital conversion (ADC).
Red dots=sample points, blue line=sine wave.
On a Blu-ray player/TV/console/TV box, selecting PCM reverses these bits and tries to recreate the analog sine wave (AC signal). The analog signal is then transmitted to the speaker circuitry at the source or to external speakers.
If you are using an audio sink such as a receiver, its internal decoding is bypassed.
With PCM, the audio is downscaled to 2.1 channels (CD quality) over an optical or coaxial connection. This is because the uncompressed surround sound files are too huge and require more bandwidth not offered by optical or coaxial.
However, since HDMI has a higher bandwidth, hi-res multichannel PCM data transmission is supported. This will include support for lossless codecs such as Dolby TrueHD (up to 7.1 channels and Dolby Atmos).
Devices with support for Multichannel PCM may have it labeled as LPCM (linear PCM).
LPCM vs PCM compared
LPCM is a PCM variation where audio samples are taken at regular uniform intervals and quantized on a linear scale (linear quantization) other than using amplitude logs (logarithmic scale).
In linear Quantization, smaller samples are taken at regular intervals which increases bandwidth requirements (uses more storage). Simply put, LPCM (PCM Plus) takes more discrete samples to give a more accurate representation of the sound and is widely used for encoding bitstream.
Thus, devices that support LCPM can handle higher sampling rates (up to 192 kbps/32-bit) and have HDMI sockets.
LPCM is used on 2-ch and surround sound formats such as Dolby Digital (AC3).
This is useful for anyone with a surround sound setup as PCM usually downscales to 2-channel audio. LCPM mode outputs up to 8 uncompressed channels over a high-bandwidth connection such as an HDMI or DisplayPort.
However, using LPCM may introduce an audio delay (lip-sync error) if the format in question is not well implemented on the audio sink (receiver, soundbar…). This is because the audio processing may not be as fast as required.
Bitstream audio out;
Also known as Audio Bitstream, Digital Bitstream, Bitstream Bypass, Bitstream Audiophile, or audio passthrough, this output mode allows you to bypass your source’s internal decoding.
As a result, audio signals are transmitted unaltered to an audio sink (Receiver, preamp, soundbar…). At the audio sink, the codec is unpacked to reveal the PCM data before amplification and playback.
The compressed audio data is transmitted as a stream of data packets (packets of 0s & 1s) from the source to the subsequent device. During decoding, these packets are unpacked to PCM/LPCM which is further processed by the DSP (Digital Signal Processor).
And since the audio transmitted is compressed, it can be relayed over a wired or wireless connection. This can be using an RF, Optical, coaxial, or HDMI which is preferred.
HDMI supports transmission of both lossy and lossless codecs including Dolby Digital, DTS, Dolby Digital Plus, Dolby TrueHD, DTS-HD, and so on. Optical and coaxial connections will only support lossy codecs such as DTS and Dolby Digital for up to 5.1 channels when using Bitstream.
Thus, to use Bitstream Out, your audio sink should support the specific codec and format (container) used for the audio.
Bitstream Dolby vs DTS
Bitstream is an output mode that supports stereo and surrounds sound codecs from both DTS and Dolby. DTS and Dolby have lossy (Dolby Digital, DTS Digital, Dolby Digital Plus) and lossless codecs (Dolby TrueHD, DTS Master Audio).
Only a high bandwidth transmission will support a lossless codec when using Bitstream. Dolby Digital and DTS digital are supported by HDMI, Optical, and coaxial connections. However, only an HDMI connection can support more than 6 channels (5.1).
Apart from Dolby Digital Plus, lossy codecs are supported by most audio connections.
Bitstream vs PCM (soundbar and TV)
When using your TV’s internal stereo speakers, decoding occurs within the TV and auto-selects PCM.
However, for a TV with a soundbar, PCM downscales the audio to 2 channels for transmission on a digital connection. Only LPCM will support surround sound codecs using HDMI.
For 2.1 channel soundbars, use PCM and Bitstream for surround sound soundbars. Only high-end and mid-range soundbars with proper DSP (DAC) implementations and HDMI inputs can decode hi-res surround codecs.
If your soundbar has an HDMI ARC or eARC input, use bitstream. This offloads the audio decoding to the soundbar, and your TV doesn’t do video and audio processing.
To Sum up
Your audio setup will be the primary determinant when selecting between PCM and Bitstream.
For a 2-channel (Stereo) configuration, selection PCM should be fine in most cases. However, for surround sound systems, you are better off Bit-streaming the audio signals from your source to your sound processor.
But in terms of audio quality, there should be no notable difference between these two digital audio output modes.
Choose the output format that works for your specific system.
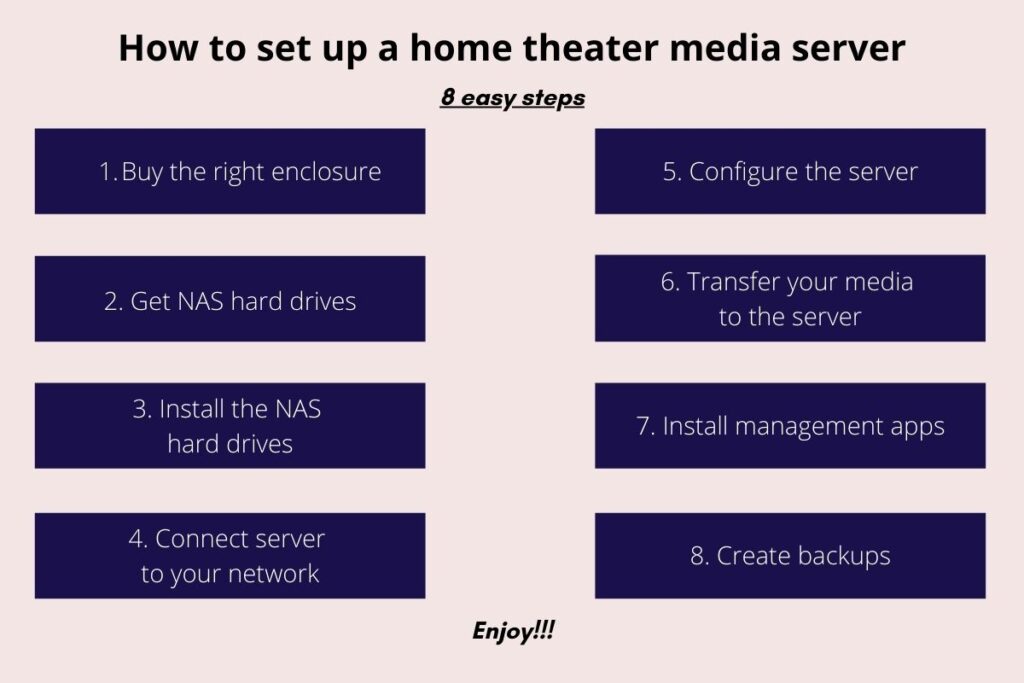
Home media server guide (How to set up in 8 steps)
Having a media room server for your media room or home theater entertainment system is a great way to consolidate and back up all your movies, music libraries, games, family photos, and so on.
There are 2 main ways you can set up a home media server for your entertainment system namely;
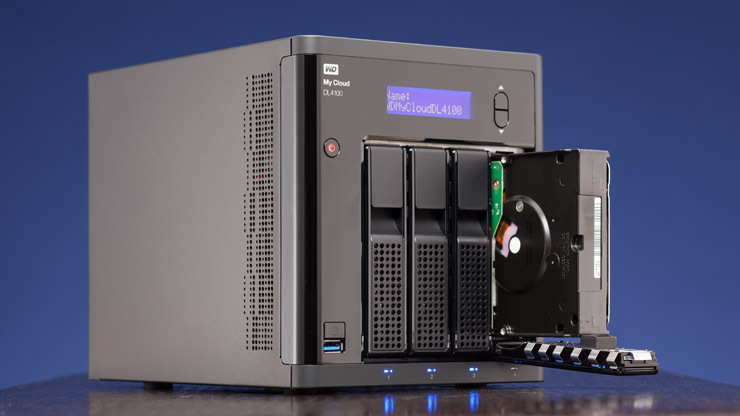
Using a dedicated NAS (network-attached storage) system- A dedicated NAS home server will comprise of a NAS enclosure with hard drive bays where you can put and add NAS hard drives which will then be connected to your local network to access your files from anywhere with an internet connection.
Repurpose/turn your old computer into a network-attached storage server- This will involve installing and setting up media server software on your home computer connected to the network and using it as a media server. Some computer operating systems may already have built-in server software.
But first, let us look at what network-attached storage is, what it does, and how it can benefit you.
What is NAS (Network Attached Storage) and why is it important?
Network-attached storage or NAS is a computer connected to a network with one or more storage drives and an operating system/NAS system that you can use to store your files, programs, movies, receipts, and so on. NAS servers also allow you to access the stored files from any location with internet access.
When compared to storing all your data in external drives, you or other people can access the stored data simultaneously as it is cloud storage.
NAS servers also allow you to back up all your data by either setting up redundancies with 2 or more storage drives or using a clustered NAS. A clustered NAS server is where you set up 2 or more home servers at different locations with the ability to distribute data between them and can also work simultaneously.
Apart from using a NAS server for entertainment purposes, you can also use it to run a small business, upload, and access important files. This can come also come in handy if you have employees that you want to access the data at the same time, something that is hard to accomplish using data stored in an external hard drive.
So, why would you use a NAS server instead of using cloud-based storage services such as google drive, iCloud, One Drive, and so on?
Let us look at some of the benefits of using a NAS home-based server.
The benefits of a NAS Home Media Server
It is free– Cloud-based services can offer you free cloud storage but are usually limited, typically around 5 and 10 gigabytes, which let’s face it, is barely enough for your movie collection. Other than that, you have to pay an additional monthly fee for more storage. However, once you set up a home server and get it connected to your network, that’s it. You can only incur extra costs the moment you decide to expand the storage or when you are replacing your drives.
You can access all your files and stream your media from anywhere as long as you have an internet connection– All you will need is a local web to stream your content from anywhere.
File sharing– With a NAS server system, you can share data between different devices without an external hard drive or pen drive. You can export files from one device to the server and access the files from multiple devices/computers connected to the network (Mac, iOS, Windows, Linux, Android, and so on). These files can be accessed by your family members, friends, and even employees if you allow them to.
Privacy– Unlike cloud storage services that are susceptible to hacking and data leaks, a home-based network that you control is more secure. We have had instances where these cloud services were hacked and where we saw massive data leaks.
Well-organized home media such as movies, music libraries, photos, etc. on your cloud. Remember that a NAS server is a computer system.
The drawbacks to using a NAS network
Can be expensive to set up The price of setting up a NAS server can rack and become super expensive, especially if you are setting up backups in a different location. Also, if you use more drives as redundant storage containers (RAID), you will be racking up twice the price to get 2 hard drives that will store the same thing (one drive stores, and the other acts as a backup in case of damage).
NAS servers can be difficult to configure- This is more likely to happen if you are setting up your NAS server by repurposing your computer. Usually, most dedicated NAS enclosures will come with their system and mostly have onscreen instructions on how to set up and are, therefore, easier to set up.
Transfer speeds limit you- Depending on the transfer speeds, you can be limited to how much you can do with your NAS server. But this should not be a problem if you are only using it for media and entertainment purposes. However, some NAS enclosures will have more than 1 ethernet port and other upgrade options that can allow you to expand and speed them up.
How much will it cost to set up a home media server for my entertainment system?
Good quality enclosures for dedicated servers like from Synology go for between $400 and $800 per enclosure. You can also get a high-quality desktop computer with server-grade gear for around $400 enough for your needs (the desktop option is cheaper with better functionality).
Hard drives for the NAS system will cost around $80 per 2 TB drive. An 8 TB hard drive will go for around $200, a 10 TB for around $250, and a 14 TB for around $360 give or take. You can use 2 or more drives depending on the number of HDD bays on the enclosure. This can be used to set up redundancies or a backup in another location with another server. The price will vary depending on the kind of setup you want. You will also need to use a server OS compatible with your tablet, phone, TV, TV box, and so on.
The price of NAS OS and management software can vary from as low as $50 to as high as $500 for a server dealing with a lot of files. Most premade NAS enclosures come with a free lightweight OS enough for your needs. For repurposing an old computer into a NAS server you will need to install an OS that you can also use a free OS such as FreeNAS or invest in one for better performance.
Some examples of NAS operating systems;
NAS OS
Description
Cost
FreeNAS
FreeNAS is an open-source NAS OS that allows you to share data over your network
Free
Xubuntu
Xubuntu is a Linux-based operating system that can also be used as a NAS OS
Free
XigmaNAS
XigmaNAS is a dedicated NAS server management operating system
Free
Amahi
Amahi is easy to use as a Home media server Operating system great for your storage needs
Free
Synology DSM
This is the OS used for Synology media servers
Comes with purchase of a Synology server
Openmediavault
This is a Debian-Linux-based operating system for a NAS server
Free
These are some of the main costs that you will incur when setting up the server. However, you can have additional costs to customize the network. A good example would be adding a TV tuner card to the motherboard that can let you record some of your favorite shows and store them on the server.
I am also assuming that you have all the other components such as ethernet cables, a TV, speakers, a good internet connection with enough bandwidth, and so on.
How to set up a home theater media server
How to set up a NAS media server, step by step
1. Buy the right NAS enclosure
If you are looking for a good dedicated NAS enclosure, you will need to check the specs such as;
The RAM– I would recommend at least 4 GB of RAM. At least 1 GB of RAM for every 1 TB of storage. Also, for the RAM (Random Access Memory), ensure that it has ECC (Error Correction Code) and helps detect and correct memory errors that can even cause you to lose your data. ECC RAM will have 9 memory chips instead of the usual 8.
CPU performance– This will be dependent on the number of cores and processor model. I would recommend core i5 or higher, especially for heavier workloads. Core i3 can also serve you well for lighter workloads.
Connectivity– Some enclosures will have built-in Wi-Fi, Ethernet ports (one or more), or both.
Disk bay capacity– This can vary from 1 to 16 slots for the hard drives. A good recommendation would be to get one with at least 4 disk bays for redundancy or RAID (Redundant Array of Independent Disks). An enclosure with 4 or more disk slots will support a RAID 6 or RAID 10 configuration (more on RAID below). If your enclosure has 1 or 2 slots it will support RAID 0 or RAID 2.
The shape, size, cooling mechanisms, and other form factors can affect the performance of the enclosure. A tower-type enclosure will be great for a home theater media server for general entertainment and small business.
Ease of use– I would recommend choosing a NAS enclosure with an easy user interface that can be easily set up with minimal effort.
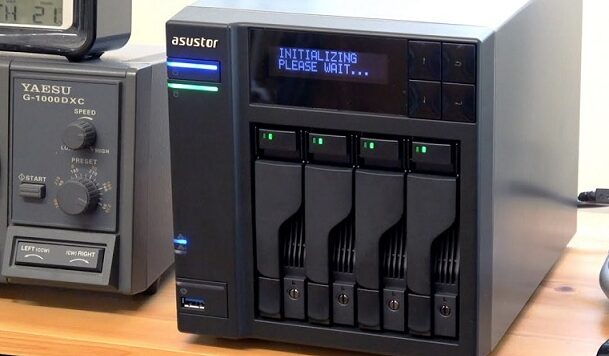
A 4-bay NAS tower enclosure
For a desktop enclosure, you can buy a built one with server-grade parts for greater compatibility. The computer should have gigabit LAN with a standard ATX PSU power supply unit) and motherboard.
The other components should have similar specs to the ones mentioned above for the dedicated NAS enclosure. You can also take out other components such as graphics cards, soundcards, and so on if you do not plan on using the server as your computer to it.
If you are going to use a desktop computer enclosure, consider the same specs as they are the most important for a home media server. It should not be filled with other unnecessary components such as graphics cards but if you are getting a deal for a cheap used desktop, buy it and take apart the components such as sound cards that are not essential.
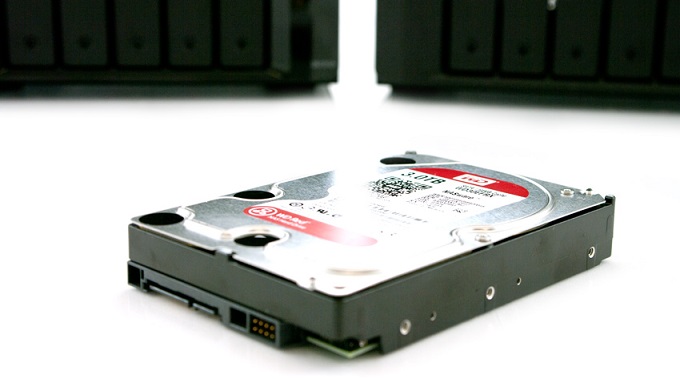
2. Get the hard drives
Some desktop computers and all NAS casings use 3.5-inch HDDs. Most of these hard drives, especially WD drives, will be color-coded as follows;
Blue and Green HDDs are mostly for general use such as gaming and browsing.
Black HDDs are mainly used for slightly heavier duties such as content creation.
Purple for processes that require continuous operation such as surveillance.
Gold HDDs are mainly used for centers that have multiple users such as data centers.
Red HDDs are the ones that are mostly used for Network Assisted Storage (NAS). This is the one you will need to use, hard drives that are made specifically for NAS networks.
Hard drives for NAS servers are designed to run 24/7 at higher speeds with their anti-vibration and heat-resistant mechanisms.
They are also configured for RAID:
RAID 0
Strips data across 2 drives meaning that the data is written across the 2 HDDs to double the performance and use the full capacity of both drives. No internal redundancy is provided.
RAID 1
2 drives mirror each other meaning that the same data is copied across the drives seamlessly and continually. If one disk fails, the other is left as a backup.
RAID 5
Data is both striped and mirrored across 3 or more drives. If one disk fails, it can be replaced by another with no data loss.
RAID 6
Identical to RAID 5 but uses one more parity block, meaning that drives can fail and the system will still be functional.
RAID 10 (RAID 1+0)
Combines RAID 1 for mirroring and RAID 0 for striping of data. Requires at least 4 NAS drives
These are the configurations that are used for most of the home media servers and the ones you should get yourself familiar with.
With these features, an initial investment for a NAS HDD may be expensive but it is worth it in the long run. They are less prone to failure from heat and vibration and in the long run, it is all about reliability.
How to choose a good NAS drive
The main considerations one makes when choosing a NAS drive are the available storage (the more storage, the better) and the speed of the drive (spindle speeds should be high). However, these are not the only considerations to make. Other factors to consider before buying include;
Vibration and heat control– If you have more than one drive in your enclosure, there will be vibrations, heat generation, and noise. A good NAS drive should have anti-vibration tech and thermal control mechanisms while maintaining high spindle speeds for better performance.
Ability to operate 24/7– The drive should have a high workload rate of around 300TB/year and a lifespan (MTBF) of around 1 or more million hours when in operation. This will ensure that the drive(s) can work continuously and seamlessly 24/7.
Add-on services– These services include health management, data recovery services such as S.M.A.R.T (self-monitoring, analysis, and reporting technology), and a warranty (should be at least 2 years). S.M.A.R.T lets you know if your disk is at risk of failure and is by far the most important add-on.
Red-Western-Digital-3TB-NAS-harddrive
Although NAS HDDs are great and will serve your home theater needs, for faster read and write speeds, you can invest in NAS NVME SSDs that are way faster. With SDDs, your server will be able to serve you better for heavier workloads.
3. Install the NAS drives
Different NAS enclosure models will have different HDD installation means. You will need to read the instruction manual to know how the drives will be installed for that model. Some enclosures may come with pre-installed drives but these will be way costlier.
However, for most enclosures, you will only need a screwdriver to get the job done. You can screw off the back panel to reveal the HDD drive cage and simply but carefully screw the drives into the slots. Some casings will have removable trays where you can mount the drives and insert them back into the enclosure.
After fitting the drives, you can then connect the NAS enclosure to power and internet then turn it on. For the fastest transfer speeds, I would recommend using a Cat 6 cable which you can then connect to a high-performance router.
But as I mentioned earlier different NAS casing brands will have different means of disk installation but the above method should work for most of them.
4. Connect the NAS server to your Network
To get the most out of your home media server, you will need a fast network.
Most if not all home media server enclosures will have at least a one-gigabit ethernet port (GbE) which allows you to have transfer speeds of up to 1000mbps (1Gb per second). Connect your server to the network using a Cat 6 (can handle up to 10 Gb/s) or Cat 5e cable (can handle up to 1 Gb/s). You can also connect the server to your network wirelessly but this will not be as reliable.
Your router should also be high performance with transfer speeds of at least 1 Gb/s.
5. Configure your home media server
After connecting the media server to your network, connect it to a monitor, install a server OS using a bootable drive if it does come with a pre-installed one, and start the NAS server.
You may also need to open the browser for that server. An example of Synology media servers would be Find.Synology.com. This will allow you to get into the user interface using your computer.
Most media servers will have a management user interface (UI) with icons, a desktop, and windows just like any other OS. From the interface, you can set up your username, password, personal domain name, and SSL security for the domain.
You may also need to format your drives once you turn on your home media server to a format that is designed for large storage, for example, Btrfs for Synology. After that, you can then create assigning permissions and shared folders depending on the number of users. For a home theater, you will only need one shared account.
You can create a shared folder each for your music library, another for movie collections, another for your photos, and your games, and you can also have a separate encrypted account for your business/work/insurance documents/bank receipts, and so on.
Each OS will have different configuration steps. The best way to learn how to configure your specific NAS OS is using Youtube videos and other online guides for that specific operating system.
For a desktop computer media server
Computer operating systems such as windows and Linux have built-in software that may need to be activated to use the computer as a server. You can use these but they would not be as effective as a standalone and dedicated media server OS.
I would recommend using a third-party NAS server OS. You can run this operating system using a Live CD, bootable USB drive by dual-booting, or simply install it as a standalone OS on your computer (this will mean clearing any other existing operating systems).
It is important that if you are using your desktop computer as a media server you avoid using it for other tasks. Doing this can slow it down tremendously. Your server will also be live only when the computer is turned on just like with any dedicated media server. You will also need to use OS and management software that is DLNA certified for better performanceand security.
You will also need to configure this server and the process will typically be the same but will depend on the software you use.
6. Transfer your media/data to the home media server
Your user manual should also have a guide on how you can transfer data to the server.
You can use a USB cable to transfer from external hard drives, a pen drive, or through your cloud network from other devices (clients). If you do not have a manual on how to transfer the data, you can search for an online manual or call customer support.
Depending on the size of your files and the transfer speeds, the transfer can take from several minutes to hours. Once you are done with the transfer, access the files from anywhere as long as you are connected to the internet or freely in the comfort of your home.
If you still use a cloud-based service such as Google Drive, you can sync it with your home media server to automatically back up files to the home server.
7. Install compatible apps for your home server
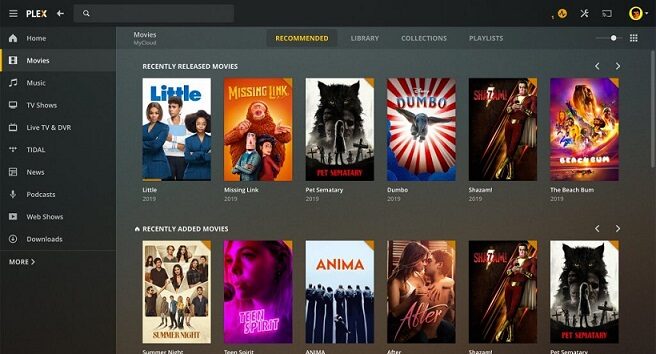
You can browse and install management apps such as Plex to help with backing up data, security, system maintenance, managing and organizing your files, and much more.
Before you purchase any app, ensure it is compatible with your server system.
Plex UI
8. Create a backup
Creating a backup for your NAS system would be logical, especially if you have stored critical files on the server. You can select the files you want to back up or you can create an automatic backup in what is known as a clustered NAS as I mentioned earlier. This will help you prepare for anything such as water damage on your home media server.
However, this will double the cost, but for extra security, it will be worth every penny.
You can also choose to skip this part for now.
You can now enjoy your media server
If you are sold on the idea of having a home media server, purchase the right equipment, and set it up as I explained, you can now enjoy your new setup.
You can view your photos, stream your music library and movie collection, you can also record shows for later viewing, and do much more with the server. This can be done from any of your clients (phone, computer, tablet, etc.) with a media player installed on the device. A BitTorrent client is also great for downloading files.
You are not limited as to how much you can do with the home media server.