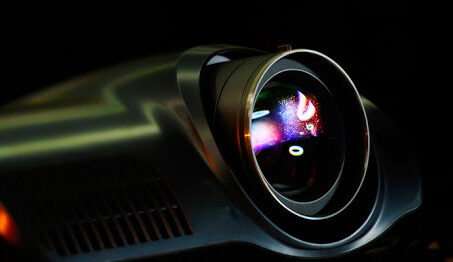
Image flickering is the visible change of a projector’s brightness as it goes through its refresh cycles. This is a common problem on DLP projectors that use bulbs that wear out with use.
A projector may flicker for various reasons that include;
Unstable power supply
The bulb reaching its end cycle
Dust builds up on the color wheel
A low refresh rate
Resolution issues
If this is a problem you have experienced, here’s how to diagnose it.
1. Unstable power supply
When using eco-mode on your projector, less voltage is applied to the lamp causing the image to flicker. This is because the photons don’t get enough power to keep them excited.
If using eco mode is causing your projector to flicker, switch to a different mode and use it for a couple of hours to see if the issue is resolved.
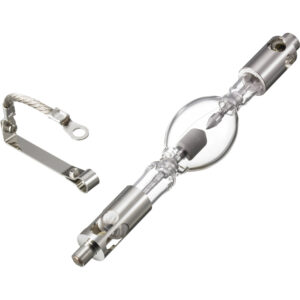
2. A dying projector bulb
Most bulbs are built to withstand between 1,500 and 3,000 hours of use with some lasting for as many as 30,000 hours.
With continuous use, the anode and cathode on the projector’s bulb wear out. Also, the bulb may develop defects due to poor power supply filtering or issues with the magnetic field required for bulb operations. These defects may be expressed as flickering.
Usually, this is a sign of a dying lamp.
Most projectors have a red/yellow indicator that flashes when the bulb is dying. Physical damage or burns may also be visible.
Granted, you can check if a projector has reached or exceeded its life expectancy in the menu under the lamp life option.
If your projector is under warranty, the manufacturer should replace the lamp for you.
Consequently, if you are out of warranty, can get a replacement lamp, and are technically skilled, you could replace it yourself. The lamp consists of a bulb and plastic housing to hold it in place.
How to replace a projector bulb
Purchase a compatible OEM or OEM equivalent lamp. An OEM equivalent uses an original bulb with generic housing.
Before disassembling the projector, unplug it from the power source and let it cool off.
Locate the lamp compartment using your user manual or online guides.
Unscrew the compartment cover to reveal the screw holding the lamp.
Use a soft non-abrasive cloth to gently lift the lamp, unplug the cables that run to it and place it to the side.
Clean the compartment using a microfiber cloth to get rid of dust and dirt.
Put the replacement lamp into the compartment in the correct orientation and re-connect the cables before you lodge it back in.
Screw the lamp and compartment cover to the projector and reset the lamp timer to zero.
If the bulb was the root of the problem, lamp replacement should solve the problem.
A projector bulb
3. Ground loops
Flickering on a projector can be a visual symptom of signal noise in the ground circuit (ground loop).
Ground loops occur when there is more than one conductive path between the ground terminals of the projector and other equipment forming a close conductive loop. This could be a loop between your source and the projector.
You can use a cheater plug (2-prong) to bypass the projector’s ground to see if the flicker goes away. This is a temporary solution that should only be used for troubleshooting.
By connecting your projector and your source (receiver, Blu-ray player, etc) to a single ground point. You could do this by connecting your AV equipment to a single outlet using a surge protector power strip.
4. Loose connections
If you are experiencing flickering, you should ensure that you have no loose video or power connections.
A faulty cable may also cause issues for you. In this case, swap out the video cable.
I would also recommend using a high-speed HDMI cable (if possible) for the projector other than VGA or DVI cable.
5. Faulty video source
A problem with the video source could cause a projector to flicker. This could be a fault with the source’s power supply unit or video card.
Flickering could also occur if there is a mismatch of video formats between the source and the projector. For example, if the output on your source is WXGA select WXGA on your projector’s menu options.
PCM or Pulse Code Modulation is the process by which analog audio signals are represented in digital form for manipulation and storage. Dolby Digital on the other hand is an audio format that compresses PCM tracks to a more compact form for distribution over different media such as Blu-rays and streaming services such as Netflix.
When Dolby Digital bitstreams are decompressed the PCM/LPCM data is derived and fed to a DAC (digital to analog converter) for the processing which gives line-level signals that can be amplified and played back over your speaker system.
It is argued that PCM produces a higher fidelity sound and more robustness.
PCM
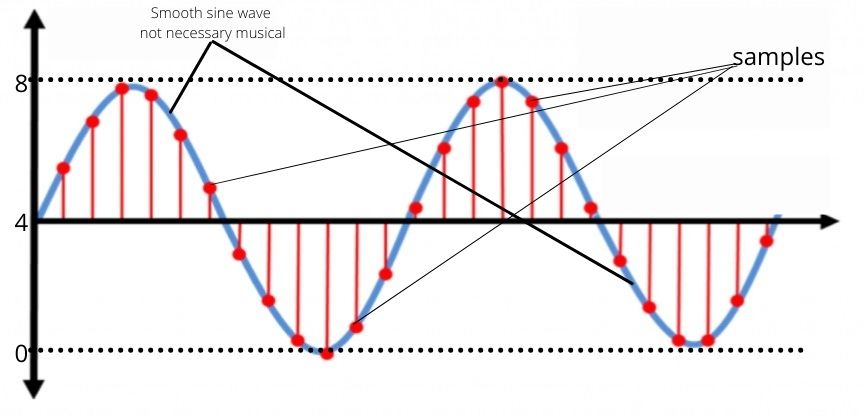
PCM or pulse code modulation is a system (an algorithm) for representing and digitizing analog audio signals for storage and streaming. The analog audio signals (sound) are sampled at regular intervals and represented as binary values (0s and 1s) for manipulation and storage (analog to digital conversion).
The samples are taken at varying bit-depth ranging from 12 to 24 bits at sampling frequencies between 44.1 kHz to as high as 192 kHz. For instance, a PCM track may be 48kHz/16-bit, 192kHz/24-bit, and so on to show the amount of audio information represented.
The bit-depth indicates the degree of accuracy during digitization. When the bit-depth is higher, the sound representation is more accurate. More bits also reduce the risk of detectable artifacts during playback.
The sampling frequency (Sampling rate) is the number of audio samples that are taken per second. A higher sampling rate is used to represent a wider frequency range.
PCM audio is used to represent anywhere from a single audio channel to multiple channels for surround sound support.
PCM tracks can be the exact replica (uncompressed soundtrack) of the studio master if the bit-depth is similar to that of the studio master and encoded without loss of fidelity thus no information is lost. The bit-depth can be reduced (downsampling) to save on bandwidth and storage as PCM is a data hog.
PCM tracks are usually 2 channel audio but the later iteration known as linear PCM (LPCM) where more samples are taken and uses more storage and bandwidth. LPCM is sometimes referred to as multichannel PCM as it is used to represent multichannel audio for formats such as DTS and Dolby Digital.
PCM underpins other audio formats such as DTS and Dolby Digital. It’s also used on some digital telephone systems and for broadcast.
Most media players and AV gear such as Blu-ray players will support PCM audio but not all media will include the PCM format.
Red dots=sample points, blue line=sine wave.
On a Blu-ray player/TV/console/TV box, selecting PCM reverses these bits and tries to recreate the analog sine wave (AC signal) for amplification and playback.
If you are using an audio sink such as a receiver, its internal decoding is bypassed.
With PCM, the audio is downscaled to 2.1 channels (CD quality) over an optical or coaxial connection. Uncompressed surround sound files require a higher bandwidth connection such as HDMI.
However, an optical or HDMI connection can be used to stream LPCM signals (5.1) from a player to an audio sink for unpacking and processing. An optical connection can transmit up to 5.1 audio channels. Any HDMI cable will be used for PCM or LPCM data.
LPCM vs PCM compared
LPCM is a PCM variation where audio samples are taken at regular uniform intervals and quantized on a linear scale (linear quantization) other than using amplitude logs (logarithmic scale).
In linear Quantization, smaller samples are taken at regular intervals which increases bandwidth requirements (uses more storage). Simply put, LPCM (PCM Plus) takes more discrete samples to give a more accurate representation of the sound and is widely used for encoding bitstream.
Thus, devices that support LCPM can handle higher sampling rates (up to 192 kbps/32 bit) and have HDMI sockets.
LPCM is used on 2-ch and surround sound formats such as Dolby Digital (AC3).
This is useful for anyone with a surround sound setup as PCM usually downscales to 2-channel audio. LCPM mode outputs up to 8 uncompressed channels over a high-bandwidth connection such as an HDMI or DisplayPort.
However, using LPCM may introduce an audio delay (lip-sync error) if the format in question is not well implemented on the audio sink (receiver, soundbar…). This is because the audio processing may not be as fast as required.
Dolby Digital
Dolby Digital (DD) is a lossy digital format compressed using the AC-3 audio coding system developed by Dolby Labs. DD supports anywhere from one to 6 discrete audio channels and is a standard in most multi-channel media such as Blu-ray. All Blu-rays are required to support Dolby Digital.
In simple terms, a lossy compression means that an algorithm is used to remove information that is deemed irrelevant depending on the sounds that our ears are sensitive to. As the studio master is compressed using Dolby Digital some information and fidelity are lost to reduce the bandwidth and storage requirements. This can compromise audio fidelity.
Dolby Digital can achieve a compression ratio of 12:1 although 6:1 and 4:1 compression ratios are common.
Dolby Digital is a constant bitrate format with a maximum bandwidth of 640 Kbps for 5.1 channel surround sound, 448 Kbps for stereo, and 192 Kbps for mono. Being a constant bitrate format means that the format is able to operate at the same data rate regardless of the program source.
Dolby Digital content is encoded at a constant bitrate to support 5.1 channels of audio at a sampling frequency of 48 kHz with a 16-bit resolution.
Dolby Digital is also used as the core for all Dolby Digital programs. As such any media encoded with another of Dolby’s systems such as Dolby TrueHD will revert to Dolby Digital on legacy devices to ensure compatibility with current and older DD equipment. The Dolby Digital track is carried on a separate stream.
As the compression audio information is unpacked by an AC-3 decoder such as a Blu-ray player or a TV, it outputs digital PCM signals (2-channel) that can be fed to a DAC or receiver using an analog, optical, or HDMI connection that is connected to the player. To output linear PCM 5.1 signals from a gaming console or player, you will need an HDMI interface. When an analog or optical cable is used for LPCM, the output is reduced to PCM (2-channel).
The Dolby Digital bitstreams can also be output using an optical or HDMI connection when the audio output is set to Bitstream.
Dolby Atmos and DTS-X are two advanced and popular object-based audio formats that are able to place sound around and above the listening position.
Dolby Atmos is encoded using the Dolby Digital Plus (lossy Atmos) or Dolby TrueHD (lossless Atmos) compression scheme. Atmos adds the element of height that allows audio to pan up and down and can support up to 128 simultaneous audio objects that can be represented by up to 35 speaker positions. DTS-X can support up to 224 audio objects and can be played back on up to 32 speaker positions. DTS-X is layered upon the DTS-HD MA or DTS-UHD audio coding systems.
Audio objects allow you to interact with audio elements in the sound program for higher precision putting you right in the action. Objects adapt to the speaker system as they are not limited by a specific speaker layout.
While it would be natural to compare these formats, this article is meant to give you a basic understanding of each object-based format and what you can expect from each other than giving an absolute winner.
Let’s roll on.
Dolby Atmos
Dolby Atmos is an adaptable and scalable object-based format that accurately positions and moves sound elements in 3-dimensional space for more immersion. It introduces the element of height to place sounds above the listener. It is used in movies, games, TV shows, VR headsets, and so on.
Atmos content is distributed using the Dolby TrueHD (lossless Atmos) or Dolby Digital Plus (lossy Atmos) audio encoding system for download or streaming. An Atmos decoder is required to unpack Atmos data.
Atmos speakers can be played back on different speaker configurations for the best rendering possible of the audio objects. Atmos objects can be placed anywhere in the room independent of the bed surround speakers. The placement of the objects is specified by spatial coordinates and is informed by the number and placement of your speakers.
However, to properly play back Atmos content, you will need overhead, up-firing, or in-ceiling speakers in your multi-channel system to place objects above you. This can be a 5.1.2, 7.1.4 system, and so on. Atmos content can be played back on up to 35 speaker positions (24 beds, 10 heights, and subwoofer).
Alternatively, Dolby Atmos Height Virtualization which is a processing mode can a virtual height effects without overhead speakers on a 2.1, 5.1, or 7.1 speaker system. This can be on a soundbar or any processor that features height virtualization such as headphones.
Dolby Surround Atmos up-mixer also intelligently to up-mix stereo or 5.1 or 7.1 soundtracks for playback on an Atmos system without Atmos content.
DTS-X
DTS-X is another object-based sound format created by DTS (Digital Theater Systems) as a direct competitor to Dolby Atmos. DTS-X content is layered on the DTS-HD master audio or DTS-UHD coding system to ensure backward compatibility with non-DTS-X decoders.
But unlike Atmos, DTS-X does has no overhead speaker requirements or specific speaker configuration to create a lifelike sound hemisphere.
While it is useful to have overhead speakers for DTS-X, they are not required as DTS-X is flexible and will adapt to your speaker placement.
Sound objects are not bound by channels and can adapt to any speaker layout from the TV speakers to multi-channel speaker layouts with up to 11.1 speaker positions. The audio objects can be placed in front, to your sides, behind, and above you using metadata provided to the DTS-X decoder. The metadata specifies where the objects should be placed and how they move in 3D space.
To enjoy DTS-X, you will need DTS-X material and a DTS-X decoder. If a DTS-X decoder is not available, the DTS-HD MA or DTS-digital core is decoded instead.
DTS-Pro is a later iteration of DTS-X announced in 2020. Any device with a DTS-X pro decoder upgrades the playback for up to 32 speakers positions including overhead speakers.
Since not all movies feature a DTS-X track, a Neural-X up-mixer is offered to up-mix standard DTS 5.1, PCM or mono content to all speakers for up to 32 speaker positions. The higher the number of channels provided to the up-mixer, the better the playback accuracy will be. Neural-X is similar to the Dolby Surround up-mixer.
Additionally, DTS virtual-X processing creates a virtual DTS-X sound hemisphere with any speaker system. This can be a 2.0, 3.1, 5.1, or 7.1 speaker configuration including soundbars and TV speakers. It creates phantom surround sound and height effects. DTS Virtual-X is meant for those that can’t afford a surround sound system.
DTS Headphone:X is another processing system that attempts to create spatial audio in a set of headphones mimicking a DTS-X system. It is able to render sound around and above you using headphone drivers. This system can work with any set of cans whether they are stereo or surround sound headphones.
To Wrap up
Now that you have a basic understanding of these two object-based powerhouses, you can try each out to determine what works for you depending on your personal preference as the audio quality is purely subjective.
Although these formats are more similar than they are different, they are based on different technologies and are encoded differently. Their implementation by the audio engineer and AV equipment from different manufacturers will also differ.
Dolby Digital and DTS are the two competing surround sound technologies. DTS content is encoded at a higher bit rate than Dolby Digital for more accurate reproduction. However, Dolby claims to have a more efficient decoding system while using less transmission bandwidth and less storage.
This guide’s intention is to give a baseline expectation of what you can expect from each technology and how they perform under different configurations. It’s not meant to set the winner as the topic for which is better can get heated.
Before looking at what you can expect from each technology, you need a basic understanding of encoding and decoding and how they relate to DTS and Dolby technology formats.
Encoding vs Decoding DTS & Dolby
Encoding is the sampling and compression of raw PCM or LPCM data to use less storage and transmission bandwidth on media such as Blu-ray, streaming, TV broadcast, and so on. Meanwhile, decoding does the inverse and tries to reconstruct the compressed signals to match as closely as possible with the source PCM or LPCM with little loss in audio quality.
The parameters for encoding and decoding are specified by the specific algorithm/codec with the assistance of metadata parameters specified during production to aid in finer control over the audio playback.
DTS and Dolby use different compression technologies and operate and different bit rate as you will see as you read through this guide.
The first two generations of DTS codecs were designed primarily for Channel Based Audio (CBA). A primary advantage of CBA is a relatively light metadata burden, as a stream is constrained to a very limited number of playback options.
Dolby audio formats are more aggressively compressed and thus use less storage and bandwidth.
Compression systems
For DTS;
DTS Digital Surround: This is a lossy 5.1 channel compression system (codec) with a data rate of 1.5 Mbps (megabits per second). Lossy surround sound with lesser compression than Dolby Digital, 5.1, Blu-ray disc, console gaming, and DVD. Coherent acoustic codec with extensions for ES and 96/24.
DTS-HD High Resolution: This is another lossy compression system with a higher bitrate of 6 Mbps and can support up to 7.1 audio channels. It is supported by platforms such as Netflix and Amazon Video. DTS-HD High-Resolution format with 7.1 speaker channel support for HD surround sound systems.
DTS-HD Master Audio– This is a lossless system with a bitrate (bandwidth) of 24.4 Mbps for support of up to 7.1 audio channels. You can find them on higher storage and bandwidth media such as Blu-rays. High bitrate lossless surround with 2 extra rear channels, 7.1, Blu-ray. coherent acoustic plus HD bit for bit extensions. 96 kHz for 6.1 or 7.1 surround. A DTS-HD MA bitstream may have a bitrate no greater than 24.5 Mbps
DTS:X– High bitrate, object-based, lossless surrounds with height channels, 9.2, 7.1.4, Blu-rays. is a direct rival to Dolby Atmos
For Dolby Labs;
Pro Logic–
Dolby Digital: This is a lossy 5.1 channel audio compression system that operated at a max bitrate of 640 Kbps for Blu-rays, gaming consoles, DVD, and TV broadcasts
Dolby Digital Plus: DD+ is a lossy format that builds upon the Dolby Digital codec for an increased bitrate of 1.7 Mbps and for support of up to 7.1 audio channels. It is supported by streaming services such as Netflix, HBO, and Amazon Prime for multi-channel audio.
Dolby TrueHD: This is a lossless audio compression system that aims to replicate the quality of the master bit perfectly with a max bitrate of 18 Mbps and can support up to 7.1 audio channels. It can be found on media such as Blu-rays.
Dolby Atmos is an object-based format encoded as Dolby Digital Plus (lossy Atmos) or Dolby True HD (lossless Atmos) codecs. Object-based surround with height channels. 7.1.4. Streaming content, Blu-ray disc, and PC.
Lossy codecs discard irrelevant audio data from the original LPCM data to produce a much smaller file size that is almost identical to the master. Lossless codecs compress the LPCM data without loss in quality.
Dolby VS DTS: Comparison table
Features
DTS
Dolby
Audio Compression
Features both lossy and lossless compression
Features both lossy and lossless compression Dolny Audio files are more compressed
Lossy codecs
DTS, DTS-HD High Resolution
Dolby Digital, Dolby Digital Plus
Lossless codecs
DTS-HD Master Audio
Dolby True HD
Object-based codecs
Yes Native and virtual DTS-X
Yes Native and virtual Dolby Atmos
Audio output
Outputs PCM for stereo and linear PCM (LPCM) for surround sound after decoding
Outputs PCM for stereo and linear PCM (LPCM) for surround sound after decoding
Backward compatibility
Uses a core + extension system for backward compatibility with legacy gear
Includes a separate Dolby Digital substream for backward compatibility
Support
Can be found on HD DVDs, Blu-rays, games, and streaming services Not supported for live-streamed content due to the higher bandwidth requirements
Found on HD DVDs, Blu-rays, games, live broadcasts such as event streaming, games, and streaming services
Dolby explained
As an audio innovator, Dolby Labs has had a long history in cinema and multi-channel audio. Dolby has been a market leader and is synonymous with surround sound,
Dolby also includes a number of container formats such as Dolby Digital Plus, Dolby Digital EX, Dolby Pro Logic II, Dolby Pro Logic IIx, Dolby Pro Logic IIz, Dolby TrueHD, Dolby Atmos, Dolby Surround, and Dolby Atmos Height Virtualization.
1. Dolby Prologic
Previously employed as Dolby Surround for VHS and TV and Dolby Stereo for film in the 80s, pro logic is an analog system that allowed the extraction of the front center and back surround channel (CS) from the left and right channels(LR) for playback on 4 speakers (LCRS). CS is matrixed in the LR from which it’s unpacked.
Can be transmitted using analog RCA cables.
Pro Logic II (PLII)
PLII was an improvement to Prologic that allowed the extraction of 5 speaker outputs from a stereo Dolby Surround source instead of 4 for an increased sense of realism.
The 2 surround channels are derived from the surround channel (S in LCRS) and create 2 similar mono outputs
Was first used in consumer products in 2000 in products such as AVRs, Soundbars, gaming consoles, and multi-channel car systems that featured a Pro Logic II logo.
Pro Logic IIx (PLIIx)
PLIIx derives 7 or 6 speaker outputs from a 2-channel Dolby Surround or 5.1 DD source. Add 1 or 2 back surround channels to 5.1 depending on whether you use a 6.1 or 7.1 speaker configuration
Pro Logic IIz (PLIIz)
Pro Logic IIz expands a 7.1 or 5.1 source for 9.1 channel playback. It includes 2 height channels for the overhead sounds for a greater sense of depth by placing sounds above your head.
2. Dolby Digital
Dolby Digital (DD) previously known as Dolby AC-3 is the successor to Dolby Pro-Logic.
It’s a lossy multichannel system based on the AC-3 codec (audio compression 3) that supports up to 1.0 to 5.1 discrete audio channels at a maximum bitrate of 640 Kbps, a max sampling rate of 48 kHz at a 16-bit resolution (up to 96 dB of dynamic range).
Dolby Digital content can be unpacked (decoded) by any device integrated with an AC-3 decoder. For less than 5.1 channel speakers, the audio program is downmix to stereo (2 speakers) or mono (one speaker channel).
Decoding can be done at the source to obtain LPCM (5.1) or PCM (2.0) stream if the sound output is set to PCM/LPCM that can be transmitted to a processor such as an AVR using an Optical or HDMI connection.
Dolby Digital EX
Dolby Digitel EX is based on the AC-3 coding system and carries a matrixed center back surround channel in the 5.1 core to complement the left and right surround channels for 6.1 or 7.1 playbacks.
The additional channel is recorded in the surround channels at -3dB and 90 degrees out of phase. During decoding the phase-shifted audio is extracted and combined for a back surround output. Once summed the channel’s output increases by 3dB (hence the 3dB reduction during encoding. The extracted audio is reproduced by one or 2 rear surround speakers depending on the configuration.
In a 5.1 system, the center-surround matrixed in the side surround creates a phantom back surround channel.
Dolby Digital EX programs automatically activate EX decoding on a compatible system.
3. Dolby Digital Plus
Will require HDMI 1.4 or higher
The Dolby Digital Plus (DD+) is a lossy/compressed but more efficient encoding system built upon the standard AC-3 codec for Enhanced AC-3 (E-AC-3) that handles higher bitrates of up to 6 Mbps. DD+ was developed as a more efficient codec for bandwidth-critical broadcast and streaming programs.
The Dolby Digital Plus bitstream is constructed as a hybrid of a 5.1 Dolby Digital core followed by the Dolby Digital + stream extension for additional channels of up to 7.1 channels on Blu-rays. The extension carries separate data for side and rear surrounds (4 surround channels) for 7.1 playback. The extension surround data is unpacked and combined with the front left, center, and right channel data from the 5.1 core for 7.1 playback. The side surrounds from the 5.1 core are then downmixed to the front left and right channels to ensure no information is lost.
Using a DD+ decoder on a 5.1 speaker configuration downmixes the side and rear surround data into the 5.1 core to maintain all information. The DD+ can also be downmixed for stereo or mono speaker playback.
DD+ should be able to handle up to 16 discrete channels (15.1) for future expansion.
It uses a constant bitrate (CBR) of 1.5 Mbps, 4.5 Mbps, or 6.144 Mbps depending on the media bandwidth.
The core 5.1 stream is delivered for devices that cannot handle the Dolby Digital Plus stream and ensure compatibility with legacy DD gear.
You will need HDMI 1.3 or higher to pass Dolby Digital plus bitstreams. When an optical connection is used, only the AC-3 track will be available. Any HDMI version can be used for the connection if the output is set to PCM or 5.1 LPCM.
The E-AC-3 codec can be used for encoding lossy Atmos content.
4. Dolby TrueHD
Dolby TrueHD is a lossless format based on the Meridian Lossless Packing (MLP) compression algorithm with a max bitrate of 18 Mbps and supports a total of 8 discrete channels at a 96 kHz sampling rate and a 24-bit resolution or 6 channels at 192 kHz/24-bit on Blu-rays. However, it can support up to 16 audio channels at a 48 kHz sampling frequency. The Dolby TrueHD standard can reach an uncompressed max bit rate of 63 Mbps with 18 Mbps being the maximum supported on Blu-ray.
Dolby TrueHD uses a variable Bit-rate system as it is lossless. The bitrate can increase or decrease to match the source audio data. It is bit-to-bit identical with the studio master and hence requires more bandwidth hence the higher bitrate numbers. The decoder has more data to work with for higher fidelity and more dynamic range.
4:1 compression efficiency of the original LPCM signals without loss in quality to save on storage.
The maximum bandwidth is seldom reached during encoding or playback.
Dolby TrueHD programs are required to have a separate Dolby Digital for backward compatibility in case the system is not fully compliant with the TrueHD standards.
Dolby TrueHD is optional on Blu-rays and other media and can carry lossless Atmos content.
Dolby TrueHD bitstreams will require an HDMI 1.3 connection or higher for transmission from a source to the processor such as an AVR. A Dolby TrueHD receiver will automatically detect Dolby TrueHD bitstreams for decoding and processing.
5. Dolby Atmos
Dolby Atmos is an object-based audio format that can be encoded using the Dolby Digital Plus (lossy Atmos) or Dolby TrueHD (lossless Atmos) compression scheme. Dolby Atmos adds the height elements to the bed channels to envelop the listener in a 3D sound bubble.
Dolby Atmos can support up to 128 simultaneous audio objects.
Audio objects are audio elements with associated metadata that defines how it is rendered in one or more audio channels.
Objects are not confined to a specific location in the mix but can instead be manipulated to move in 3D space by the audio mixer for accurate representation during playback on your specific speaker setup making it easier to localize the moving objects. Atmos can adapt to your specific speaker configuration as the audio objects are flexible.
Dolby Atmos will require the addition of overhead/height speakers to playback overhead effects such as a flying chopper or birds. It can be used on up to 35 speakers location (24-bed, 10 height, and one LFE channel)
HDMI 1.4 or higher
Dolby Atmos Height Virtualization
Dolby Atmos Height Virtualization is a Dolby surround sound processing mode aimed at creating a virtual 3D Dolby Atmos effect without overhead speakers in a 5.1 or 7.1 surround sound configuration.
This is done by height cue filters fitted in the decoder
Dolby Surround
Dolby Surround is an up-mixing technology that takes a standard 5.1 or 7.1 program and intelligently adds the height effects for playback over an Atmos system without needing Atmos content. This will depend on the number of height, in-ceiling, or up-firing speakers available in your system.
Dolby Surround can also up-mix stereo tracks for playback on a surround sound speaker configuration.
It helps increase the sense of space as the surround channel reproduces the ambiance, the center speakers for the dialogue, and the front left and right channels for the main sounds to give a more natural feel to the sound with enhanced realism.
DTS explained
DTS (Digital Theater Systems) was started as a direct competitor to Dolby Labs. DTS has developed a series of multichannel audio solutions for home AV, video games, broadcast, streaming, Blu-rays, and other digital media. Being a household name DTS is supported by all major AV gear manufacturers.
DTS has invented codecs and formats such as DTS digital surround, DTS-ES, DTS Neo-6, DTS-HD Master Audio, DTS-HD high resolution, DTS-X, DTS-X pro, DTS Neural X, and DTS Virtual-X.
1. DTS Digital Surround
The DTS Digital surround is a lossy (constant bitrate/CBR) format that is compressed using the coherent acoustic coding system at a max sampling frequency and bit-depth of 48 kHz/24-bits for support of up to 5.1 channels at a maximum bitrate of 1.5 Mbps. The bit depth can vary between 16 and 24 bits. It was later expanded with extension data to store increased resolution data additional channel information and extended frequency response/higher sampling rates depending on the stream type.
It operates at the same bitrate all the time.
All current and legacy DTS decoders make use of the core DTS stream which is provided if the decoder fails to the decoder the extension data that needs a more advanced decoder
DTS can reach sampling rates of 48 kHz for 6.1 discrete and 96 kHz/24 but for 6.1 matrix and 5.1 discrete. The Bitrate can go as high as 1.5 Mbps on Blu-rays and 768 Kbps on DVDs. It was also used to encode DTS music CDs back in the day at 1234 Kbps.
DTS music CD soundtracks were compressed using the 5.1 compression algorithm at 44.1 kHz while some are encoded at 24 bit at 88.2 kHz for stereo. It had the capability of stereo and surround sound playback.
DTS is a mandatory audio format for both HD-DVD and Blu-ray (meaning that players must support the format, not that every disc must carry a DTS soundtrack)
DTS bitstream can be transmitted by Any HDMI cable, optical output
The Extension data will contain information on the DTS ES and DTS 96/24 formats.
DTS ES
DTS-ES or DTS Extended Surround adds a center-back surround channel to a 5.1 core.
It can either be DTS-ES discrete or DTS-ES matrix.
DTS- ES matrix
DTS 96/24 can support up to 6.1 matrixed channels.
An ES phase shift (90 degrees) is applied during encoding in the left and right surround channels. This allows a Cs (Center surround) channel to be matrixed to the left and right surround channels. A phase shift is applied to prevent phase cancellation after acoustic summation during playback is a 5.1 or stereo system.
DTS-ES Matrix adds a muxed/pseudo-center-surround channel. The channel is matrixed into the left and right surround.
This codec supports a matrixed Center surround (Cs) for matrixed 6.1 at a 96 kHz sampling frequency using the DTS 96/24 coding system and 48 kHz with DTS digital surround.
The center-surround channel is extracted from the left and right surrounds using the DTS Neo-6 decoding system to produce one or 2 identical mono channels.
This surround channel is usually played back 2 speakers as placing a center speaker behind you would be distracting if you are too close to the speaker.
When played back on a 5.1 speaker configuration, a phantom/virtual center-surround is produced.
DTS-ES Discrete
DTS-ES Discrete adds a discrete center-surround channel to the 5.1 core for a total of 7 discrete channels and a 48 kHz sampling rate.
The back surround channel can be decoded to produce 2 similar mono signals for playback on 2 rear surround speakers (7.1 playback) to increase channel separation. These 2 mono channels are matrixed into one.
DTS-ES discrete provides better channel separation than DTS-ES matrix 6.1 and Dolby Digital EX as the audio in the left, right and center-surround is not identical due to the nature of lossy compression which does not allow for fully discrete channel separation. The center-surround in DTS-ES discrete have total separation.
DTS-ES discrete programs also contain matrixed audio content for backward compatibility with DTS-ES matrix decoders. The matrixed content is removed when an ES Discrete decoder is used by canceling out the matrixed audio in the left and right surrounds.
DTS 96/24
DTS 96/24 is a lossy stream type (container format) where the source content is split into the core+extension. The core is encoded 24/48 while the extension carried the payload for higher frequencies to reach 96 kHz. Additional information for the higher sample rates is carried not in the core, but in the extensions.
It is thus compatible with older DTS equipment in absence of a 96/24 decoding.
The extension contains the difference between the 96/24 payload and the 48 kHz core. The extension data is then interpolated to the core to obtain the 96 kHz/24-bit data.
Without a 96/24 decoder, you only get the 24-bit 48 kHz core.
The DTS 96/24 bitstreams is thus always at a constant bitrate of 1.5 Mbps
DTS-express (DTS-HD low bitrate/LBR)
DTS Express is a compressed audio format with a data rate ranging from 48 to 512 Kbps and supports up to 5.1 audio channels at 48 kHz/24 bit.
This format is mandatory in Blu-rays for stereo (2-channel) presentation of secondary audio support in Blu-rays and for streaming services audio content (though rare) as it is a low bitrate codec while maintaining listening quality for mono stereo or 5.1 surround playback. This codec allows streaming services to dynamically adjust the bitrate for streaming more or fewer data to compensate for bandwidth fluctuations.
DTS Express is based on DTS compression but is more compressed than DTS Digital surround for streaming. It is thus compatible with all DTS decoders.
It also provides up to 5.1 channels through an optical or HDMI output.
DTS Neo-6
DTS Neo-6 is a decoding system that up-mixes a 2.1 or 5.1 channel program for playback on a 5.1 or 6.1 speaker system. It is similar to PLII/PLIIx.
DTS Neo:6 comes in two versions where one is optimized for music listeners and the other for watching movies in Music and Cinema respectively.
2. DTS HD
DTS HD is a compression technology developed by DTS.
It offers both lossy and lossless capability, higher data rates, higher sampling frequencies, DTS CA core for backward compatibility, secondary audio, and DTS-HD LBR extensions. This can be done at multiple bit depth (16, 20, and 24 bits) depending on the source material.
DTS High Definition is a family of codecs that adds extensions to the core specifically;
DTS-HD High Resolution (lossy)– Has a constant bitrate. Up to 7.1 discrete channels with a sampling frequency of 96 kHz and 24 bits of signal resolution
DTS-HD Master Audio (lossless)– Lossless Audio with variable data rates up to 24.5 Mbps for Blu-ray Disc. Uses variable bitrate. up to 192 kHz for DTS-HD Master Audi)• Up to 192 kHz sampling frequency and 24 bits of signal resolution for 2.0 channels
And since it includes the core 5.1 DTS digital track, it features 3 levels of performance that are DTS digital, DTS-HD high resolution, and DTS-HD master audio. Thus audio compressed using this coding system remains backward compatible with older DTS gear at up to 1.5 Mbps.
Contain DTS express or Secondary Audio for additional content such as commentaries. The secondary audio is encoded in standard DTS at up to 48 kHz/24-bit that needs to be disabled on a BD player to output HD bitstreams.
DTS-HD High Resolution
DTS-HD high resolution simply called DTS-HD HR is a lossy (constant bitrate rate) stream type as it operates at the same bitrate at all times. that encodes audio at up to 5.766 Mbps on Blu-rays and 3.018 Mbps on DVDs. It is capable of delivering 7.1 independent/discrete audio channels at a 96 kHz sampling rate and at a 24-bit resolution.
DTS-HD HR achieves compression ratios of around 3:1.
It is an alternative to DD+ in that it is a compressed digital format at a higher bitrate for up to 8 discrete channels. DTS-HD HR is encoded in the form of an extension to the core DTS data that remains available for legacy equipment. If your audio system is not compatible with the DTS HD bitstream, the DTS 5.1 channel is unpacked while the DTS-HD stream is ignored.
This format is optional on Blu-rays, DVDs, and other source media.
An HDMI 1.1 connection or higher is required for transmission of DTS-HD high-resolution bitstreams to a compatible decoder.
DTS-HD Master Audio (DTS-HD MA)
Formerly known as DTS++, DTS-HD Master Audio sometimes abbreviated as DTS-HD MA is a lossless (variable bitrate) codec that can carry up to 7.1 audio channels at 96 kHz sampling rate at a 24-bit resolution. It can also support 2 discrete channels at 192 kHz/24-bits on Blu-ray. 192 kHz/24 bit for 2-channel audio on DVDs
Support for DTS-HD MA is optional on both Blu-rays and HD DVDs but has become a de facto standard on Blu-rays and 4K Ultra-HD disks.
DTS-HD supports variable bits rates on a Blu-ray disc of up to 24.5 Mbps for lossless encoding and additional channels (up to 11.1). DTS-HD MA tracks are bit to bit identical to the studio master.
This multi-channel format competes with Dolby TrueHD, a lossless codec by Dolby Labs as seen above.
During encoding, the DTS-CA core (DTS Digital at 1.5 Mbps) is encoded first followed by a stream of supplementary data representing audio above 48 kHz that was discarded. Thus DTS-HD MA has a lossy core for backward compatibility and for playback on legacy DTS devices.
DTS-HD Master Audio requires an HDMI 1.3 or higher connection for transmission of the bitstreams. If an optical connection is used the standard DTS digital track is played.
DTS Express support. Neo 6 upmixing for 5.1 ch
3. DTS-UHD
DTS-UHD is the third-generation audio coding system developed by DTS. DTS-UHD supports both lossy and lossless audio compression
Lossless audio coding is always variable bit rate
DTS-UHD is a bitstream audio delivery system that supports channel-based, object-based, and high-order ambisonic audio presentations. The audio stream can be presented on a minimum speaker configuration.
High-order ambisonics are mathematical frameworks for handling 3D sound fields.
This audio system is comprised of compressed audio data and metadata components. Metadata includes parameters for loudness, dynamics, signaling content, and spatial coefficients for the rendering of DTS-X objects. The metadata also defines how the sound is diffused and which speaker should be silent and which one should have sound output.
However, the bed-channel metadata can override the object-based metadata.
In legacy DTS systems, the core 5.1 data is extracted while the additional data is ignored by the decoder.
4. DTS:X
Similar to Dolby Atmos, DTS-X is an object-based audio format that creates a sound hemisphere that envelops the listening. The first version supported 12 speaker positions but was improved to handle up to 32 speaker positions. It can support up to 224 objects and is mostly found on UHD Blu-rays.
The placement of the audio objects is specified by coefficients that dictate where the rendered objects will be placed in a 3D sound space. The placement data is contained in the metadata data packet that also contains playback parameters such as loudness, diffusion, and size of the objects.
However, unlike Atmos, DTS-X does not require overhead/height speakers it figures out the speaker layout and adapts to it scaling the height effects. That notwithstanding, it is useful to have overhead speakers for a more accurate presentation. The only requirement is that you place native DTS-X content and use a DTS-X processor. If the system is not compatible with DTS-X a DTS-HD MA or DTS digital core is presented instead.
DTS-X is layered upon the DTS-HD MA or DTS-UHD codec.
Will require HDMI 1.4 or higher
DTS-X pro
DTS-X pro is an object-based decoding/rendering system that can support up to 32 speaker positions and can be used to decode standard DTS-X content over more channels removing the 11.2 channel limitation.
DTS-X is flexible and can adapt to a variety of speaker layouts and is geared to work with IMAX-enhanced content. IMAX enhanced is a content certification format that provides the best video and audio quality for movies.
This is not a widely used system but can be sound on some AVRs such as Marantz and Denon receivers.
DTS Virtual-X
DTS Virtual:X is a spatial post-processing system that attempts to create a virtual 3D sound bubble with any speaker configuration (2.1, 3.1, 5.1, 7.1, and so on) for a believable spatial experience. It is similar to DTS-X but does not require the use of surround, height, or up-firing speakers as it uses psycho acoustic algorithms to crease virtual surrounds and height channels for increase width and height.
It creates believable phantom surround and height channels by translating PCM or DTS content (HD, 5.1, DTS-X…) content in any speaker system. This is done using tricks such as delays and signal level adjustments.
DTS Neural-X
DTS Neural-X is a spatial upmixing technology that takes a mono, stereo, or surround sound (5.1 or 7.1) program for playback depending on the number of speakers. This is done with the idea of creating a 3D sound bubble by approximating the width and height of sound filed data of DTS-X.
Neural-X detects the number of speakers and pans the audio playback to the speakers. This can be done for up to 32 speakers depending on the processing capabilities and the number of outputs.
Most home AVR with Neural-X upmixing will support upmixing to a total of 11 speakers at most.
It can place sounds above (height speakers) and around (surround speakers) the listener with amazing accuracy from any DTS source.
It is equivalent to Dolby Surround Atmos and a replacement for DTS Neo-6
Summary
Dolby Digital vs DTS is a topic that is highly debated with a divide on which technology is better and which one can provide higher audio quality.
Many, especially audio nuts will claim that DTS is better because of the higher encoding bit rate during compression while others, especially most average home theater users will find Dolby to be much better because of the superior audio processing for better dynamic range.
However, I cannot give a conclusion on which one is better for you based on the compression and processing numbers alone.
There are many things to consider when deciding between the two including what kind of speaker layout you have and personal preference because how we hear and perceive sound is very subjective.
most AVR brands now offer a complete range of Dolby, DTS, and brand-based proprietary decoding and up-mixing capabilities.
Some speaker specs can be confusing and this is especially true for power ratings (wattage) that are often misleading to the average tech consumer.
This is because some manufacturers inflate their speakers’ power ratings with the hopes that consumers will make their buying decisions mostly based on wattage. Different manufacturers also have different methods of testing speakers.
But what is speaker wattage and how much is enough? Well, let’s break this down.
Speaker wattage is a specification used to express the amount of electrical power a speaker can draw from an amplifier. Wattage is denoted in watts or “W” and can be RMS or Peak power.
So, is 1000 watts louder than 200 watts? No. In this guide, I am going to explain why this is the case and why driving speakers at 1000 watts is a bad idea.
But we first let’s look at some concepts to better understand speaker wattage.
Decibels
A decibel (dB) or a 10th of a Bel is a unit used to show the relationship between electrical power and acoustic energy on a logarithmic scale.
In the case of speakers and sound, it is used to express the sound pressure level (SPL) which directly affects perceived loudness. This can be as low as 0 dB (near total silence) to as high as 130 dB (threshold of pain).
But here is what matters;
To increase perceived loudness by 3dB, you need to double the power or half the power for a 3dB decrease.
To double or half the perceived loudness, you need an increase or decrease of 10dB.
To increase or decrease the SPL by 10dB, 10 times, or one 10th the power is required respectively.
Doubling the distance from the source to the ear decreases the sound pressure level by -6 dB (4 times the power or -50% the perceived loudness).
So, to go from near silence (0dB) to normal human speech level (around 60dB) you will need 106 or 1,000,000 times the power.
Also, the difference between 200W and 1000W is just above 6dB which is not even double the perceived loudness. To double the loudness from 200W, you need about 10dB or 10 times the power which is 2000W.
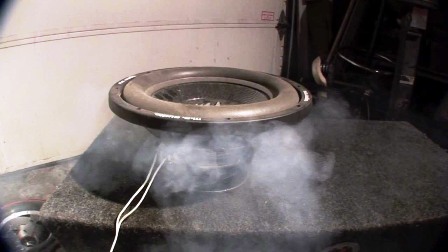
2000 watts is more power than a heater can handle and no speaker driver can handle this kind of power without damage. A speaker would not be able to handle 1000 watts leave alone 2000 watts before it goes “Puff”. More on this later on.
Understanding dB levels are important in determining how much power speakers can handle.
The table below is a breakdown of just how loud different dB levels are;
Decibel level
Real-life examples
10dB
Rustling leaves
30dB
A whisper
40dB
Refrigerator hum
50dB
A quiet office
60dB
Normal speech
70dB
Toilet flushing
80dB
Leaf blower sound
100dB
A handheld drill
120dB
Sound of siren
130dB
Live rock band
160dB
Shotgun blast
Speaker efficiency
Speaker drivers are highly inefficient mechanical devices that convert most of the drawn electrical power to heat energy other than acoustic energy.
With the most efficient speakers being about 5% efficient on average, you can a picture of how inefficient these devices are. That means that about 95% of the power is converted into heat leaving about 5% of that power to be converted into sound.
All this heat has to be dissipated from the driver somehow (usually through convection from the cone movement and conduction through the driver structure). If this doesn’t happen, the heat will accumulate and things could get bad real fast (blown speaker). More on the effects of heat later on.
Blown subwoofer
But don’t confuse speaker efficiency for speaker sensitivity although the two are related. Speaker sensitivity is a measure of how well a driver can convert wattage to acoustic energy and is denoted in dB/W/M. Efficiency on the other hand is measured as a percentage.
For the highly efficient speaker above (5% efficiency), the sensitivity will be about 99dB for 1 watt at a distance of 1 meter. We get this using the formula below;
Sensitivity= 112 + 10 log (efficiency)
99dB is just as loud as a handheld drill (using the table above). This means that for 1 watt of power, the perceived loudness from the speaker will be about as loud as a handheld drill when you are 1 meter away from the speaker (on-axis of course).
However, not many speakers, especially home theater or hi-fi speakers, are these efficient. Also, the sensitivity rating can be in dB/2.83v/M.
But power is a product voltage (V) squared divided by the resistance to current flow in the driver circuit (impedance, Z, in this case) hence;
Power=V2/Z
So, to get one watt with 2.83 volts, you need an 8 Ohm load meaning the speaker should have an 8 Ohm impedance. Thus, speaker sensitivity is the amount of acoustic energy at 2.83 volts on an 8 Ohm load at one meter. When looking at speaker sensitivity, this is important to remember.
Not many speaker drivers are that efficient. A 1% efficiency (92dB/W/M) should be enough for most home users. Meanwhile, an efficiency of around 0.2% (85dB/W/M) is pretty low even for a home setting. Keep these two examples in mind, they are going to be important.
Now for what you are here for….
Speaker wattage explained
This is where the concepts we have looked at the start to add up and where you begin to see why a 1000-watt speaker doesn’t make sense.
So, we have two speakers, one with a sensitivity of 92dB (speaker A) and the other with a sensitivity of 85dB (speaker B). For one watt, speaker A produces 92 decibels of acoustic pressure while speaker B produces 85 decibels of the same.
Let’s say you are sitting 4 meters away from your speaker and if you can remember from earlier, we lose about 6dB of acoustic pressure every time we double the distance (can vary depending on other factors such as points of reflection, room loss, dispersion et al).
At 4 meters from the speaker, you lose about 12dB give or take. This means that you will now get 80dB from speaker A and 73dB from speaker B in that listening position with one watt of power.
To get to 92dB at this position for both speakers, speaker A needs to draw 16 watts from the amplifier while speaker B needs to draw just under 100 watts for the same SPL. But this isn’t exactly accurate when taking thermal compression into account.
What is thermal compression?
Thermal compression is a phenomenon where speaker drivers become less efficient as heat builds up in the voice coil. This is because as the voice coil gets hotter, the nominal impedance (Z) increases lowering the amount of power delivered to the speakers.
All speakers suffer from thermal compression no matter how efficient they are.
Now back to our two examples. Speaker A which is 1% efficient, about 15.84 watts will be converted to heat (at 4 meters for 92 decibels) while speaker B which is 0.2% efficient will convert about 99.8 watts to heat for the same with all factors being constant (spoilers: they don’t remain constant).
This means that speaker B will get pretty hot for the same listening level and the temperature will increase with time.
Most voice coils are made of copper and adhesives that can withstand maximum temperatures of around 200°. Most manufacturers take this into account when designing their drivers for better heat dissipation.
Assuming both speaker drivers are 8 Ohm drivers and are made of copper windings (for the voice coil) with a DC resistance (DCR) of about 6 Ohms at 20°, we can calculate how much power is delivered to each driver after a certain period using the formula below.
RT2 = RT1 × (1 + α × (T2 – T1))
Where α is the thermal coefficient, T1 is the initial temperature, T2 is the final temperature and R is the resistance.
Copper has a thermal coefficient of resistance of 3.93 *10-3 per degree Celsius meaning that the DCR increases by 0.393% for 1°. Okay, try not to get lost.
So, to get the maximum temperature, the DCR for both voice coils will increase to 9.7 Ohms which will also increase the nominal impedance (Z) and we can calculate Z using the formula below;
Z=DCR × Z ratio where Z ratio=nominal impedance/DCR hence Z ratio=8/6= 1.33
Substituting the figures gives us 9.7 × 1.33= 12.85 Ohms
This means that by the time we get to 200° the impedance will have increased from 8 Ohms to 12.85 Ohms which will effectively reduce power delivery to the speaker driver. The sensitivity of drivers is also reduced.
Assuming we deliver 40 volts continuously on average to a driver at 8 Ohms, it takes a couple of seconds for the driver to reach maximum temperature. Using P=V2/Z, we see that we should expect about 200 watts delivered to the driver, but this does not happen because the impedance increases to 12.85 Ohms.
The power delivered thus drops to;
P=402/ 12.85= 124.514 watts
The power drops from 200 watts to 124 watts, a 76-watt drop or a 2.08 dB drop. You can calculate the power drop in dB using the formula;
dB (power)= 10 × log(P1/P2)
The sensitivity in speaker B will be reduced to under 83dB and that of speaker A is reduced to under 90dB. This is a very significant drop though it may not seem like the case.
But is important to remember that speaker B will reach the maximum temperature much quicker than speaker A to reach a certain sound pressure level since it is less efficient.
The efficiency is then reduced further as heat builds up since the impedance increases which means that more power is needed by the less efficient speaker to reach the same level as the more effective driver which increases the nominal impedance even further and this continues until its limits are and you eventually end up with a blown speaker.
This is an oversimplification as different drivers that play different frequencies have different thermal masses, and designs, and will transfer heat differently. It takes longer to damage a subwoofer’s voice coil than a mid-range woofer’s voice coil (adhesive + former + copper windings).
But thermal compression also helps protect the drivers to a certain degree because as the impedance increases, less power is delivered and the temperature rise is slowed.
What this means
There is no reason to believe that any speaker would be able to handle or raw 500 watts leave alone 1000 watts for sustained periods. The speakers will blow long before you can get to 1000 watts.
It is also important to remember that soundtracks are complex with major peaks and dips at different frequencies. Usually, the peak to the average ratio for most soundtracks is around 10dB.
The peak to average ratio is the ratio between maximum power and the average power of the signal.
Using our examples and assuming that our average level is around 92dB, we established that speaker A needs 16 watts to reach that level, 10 times the power (160 watts) is required to handle the instantaneous peaks. Meanwhile, speaker B will need 1000 watts for the peaks at the same level.
You don’t need quantum physics to know which speaker will get smoked.
Peak vs Continuous power
Peak power is the power that speakers can handle instantaneously (over very short periods) usually microseconds while continuous power is the amount of power that a speaker can handle over sustained periods.
Continuous power handling is more reliable when comparing different speakers before making a purchase but it should also not be confused with RMS.
But the most important thing to remember is that peak power only shows how well a speaker can handle the peak crests and is not a measure of how well a speaker can handle continuous power over longer periods hence is highly unreliable. You are better off looking at the continuous power ratings provided by the manufacturers.
Speaker mechanical limits vs wattage
Apart from thermal limits, speaker drivers also have mechanical limits that determine how much wattage they can handle.
This includes things such as the maximum excursion before distortion (Xmax) and (maximum excursion before damage occurs Xdamage). As you increase power delivery to the drivers, you get ever closer to exceeding the limits of the drivers which in turn increases the chances of severe damage.
You need to consider all these things when looking at how much power the speaker can handle.
How many watts do speakers need?
As you can see from above, there are many things to consider when choosing a speaker other than wattage, most of which are beyond the scope of this article.
But in this case, you have a better chance of getting your money’s worth if you choose a more efficient speaker other than choosing one that can handle more watts.
You can get to a reasonable listening level by using a more efficient speaker with fewer watts. More watts do not mean louder but also louder does not mean better sound quality. With a more efficient speaker, you will be able to reach a pretty reasonable volume with just a few watts but you should also be careful not to crank up the volume knob too high (remember, thermal compression).
Also, because most sensitivity ratings nowadays are in 2.8 volts other than 1 watt per meter, ensure that these 2.83 volts are on an 8-ohm load. These are details that you cannot afford to ignore as sensitivity is heavily reliant on the load (the speaker’s nominal impedance, Z).
It is also important to remember that speaker drivers do not produce their power and rely on power amplifiers to feed them with the power they need.
Do not get deceived by highly inflated power ratings that can be super deceptive. Peace!
In this age of major technological advances, the different audio formats can be confusing. A great example is PCM audio and FLAC, covered here today.
PCM (Pulse Code Modulation) is a standard sampling algorithm used in analog to digital conversion (ADC). FLAC, on the other hand, is a lossless container format that compresses audio files to use 40-50% less storage.
Uncompressed and original audio recordings can be stored using PCM Audio that can be converted to and from lossless FLAC, bit-perfectly.
Can you hear the differences between the two? Let’s look at what each format entails first.
PCM audio explained
PCM standing or Pulse Code Modulationis a digital sampling method where bits (0s, 1s) are sampled and represented from an analog signal. These samples are taken at regular intervals at sample rates above 40kHz (40k samples per second).
The sample rate should be 40kHz or above because of the Shannon sampling theorem (Nyquist theorem). It states that for the most accurate representation of an analog signal from a digital one, the sample rate needs to be at least twice the highest frequency.
And because the upper limit of human hearing is 20 kHz, the ideal minimum sample rate is 40 kHz. Higher sample rates are used (oversampling) to account for any imperfections hence sample rates of 44.1 kHz, 96 kHz, and so on with 44.1kHz being the standard. The way they arrive at these sample rates is a story for another day.
A sample rate of 44.1 kHz will mean that the audio recording will have a maximum frequency of 22 kHz. What’s more, a higher sampling rate will mean that more storage is required for the audio file.
In summary, a higher sampling rate means that more high-frequency audio information is available for playback.
Apart from the sample rate, the bit depth is also crucial in PCM.
Audio bit depth (number of bits per sample) determines the dynamic range for particular soundtracks and is denoted in dB or decibel. Dynamic range is essentially the difference between the highest (loudest) and lowest (quietest) amplitudes of an audio signal.
The common bit-depths are 8-bit, 16-bit, 24-bit, and 32-bit with 16-bit being the standard. Every bit is equal to a dynamic range of around 6 decibels (. So, with a bit depth of 8 bits, you would have a dynamic range of 48 dB, 96 dB for 16 bits, and 144 dB for 24 bits.
The relationship between decibel levels and perceived loudness is complex. But what you need to know is that the decibel level, where bit depth is concerned in PCM audio, is a measure of the electrical content in an audio fileor the audio file’s resolution.
According to psychoacoustics (study of how we perceive sound), the maximum dynamic range for us is around 120 dB with our threshold of hearing being around 90 dB.
144 dB is within the threshold of pain and would be impractical for anyone while 48 dB is too low. This leaves us with a 96 dB sweet spot or a bit depth of 16. A bit-depth of 16-bits is all we would need for rich audio playback but is often exceeded.
During mixing, a bit depth of 24 may be preferred by some as it makes dealing with room noise easier and also increases the buffer before which clipping can occur as the noise floor is lowered. The noise floor drops with an increase in dynamic range and the fewer the bit the more noise you get (less headroom).
Sample rate and bit-depth knowledge are crucial in understanding PCM.
When FLAC compression is used, the uncompressed file and lossless FLAC will be similar to each other bit for bit. FLAC files can, therefore, be uncompressed and reversed to their original format during decoding.
For example, after ripping (copying) a PCM file (CD quality) to FLAC for storage in your home media server, you can easily convert the file back to PCM if need be.
The advantage that FLAC has over uncompressed audio, PCM audio files included, is that it uses significantly less storage. This is usually about 40% less storage.
The way FLAC accomplishes this lossless compression is by removing redundancies (useless parts).
Files are also compressed through other smart means such as rearranging bit strings. Take this sequence for example: ABCDABCDABCDABCD. What FLAC would do on encountering something similar is rearranging the sequence to (ABCD)4. This would effectively compress the sequence but can be uncompressed to its original form.
This is an oversimplification, but you get the gist. The same thing happens during FLAC compression but in bit sequences instead of letters.
Also, in most cases, this lossless format will have a similar sample rate and bit depth as the uncompressed file. But keep in mind the standard which is 16 bit/44.1kHz.
Which sounds better: PCM audio or FLAC
This is a huge point of contention for a considerable number of audio enthusiasts. So, I am going to try and demystify it in the simplest terms possible.
There are no sound quality differences between PCM and FLAC files as long as the conversion goes right which it most probably will. This is because as we have seen, FLAC is a bit-perfect compression of the original uncompressed file, PCM in this case.
If you reconstruct a PCM file from a FLAC file, you are going to get something similar. Although FLAC is not entirely lossless (no compression format is), any lost details will not matter since they would be out of our audible range and we can, therefore, not hear them (no one can).
Remember when I mentioned that there is an upper limit to how much we can hear as far as frequencies and dynamic range are concerned. Yes, anything above those values (16 bits and 44.1 kHz due to oversampling) does not matter as much.
What’s more, there will be no sound quality difference between a 16bit/44.1 kHz FLAC file and a 24bit/192 kHz PCM file, NONE.
If you still believe that you can hear a difference between PCM audio and FLAC, I would like you to attempt this challenge. Take two identical files (same artist, same song, and so on), one PCM, and one FLAC.
On your computer, install Audacity, open it and open the PCM file using it. Open the FLAC file on the same timeline but this time invert it, then render the difference. What you will be left with is digital noise which is essentially silent and will have nothing to do with what you hear upon playback.
So, before you decide to convert your FLAC collection to PCM, these are important considerations.
FLAC vs PCM: Comparison table
PCM
FLAC
Is an uncompressed format
Is a compressed but lossless format
Offers high-quality audio playback
Offers high-quality audio playback
Is used to archive original recordings
Can be used to archive PCM files
Requires more storage and bandwidth due to the larger files
Takes up less storage and takes up less bandwidth due to the smaller sizes
If you are new to audio and headphones, in particular, you may not be very familiar with the various types of headphones drivers that are available in the market. This is a topic that can also get a bit confusing even for audio enthusiasts.
So, what are the main types of headphone drivers available for audio consumers today?
There are 6 main types of headphone drivers, namely;
Dynamic or Moving coil drivers
Planar magnetic or Orthodynamic drivers
Balanced armature drivers
Electrostatic drivers
Bone-conduction or Magnetostriction drivers
Hybrid drivers
All these drivers are transducers and at the basic level, they all serve the same purpose and that is to convert electrical sound signals into audible sound waves through variations in sound pressure (acoustic pressure) that can be received by our ears and get processed by our brains.
But before we can look at each of these drivers in more detail, you should first get familiar with common phrases and jargon that you may encounter when deciding which type of driver is best suited for you.
Headphone driver glossary (Meaning of common terms)
Term
Meaning
Transducer
Is a device that converts energy from one form to another. A speaker or headphone driver is a transducer.
Neodymium magnet
Is the most common type of permanent magnet used in most drivers mainly due to their efficiency, power, and how small they can be made.
Diaphragm
Is a thin but semi-rigid material used in all drivers to create waves through back-and-forth movement.
Sound pressure
Is the variation in atmospheric pressure that is caused by soundwaves. It is measured in decibels
Voice coil
Is a coil in a headphone driver that is induced by a current to create an electromagnetic force that drives the diaphragm.
Electromagnetic force
Is a magnetic force that is created by electrically charged particles.
IEM
In-ear monitor
Transient response
This is the ability of a headphone driver to start and stop as fast as possible per the analog sound signal
Bass response
Ability to reproduce low audio frequencies
Distortion
These are unwanted artifacts in sound mainly caused but the non-linear movement of a headphone driver
Imaging
This is the ability of a headphone driver to reproduce the best possible replica of the recorded soundtrack to space and stereo balance
Piezoelectric effect
The ability of a material to produce an electric charge under mechanical stress. Can also include sound vibration. The reverse can also occur where sound vibrations are generated by applying an electric charge on the material which is known inverse piezoelectric effect
Electrostatic effect
This is the effect of electric charge fields where similar charges repel and opposite charge attract
1. Dynamic or Moving coil drivers
This is the most common and oldest type of headphone driver that is also found in the majority of conventional cone speakers.
These drivers are made of;
A permanent magnet, usually a neodymium magnet
A voice coil which is a thin wire wound over a former
A spider to support the voice coil
A diaphragm directly connected to the voice coil
A suspension for the diaphragm
A dust cap that prevents dust and other particles from getting into the voice coil
The technology behind dynamic drives is highly developed and they are, therefore, easy to manufacture and mass-produce ranging from small-sized drivers that can fit in IEMs to large concert PA systems.
The larger the driver the more air it can displace for louder sound (higher SPL), especially when playing lower bass frequencies. However, a larger driver does not always mean better sound or better bass.
How dynamic drivers work
It all starts when an audio signal is fed to the driver through its leads that connect to the voice coil.
This is usually an analog and varying electrical signal that varies depending on the frequency being played.
Once the signal is applied to the voice coil, an electromagnetic field is formed by electromagnetic induction around the voice coil which changes depending on the kind of AC signal cycle being received whether it is negative or positive.
Due to this changing electromagnetic field, the voice coil can either be attracted or repelled by the permanent magnet in which the voice coil is suspended. This is why this type of headphone driver is also known as a moving coil driver.
As the voice coil is attracted and repelled, it moves the diaphragm back and forth rapidly per second. These movements vibrate the diaphragm which creates sound waves due to compression and rarefaction of air.
The soundwaves created by the drivers reach our ears where they are translated by our brains.
Pros and cons of moving coil drivers
Pros
Cons
Cheaper compared to other driver types which makes dynamic headphones more affordable, especially for the average consumers
Has a higher total harmonic distortion, especially at higher volumes
Can produce deeper and punchy bass as it can move large amounts of air
Poorer bass response at the roll-off points
Highly available
Poorer transient response due to the mass of the diaphragm structure
Does not require a lot of amplification power to be driven
May lack accurate precision
Have a sound signature that most audio enthusiasts find pleasing
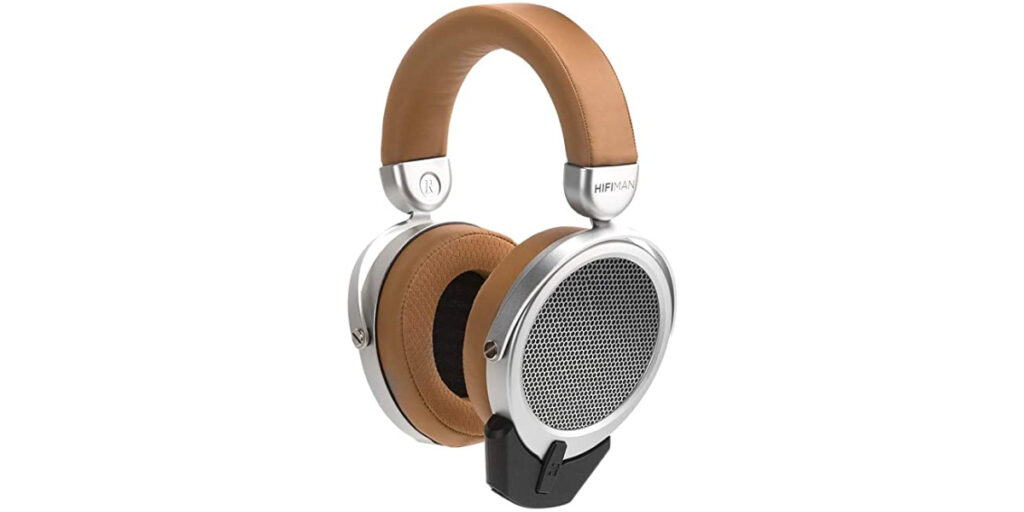
2. Planar magnetic headphone drivers
These drivers are also known as Orthodynamic drivers. The name Orthodynamic drivers are attributed to the popularity of the Yamaha planar magnetic headphones that appeared in the 1970s.
But contrary to dynamic drivers, planar magnetic works on different principles which we will discuss below.
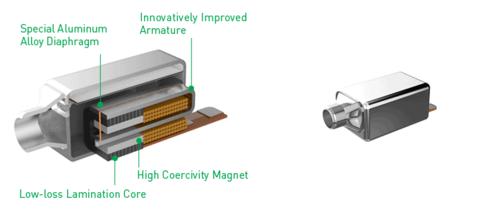
These drivers are made of the following parts;
A thin flat diaphragm in which thin flat conductive wires are embedded
One or two powerful and permanent magnet arrays
These are the two main components that make up a planar magnetic headphone driver but the magnets need to be evenly arranged with respect to the conductive wires for linear, near-perfect pistonic motion.
They are known to sound better than dynamic drivers due to low distortion which is brought about by the linear movement of the diaphragm. However, they require more power and are heavier when compared to moving coil drivers found in most headphones.
How planar magnetic drivers work
Similar to dynamic drivers, planar magnetic headphone drivers also use electromagnetic forces to move the diaphragm.
This occurs when a varying audio signal flows through the conductive wires on the diaphragm. The current (alternating current) makes the diaphragm an electromagnet, but since audio signals are not a perfect sine wave, the electromagnet also varies depending on the signal.
Diaphragms on planar magnetic drivers are suspended between the magnetic arrays. This means that the diaphragm can either be attracted or repelled by the magnetic array and in the process, it moves/vibrates rapidly to create sound waves with planar wavefronts that we can perceive.
However, the magnetic arrays also need to be perforated to allow air to pass through and for sound waves to escape.
Pros and cons of planar magnetic drivers
Pros
Cons
Lower distortion
Heavier
Faster transient response due to the effective and lightweight diaphragm
Require more amplification power and often need to be paired with a headphone amplifier
Better and more open soundstage then moving-coil headphone drivers and open-back design found on most of the planar magnetic headphones
Costlier than dynamic drivers
More accurate bass response
Not widely available for the audio consumer market
3. Balanced armature drivers
The next driver on this list is the balanced armature headphone driver or BA driver that also uses electromagnetic induction for audio playback.
These drivers are arguably the smallest drivers on this list and are usually used in IEMs due to their small sizes. They are small enough that multiple drivers can be fitted into one IEM enclosure with drivers ranging from as low as 1 to as high as 7 in some high-end IEM models.
Balanced drivers use technology borrowed from hearing aids with some modifications for sound reproduction with the help of the following parts;
A balanced miniature arm or balanced armature (is centered between 2 permanent magnet poles with a net force of zero)
A conductive coil wrapped around the armature
A thin diaphragm membrane
A driver rod that connects the diaphragm to the armature
A permanent magnet with two poles namely: north and south
All these components are put in one small isolated enclosure which is then put in the main headphone housing where other drivers can also be added depending on the design.
Where multiple-way armature drivers have been added in a certain IEM design, a crossover also has to be added since the different drivers can only handle a specific frequency band. The crossover is responsible for assigning the right signal to the respective driver that can best handle a certain frequency range.
For example, in the case of an IEM with 4 armature drivers, usually, one driver will handle the bass and sub-bass frequencies, one will handle the mid-range frequencies, another will be responsible for the upper-mids and the last driver will playback the highs or trebles.
How do balanced armature drivers work?
As I mentioned earlier, balanced armature drivers also apply principles of electromagnetic induction to produce sound but unlike the other two drivers discussed above, armature drivers do not displace air. This means that balanced armature drivers are not great at reproducing low frequencies.
All this begins when a varying signal is fed through to the driver from the source. This signal induces the coil that is wrapped around the miniature arm to create a changing electromagnetic field.
These changes in the electromagnetic field cause the balanced armature to be attracted by either of the poles causing it to move rapidly moving the driver rod which, in turn, moves the light diaphragm with it, reproducing sound.
Pros and cons of armature drivers
Pros
Cons
Has great noise isolation
Does not reproduce punchy bass
Is efficient and does not draw a lot of power
They are costlier to manufacture than dynamic drivers
Great at reproducing accurate and precise upper mids and high frequencies
Most armature drivers can only handle a narrow frequency range hence the need to use multiple drivers
4. Electrostatic headphone drivers
Electrostatic drivers are different from the 3 drivers we have discussed above in that they use electrostatic principles to playback audio other than electromagnetic induction.
Electrostatic principles are the same physics principles that get your hair attracted to a static surface such as a balloon that has been rubbed on some sheets. This is essentially the same principle that these drivers use for operation.
This is accomplished when the following parts work in tandem;
A thin diaphragm usually made of mylar (BoPET)
2 perforated stator plates in which the diaphragm is sandwiched
Spars to separate the stator plates from the diaphragm
These headphone drivers are accredited for being super accurate and precise as they reproduce every single detail of an audio signal. This is why electrostatic headphones are highly relished by audiophiles.
However, this level of detail can also be detrimental to your listening experience if your audio signal has any forms of artifacts that the drivers will faithfully reproduce.
These headphones are also known for having a wide frequency response which does not really matter that much but lacks the bass punch that moving coil drivers are known for.
Additionally, there is also the question of price when it comes to investing in electrostatic headphones. This is because these headphones are super expensive with most of them retailing at the $3000 price range or above without even factoring in the fact that they need electrostatic headphone amps (energizers) to drive them due to their over-the-top impedances which range at the kilo-ohms region usually above 100 kΩ (100,000 Ohms). This makes the cost of owning one of these headphones extremely high.
Weight can also deter potential buyers from picking up one of these electro-acoustic transducers.
With all that said, these are probably the best headphones you can buy for the best lifelike audio playback. There is little distortion of the sound by the driver, high acoustic accuracy, the transient responses are super-fast and the sound signature is great if you do not mind the lack of punchy bass which some may find boring.
How electrostatic drivers work
For electrostatic drivers to work, the diaphragm needs to be electrically charged which is usually done through DC biasing. To accomplish this the diaphragm is coated with a conductive coating that enables it to hold a charge.
DC biasing entails applying a fixed DC and voltage to the conductive material on the diaphragm. This ensures that the diaphragm is electrically charged when in use which is usually a positive charge.
Remember we mentioned that electrostatic drivers also have perforated stator plates. The main function of these stator plates is to either attract or repel the positively charged diaphragm once an audio signal is applied.
These stator plates essentially act as fast-discharging capacitors that can either have a negative or a positive charge.
So, when an audio signal is applied to the plates, one of the plates will hold a positive charge while the other will hold a negative charge at any given point.
When one plate is positively charged it repels the positively-charged diaphragm and at the same time, the other plate attracts the diaphragm which doubles the net force on the diaphragm allowing it to move air which escapes through the perforations to reproduce sound.
And since audio signals alternate thousands of times a second, the stators rapidly shift between negative and positive charges either attracting or repelling the diaphragm causing it to move linearly as the force is applied evenly across the entire diaphragm surface.
However, for this to work flawlessly, the diaphragm should not touch either of the plates. This is where spars come in to ensure that there is enough separation between the plates and the diaphragm.
Something else to also keep in mind is that electrostatic headphones produce sound waves with planar wavefronts similar to those produced by planar magnetic headphones.
Pros and cons of electrostatic drivers
Pros
Cons
High levels of accuracy which gives high-quality sound
Any artifacts in the audio signals are also reproduced resulting in a poorer experience if the signal is not too clean
Fast transient response
They are super expensive
They have a low distortion
They are not portable since they require an external amplifier due to their high-power consumption
Do not have the best bass effects
5. Bone conduction drivers
Bone conduction drivers are a whole different beast by themselves in that they do not operate like other convection headphone drivers but directly vibrate the listeners’ skulls to make audible sounds.
They do this by completely bypassing the eardrum and effectively sending vibrations directly to the cochlea and stimulating it before the vibrations are sent to the brain for interpretation. This means that bone conduction headphones are used without any direct contact with the listener’s ear canals.
Bone conduction headphones are especially useful for individuals that want to hear what is going on around them, especially when outdoors, and for individuals with conductive hearing loss since they do not require the eardrum to stimulate the cochlea.
All this is accomplished by one key component found in these headphones and this is a moving coil/moving iron or a piezoelectric transducer.
The piezoelectric transducer found in some bone conduction headphones uses reverse piezoelectric effect when a potential difference (audio signal) is applied across it.
This potential difference causes the transducer which is essentially a crystal element structure to change shape depending on the applied signal producing vibrations that are sent through the cheekbones and stimulating the cochlea structure so that we can hear the sound.
Pros and cons of bone conduction headphones
Pros
Cons
Great for people with hearing loss
Does not have the best audio quality when compared to other drivers
Great for audio playback when outdoors as they do not mask the sound around us
Lacks in bass
Can be effectively used underwater since most of them are virtually water-resistant to a certain degree
Has to press the bone structure and is, therefore, uncomfortable for extended use
Has audible distortion at high listening levels
6. Hybrid drivers
Hybrid headphones combine both electrodynamic and balanced armature transducers with the dynamic drivers primarily being used for the low-frequency bass frequencies.
This is because as we mentioned earlier armature drivers do not reproduce sound by displacing air and are, therefore, not effective at playing back the bass effects which require displacement of a lot of air to sound rich and deep.
Most hybrid headphones will have a single dynamic driver to handle the bass frequencies which can be paired with about 3 miniature arm drivers to playback the higher frequencies.
How to choose the right headphone driver
Choosing the right kind of headphone driver will come down to three main things and these are;
Personal preference
Listening habits
Budget
Depending on how you like to listen, whether you are a bass-heavy person, whether you are interested more with the details in the critical frequencies, noise isolation, portability, comfort as it pertains to the headphone’s weight, and so on, you can decide to go for one headphone driver over the other.
The other important thing that most people tend to gloss over when advising on the right headphone driver for different uses is the cost of the headphone.
Moving coil headphones will probably offer you the most bang for your buck depending on your budget, especially with the entry-level and mid-range products. You can also spend as much as you want on high-end audiophile-grade headphones if your budget allows you.
Conversely, if you are well-off and are very interested in the precision and accuracy of the audio playback, you can decide to purchase yourself a pair of electrostatic headphones for several thousand dollars that you can be used in your listening room. But it is important to note that these headphones need to be driven by “energizers” and are the least portable of all the headphone drivers.
For audio enthusiasts that suffer from conductive hearing loss, bone conduction headphones will offer the most value but they can also go for quite a premium with prices ranging over $300 for high-quality products.
The other options are also great and as I mentioned above you have to take several factors and personal preference into consideration.
Does the size of the headphone driver matter?
The size of the headphones’ drivers does not matter as much, at least where audio quality is concerned.
Larger drivers do not necessitate a better listening experience but are important for displacing more air which can come in handy for people the love to listen to high levels and for punchier bass. You should also keep in mind that punchy does not mean great bass.