Recent Posts

When should I Replace or Upgrade an Old HT Subwoofer?

Upgrading a Home Theater Suwoofer

If you have had your subwoofer for some years now since you first built your system or feel like it does not properly fill your home theater room, it may be time for an upgrade or a sign that you need an additional sub. An upgrade can also be done on a subwoofer that has started to wear out or has a damaged part.

There are important factors that you need to consider when thinking about replacing an old subwoofer. This will include your room size, how loud you listen, what features your current subwoofer has, and newer features such as calibration controls.

Also, if you are contemplating whether you should repair your old sub or buy a replacement, you may be better off buying a new one as some repairs could cost you as much as an upgrade.

How long do subwoofers last?

A high-quality home theater subwoofer can last you between 15 and 30 years provided you keep in good condition and that you do not do anything that can physically damage it.

All subwoofers eventually wear out after a certain period of time and upgrades are always inevitable after some years. It may lose some of the punch it had when you bought it, some of the parts may loosen up, the amp may get blown for a powered sub, or power surges and brownouts could damage the internal components.

Also, if you are prone to overdriving your subwoofer and clip it often, the lifespan will be reduced significantly.

Some factors can affect how long your subwoofer lasts and when you may need an upgrade but with proper care, being mindful of how loud you get, and a well-built subwoofer, it should last you for several years if not decades.

When to upgrade a home theater subwoofer

  • More power and better bass– If feel like your room is lacking as subwoofer bass is concerned, it may be time for something better. This is especially for users that love listening to high levels and have space for such levels. You can sell your existing sub, add some money on what you get, and get a more powerful subwoofer or get a new sub but keep the existing one for a double subwoofer set up to better balance and fill the bass.
  • If you have a larger space– If you recently upgraded your home theater to have more room or moved to a new house with a larger media room, you may need to replace your current subwoofer for a large and more powerful one or get an additional sub to better fill the extra space.
  • Physical damage– Damage can happen on any part of a subwoofer and this includes the amp or power supply if you are using an active sub, the crossover, or even the speaker coil on the sub’s driver. Some of these parts can be expensive to fix which when coupled with other costs such as shipping may not be worth fixing. You may be better off buying a newer sub that can match or exceed your current specs.
  • Newer features– Subwoofers have greatly improved over the years with newer features such as EQ adjustments, room correction, DSP controls, calibration apps, wireless connection options, noise reduction, and more power at a lower price point compared to older subwoofers. Although you cannot upgrade based on these features alone, they worth considering.

How to choose a subwoofer for an upgrade

With the numerous subwoofer brands and specifications, it may not be easy finding a subwoofer that can replace or be a great addition to what you currently own. But there are several important factors that you should consider once you have decided to upgrade or replace an old subwoofer.

Let us cover the important tips and factors to help you make the right decision.

1.      The bass quality

More bass does not always mean quality bass.

Having a subwoofer that can offer you better bass-quality compared to your current system is more important than having a loud subwoofer which is boomy. Do not equate loudness to quality.

With a better and higher-quality subwoofer that can accurately reproduce the low-frequency signals, placement will be much easier for more realistic bass and better fidelity.

The problem is that you cannot tell if a sub will have high-quality sound by just looking at the spec sheet alone. This is not to mean that the specs do not matter as they do but you will often find a sub with higher specs but with a poor design.

For example, you may find a 12” sub rated at 100 watts and 400 watts max that sound worse than an 8” sub rated at 80 watts and 300 watts max.

So, how exactly do you tell if a subwoofer is of high-quality, especially if you are shopping online? The answer lies within the internet.

There are many online platforms such as online product review sites, video resources, online forums such as Reddit, and the likes where you can find the consensus of users that have had a chance to use a certain subwoofer product that you have identified. You can also ask questions and find other better alternatives that have been used and reviewed by pros.

But in most cases, subwoofers with more power and better design will often perform better in both smaller and larger rooms but there is no clear-cut rule of thumb to follow.

2.      Subwoofer driver size

A subwoofer with a bigger driver does not always mean better but in most cases, a bigger driver will often mean that the sub has a deeper bass.

You can also replace your current sub with a sub of the same size but to ensure that you are getting your money’s worth, you should ensure that the sub has decent housing for its driver. So, if you decide to get a 12-inch sub, the cabinet should have enough space for optimal performance.

You should also look at the frequency response (written in Hz) and consider the size of your current home theater or media room.

Rooms that are larger than 150 ft² would be better suited for a 12” inch driver or larger as it can push more air for better performance and a fuller bass while smaller rooms (under 150 ft²) may need a sub with a smaller driver.

Frequency response will also be affected by the size of the driver. Subwoofers with larger drivers often have a bigger frequency range and can play very low frequencies for deeper bass effects. We, humans, hear frequencies as low as 20Hz and feel frequencies below that.

The lower the driver can get the better. Most subwoofers on the market today can reach as low as 25 Hz but as a general rule of thumb ensure that sub can reach as low as 40 Hz if you are not into bass effects that much.

3.      Power/Wattage is still important

Power is what you will often subwoofer enthusiasts talk about it is a very important consideration to make, especially when you are doing an upgrade.

You will need to upgrade to a subwoofer that is more powerful than what you currently own. However, a more powerful sub will not always be louder than a less powerful sub at a certain volume but the power rating is a guide on how loud the subwoofer can get (the peaks).

For example, a subwoofer rated at 200 watts and another rated at 400 watts will have the same loudness at a regular listening volume. However, the subwoofer rated at 400 watts can be cranked to a higher volume without distortion.

With that said, you will want to only look at the power the sub driver can draw continuously without distortion or RMS Power rating. Ignore the PMPO ratings but I would recommend staying away from subwoofers whose power ratings are in PMPO (peak power) alone as they are often not quality subs.

PMPO power ratings are not reliable as they are often taken from the peak over a short period (usually milliseconds) power and usually in perfect acoustic conditions that are not attainable in a normal home theater setting.

Manufacturers that use PMPO ratings on their products usually do this in the hopes that you will base your buying decisions based on the highest power ratings and are often inflated rating and deceptive.

However, even correct power ratings alone will not let you know how well a certain subwoofer will perform. All factors such as the ones mentioned above should be considered.

4.      Passive vs Active subwoofers

Passive subwoofers require external amplification and can be power by a receiver, a separate amp, or an integrated amp/monoblock.

If you currently have a separate amplifier for your subwoofer, getting a passive subwoofer can work great for you. This is because you don’t want to be driving the sub directly from a receiver as this can cause so much stress on the receiver, especially if you get a more powerful sub.

The alternative would be investing in an active/powered subwoofer that has a built-in amplifier and does not require external amplification.

Powered subwoofers are also recommended since they have a volume control knob and other adjustments knobs/dials/toggles that can be used during calibration.

5.      Wireless Vs wired

All subwoofers need at least one power connection whether it is from an amplifier or a power outlet.

But you can choose between a wireless or wired sub woofer to send your low-frequency signals from your audio processor. Having a subwoofer that has a wireless connection is something that you should consider when looking for an upgrade.

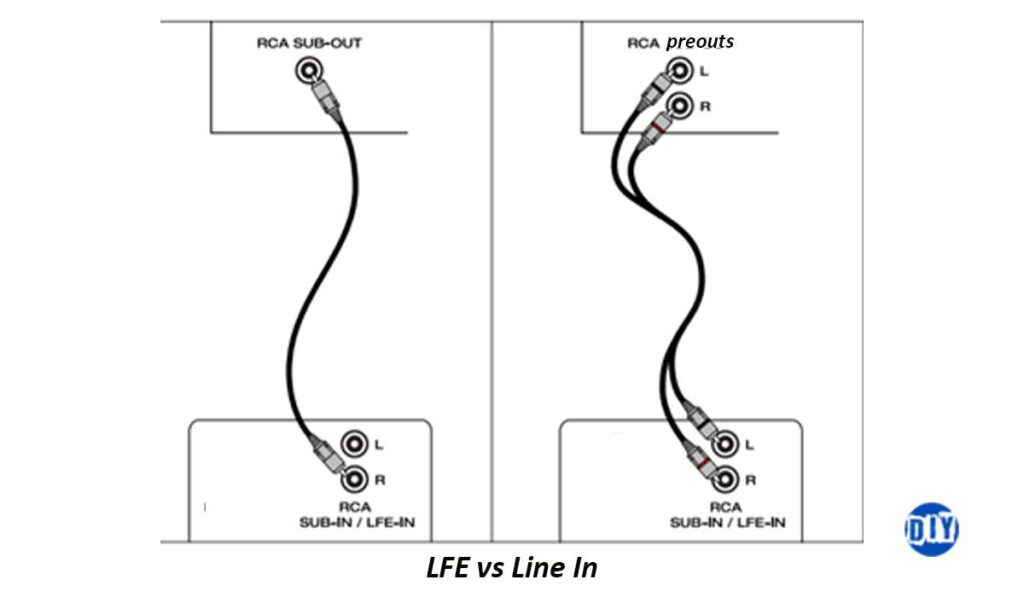
This will eliminate the need of using an RCA connection between your source and the sub which will reduce clutter in your home theater or media room. You can do the connection via Bluetooth, Wi-Fi, or an RF transmitter and receiver that can be connected to your receiver/pre/pro and sub respectively to complete the connection.

However, it is important to get a sub that has both wireless and wired connection options.

6.      Ported Vs Sealed subwoofers

When choosing between a sealed or a ported sub, it is important to consider how big your room currently is.

If you have a larger room usually above 3000ft³, you should upgrade to a ported subwoofer since it can push more air and have more bass without drawing a lot of power but high-quality ported subs tend to be costlier than their sealed counterparts of the same quality.

On the other hand, if your room is smaller (under 3000 ft³), a sealed subwoofer will be good enough for you. These subs do not push much air but should be enough for day-to-day entertainment needs in smaller rooms.

Also, you may have heard about subwoofers with passive radiators which are essentially more controlled ported subs. These subs have non-powered cones on the side of their enclosures that react according to the air being pushed by the powered driver which makes these subs more precise and adds depth to the bass without needing a larger enclosure.

If you are within budget for a good passive radiator sub, it may be worth upgrading to provided you consider all the other factors.

7.      Down-firing vs Front-firing subs

Down-firing subwoofers have drivers under the enclosure and are designed to send soundwaves downwards to the floor while front-firing subs have drivers on the front on the sides that radiate the bass soundwaves.

Both subwoofers are great as low-frequency soundwaves are non-directional meaning that there are few differences between the two types of subwoofers.

However, you should consider where you want to place the sub when choosing between the two. For corner placement, a down-firing sub will be great but if you want to place it at the front of the room, a front-facing subwoofer will be better as it also adds to the aesthetics.

8.      Calibration and EQ adjustments

Unlike older subs, some modern subwoofers have onboard room correction and EQ adjustments that are usually found on a receiver/pre/pro.

Subwoofers will room correction controls usually come with an SPL meter or an app that can be installed on a tablet or smartphone to help tailor it depending on the room’s layout and subwoofer placement for optimal performance.

Equalization (EQ) adjustments are done by an onboard DSP (Digital Signal Path) using an app. This lets you tweak the frequency response to reduce peaks and drops by cutting and boosting certain low frequencies.

Other subwoofers have noise reduction capabilities which can help make the bass less boomy/muddy.

However, it is worth noting that subs with these features are costlier usually above $600.

How much does it cost to upgrade a subwoofer?

Replacing an old subwoofer can cost you from under $100 to as high as $2000.

Usually, a subwoofer that costs less than $100 will be low-quality and a $200 sub on the other end of the spectrum would be overkill for most home theaters and media rooms and would be out of reach for most peoples’ budget.

A good price range for a high-quality subwoofer would be between $300 and $1000 with $600 being the medium price point.

Investing in a high-quality mid-range $600 subwoofer should be within the reach for a wide range of home theater users and should have some of the modern and improved features that would make it a worthy and long-lasting investment.

But as you spend your hard-earned money remember to put all the factors and tips above in your considerations.

Soundbar Audio delay- Lip sync error (Fix delay on Tv & soundbar)

TV & SOUNDBAR lip sync errors

A lip-sync error occurs when the video and audio output from the Tv and soundbar are out of sync causing the sound to lag behind the rendered frames. This is known as Soundbar Audio Delay is more apparent during lip movements the name lip-flap or lip-sync error.

These timing errors are common but not always perceptible. We are only able to detect the audio delay if it lags the video by 2 frames or more at 24Hz (frames/second) or by more than 7 frames at 60 Hertz. A lot of viewers find more than 2 frames of delay annoying.

In other instances, you may have a video delay that we are sensitive to. Even 1 frame of early audio at 24 frames/sec will feel unnatural to us.

Differences in the video and audio outputs may be introduced by signal delays in your media, Tv, Soundbar, or other digital devices.

Fortunately, you can isolate and fix the source of the delay, as I will show below. But first, let’s look at what causes audio delay.

Causes of lip-sync errors

Audio delay is common and natural. This comes down to the fact that light travels faster than sound. Thus, we have adapted to expect that sound output always follows the video output and have developed a greater tolerance for audio delay.

This also applies to any soundbar/TV setup we have at home.

But with the increased use of digital processing and storage for audio and video, lip sync errors became more common as video processing takes longer. By the time the soundbar outputs the sound, the video is not rendered a discrepancy where the audio comes earlier.

Our brains are highly sensitive to video lagging audio (video delay) as sound cannot travel faster than light.

As a rule of thumb, we detect AV timing differences of +45ms to -125ms. The audio should not lead the video by more than 45 milliseconds or be late by more than 125 milliseconds. This is known as the threshold of detectability.

What’s more, the threshold of acceptability is +90ms to -185ms beyond which we find the error intolerable. In this case, the audio is earlier than the video by more than 90 milliseconds or delayed by more than 185 milliseconds.

  • Negative value (-) =Audio delay
  • Positive value (+) = Video delay

Tv and soundbar manufacturers add an auto lip-sync feature to combat this. This delays audio processing at the source to compensate for estimated frame rendering delay depending on the format and amount of compression.

Audio delay is also added into a broadcast, stream (Netflix, Hulu, Disney+…), Blu-rays, DVDs, and so on.

However, additional devices in the chain may delay the audio further where we can detect it or to extremes that irk us.

For example, for a wireless surround soundbar configuration, delays may be introduced in the transmission process.

Also, different TV and soundbar brands use different connections that include and are not limited to HDMI and Optical (SPDIF). Depending on the implementation of the connections, their transceivers (transmitter & receiver) may increase the delay.  

Converters or interconnects such as HDMI Switches and splitters between the TV and soundbar can cause delay.

When used between the source (eg Blu-ray player, or gaming console) and the TV, HDMI switches and splitters may increase video delay as they decode and re-encode the signals.

How to sync a TV to a soundbar

Some TVs and/or soundbars have an audio sync feature that lets you adjust the level of audio delay. For instance, some Samsung soundbars allow for audio sync adjustments of 0 to 300ms. Right adjustments (towards 300 milliseconds), increase the amount of audio delay while left adjustments (towards 0), reduce it.

You can manually adjust the values as you watch or use a “beep and flashsync test video such as this one to make it easier.  Stream the video or download it to a pen drive or any other storage device. Additionally, your streaming service (Netflix…) may have an audio sync tool you can use.

Below is a screenshot of a YouTube sync test I used;

Lip sync test video screenshot
Lip-sync test video screenshot

You should pause the video as soon as you hear the beep, to estimate how much video or audio you have. Expect an input delay and anticipate the beep to press pause super quick.

With the results, adjust the audio delay value accordingly. Reduce the delay if it’s lagging too behind (too late) and increase it if is coming too early.  If you pause with the bar at 0 when the beep goes, your audio and video are in sync.

Unfortunately, there is no sync feature on TVs to delay the video if you are using it as your source (for a broadcast, stream, pen drive media…).

How to fix sound delay on a TV and soundbar

1.      Find the source of the delay

As mentioned earlier, the source of delay may be a stream/broadcast/local media so tune to a different channel or change the media to one with an alternative sound codec/format. If the issue goes away, don’t do anything else as the fix may be inaccessible to you. But if it persists, do further diagnosis.

Any device in the digital chain can delay the audio. This could be your source, TV, soundbar, an HDMI splitter, or HDMI switch.

Swap your AV source and if the audio delay is present on all sources, it may be due to another device.

Disconnect your soundbar and use the TV for both Video and audio playback. If a delay is present, the TV is the culprit. Check for a Lip Sync feature on the TV sound settings and reduce the amount of delay (adjust to the left/towards 0). If the lip-sync error persists even at 0, you may be out of luck.

If the delay is not present, the audio transmission and processing of certain formats at your soundbar may be taking too long.

If there is a device such as a SPDIF to HDMI extractor or HDMI splitter between the soundbar and audio source remove it from the chain. This may fix the issue.

For external sources such as a Blu-ray player or streaming box, connects its audio output to the soundbar’s input to reduce transmission delays.

2.      Refresh your Soundbar and TV

Shut everything down and give your equipment time to cool down before restarting them.

You may also need to reset the audio setting to default and turn off any room correction or audio equalization features (EQ). Equalization lengthens audio processing introducing audio sync issues.

3.      Change the soundbar’s input

In some cases, audio and video timing errors may be limited to a certain transmission mode or interconnect between the source/Tv and soundbar. This transmission can be wired (HDMI, AUX, Coaxial, or optical) or wirelessly (Bluetooth).

Use a solid connection HDMI or optical connection for surround sound. HDMI is preferred as it is a high-speed connection and will support most surround codecs. An optical connection is only good for uncompressed stereo (2-channel) or 6 compressed surround codecs.

For a soundbar with more than one HDMI input, use a different HDMI input. Avoid using a wireless connection if possible.

4.      Change the audio format

On the TV;

Turn ON game mode/auto low latency mode to reduce video processing which ensures the frames are rendered as fast as possible.

Disable noise reduction/motion enhancement features as they may delay video output.

Additionally, you can set the audio output mode to Bitstream or Audio passthrough. Bitstream lets you transmit compressed audio signals to the soundbar for digital processing reducing the TV’s workload. This is an option for a soundbar with superior processing.

However, if an issue occurs at the soundbar during decoding and processing or if the sound format is not well supported, the sound output may be delayed.

For TVs with superior audio processing, set the output mode to PCM (2-channel audio) or LPCM (surround sound). The TV decodes and syncs your video and audio while the soundbar only processes the audio.

All TVs will support PCM but some may not support LPCM.

At the source;

Some sources such as Blu-ray players and streamers have Lip sync/Audio delay/Audio sync features that work in the same way as I explained above.

Change the output mode between Bitstream and PCM to see where the audio is best synced.  

5.      Split the video and audio at the source

For an external source, splitting your Audio and Video signal at the source can reduce audio delays.

This involves running a cable from your source to the soundbar over HDMI or optical. The video feed goes to the TV.

This option is not applicable if your TV is the audio source.

Do HDMI cables cause the audio delay?

A working HDMI cable should not cause audio delay. This is because an HDMI cable is a high bandwidth cable. Any delay introduced by the cable itself will have a negligible impact.

Delay occurs as the HDMI components encode and decode signals for transmission at the TV and soundbar respectively.

However, a poorly implemented HDMI ARC connection (HDMI version 1.4 or later) may introduce audio delay. ARC has a 1 Mbps bandwidth to carry 2 uncompressed audio channels (PCM) or 6 compressed audio channels with codecs such as Dolby Digital and DTS.

Soundbars with eARC support (HDMI 2.1 or later), accept up to 8 uncompressed or 32 compressed channels. HDMI eARC has a bandwidth of 38 Mbps.

ARC (Audio Return Channel) and eARC (enhanced Audio Return Channel) let you transmit audio back and forth between your source and soundbar.

To Sum up

Audio and video timing errors can be a pain to deal with as a viewer as they detract from your experience. The level of annoyance will depend on how severe the errors are and how well you can pick up on them.

Hopefully, the fixes may be feasible but if not feel free to leave a comment below or contact customer care for support.

LFE vs Line-in vs Speaker-level inputs (Explainer)

Subwoofer- line in VS LFE

When connecting an active subwoofer to a receiver there are one or more inputs you can use;

  • LFE input
  • Line-in/Line level inputs
  • Speaker level inputs

In a nutshell…

The LFE input accepts mono bass signals from an AVR using one RCA cable while the line-in inputs accept 2 RCA connections for left and right stereo signals. Meanwhile, speaker level inputs let you connect a subwoofer to a receiver or amp’s powered speaker outputs using 2 speaker cables.

Both LFE and line-in are line-level inputs that use RCA jacks. The speaker-level inputs are high-level inputs.

An LFE connection is preferred since most bass signals are mono. Line-in inputs connect to an AVR’s left and right pre-outs for 2-channel audio (stereo). Speaker-level inputs are great for a receiver/power amp with no sub outputs.

For further enlightenment, let’s dive deeper into what each input entails.

What is LFE on subwoofer?

The LFE or Low-Frequency Effects channel is a dedicated mono audio path responsible for bass effects such as explosions and gunshots within the 3 to 120 Hz audio frequency range.

On a receiver or other audio processor, the LFE effects are summed/combined with bass from the main left and proper channels into one mono signal which is sent to the sub’s LFE input (mono input) with the use of a mono unbalanced RCA cable.

When using the LFE input, the sub’s internal Low Pass Filter (LPF) is bypassed, thus bass management is done at the receiver (Audio sink). Some subs have a Bypass Switch that does the same.

The sub’s crossover can also be bypassed by setting it higher than the receiver’s. For instance, if your AVR’s crossover point is set at 100 Hz, set the crossover at your sub to maximum, usually around 150 to 180 Hz.

Failing to disable the sub’s low pass filter will cause losses in the sub’s passband and in turn degrade the quality of the bass output.

As such, the low pass filtering is done at your audio sink/receiver. Audio frequencies below the crossover point (passband) are sent to the sub making it easier for the main speakers to playback audio above the cutoff frequency if they are set to “Small”.

Setting your mains to “Large” (LFE+ main) sends full-range signals to the main speakers and low frequencies below the crossover to the subwoofer.

An AVR can have one or more LFE outputs (sub-out). Multiple sub outputs make it possible to send multiple identical mono signals to more than one sub using RCA cables.

For example, receivers with dual LFE outputs (L/R) are intended for use with two subwoofers, L connects to a left sub and R for a right sub.

There is no to combine the two outputs using a Y-cable for a single LFE input. This is because most bass information is mixed as mono as our ears are terrible at picking directional cues at frequencies below 60 Hz or so.

For a sub with 2 RCA inputs (left and right) with none labeled as Mono or LFE, use a Y-splitter cable so the sub receiver has 2 input signals. These are known as line-in inputs.

LFE and Speaker level inputs

Subwoofer line-in

The subwoofer’s line-in section uses left and right inputs for transmission of full-range stereo signals (~20 Hz to 20 kHz) from an audio processor such as a receiver.

At the sub’s circuitry, the 2 stereo signals are combined into one since a sub is a mono speaker and most bass information is mixed as mono (one channel). However, combining the left and right bass signals into one subwoofer output can cause phase cancellation lowering the bass output.

Line-in inputs can also accept parallel mono signals (2 mono signals) when a Y-splitter cable/adapter is used from an LFE output. This sums the bass at the output increasing sensitivity by about 6 dB. Thus, you should reduce the sub’s gain at the source by ~6 dB to get the same bass output level as before.

Conversely, this is great for an AVR with one sub-output and a sub with no mono-input.

The connection is completed using 2 RCA cables from the front left and right preouts on your audio processor.

And since full range signals contain low, mid, and high frequencies, the subwoofer’s built-in crossover cuts off the highs, mids, and upper bass at around 80 Hz. The sub only plays back low frequencies below the crossover point.

Some subs have line-level outputs (Line-out) to send audio signals above the cutoff point to an amplifier and speakers or powered speakers with RCA inputs for playback.

Subwoofer-LFE-vs-line-in

Subwoofer speaker level inputs explained

Speakers level inputs are high-level inputs that accept powered signals from a receiver or power amp using speaker cables. This is unlike LFE and line-in inputs which are line-level inputs.

With speaker-level inputs, your main speakers and subwoofer get similar audio signals.

At the subwoofer’s internal circuitry, the high-level signals are stepped down by resistors to line level before amplification by the sub’s internal amplifier.

In this case, the subwoofer receives full-range signals, thus crossover is applied for the sub to only reproduce the lower sound frequencies (bass and sub-bass).

As a side note, a line-level converter can also be used to connect powered outputs from an AVR or amp to a sub without speaker-level inputs. This converter outputs line-level signals (RCA outputs) from a speaker-level feed which is handy for AVRs without dedicated sub outputs.

To Sum up

Assuming you have all the outputs and inputs mentioned above, your specific connection will come down to the available sub outputs and the device you prefer to use for the crossover.

Using a single LFE cable is the most common scenario. The receiver combines all bass information including LFE and bass from the main channels below the crossover point (L+R+LFE) to a mono output.

When line-in or speaker-level inputs are in use, a full-range signal is transmitted. In this case, the sub’s low pass filter dial sets the frequency cut-off point at around 80 Hertz.

Does quality of an HDMI cable matter?

Does an HDMI Cable _quality_ matter_

HDMI stands for High Definition Multimedia Interface.

Since its inception in the year 2002, HDMI has taken over the world of audio and video transmission consumer products being used as the connector for most devices. But there have been several types and versions of HDMI cables and connectors that can sometimes be confusing when some users are shopping around.

HDMI cables can be manufactured with different materials and at different price points which gives some cables a higher-quality feel. However, the aesthetics and build quality do not affect the video or audio qualities when you are consuming content meaning that a $1000 gold-plated HDMI cable will give you the same AV quality as a cheap $10 HDMI cable.

These cables made have different shielding with one have expensive-feeling golden ends and the other may have cheaper plastic ends but when it comes to performance, this will not make much of a difference.

There may be perceived quality differences in your content due to a preconceived notion, which happens to all of us, but it is simply non-existent or negligible.

However, investing in higher-quality HDMI cables, especially for longer runs, will serve you for much longer and will be less susceptible to radio interference and physical wear and tear which are common in most home theater and media room settings.

There are considerations that you need to make when buying each HDMI cable but before we get into that we should look at an overview of how HDMI cables work.

HDMI cables explained

HDMI has been around for some years now and has managed to replace most analog and digital connectors with the capabilities and the convenience that they offer in transmitting uncompressed video signals and both compressed and uncompressed audio signals between different electronic devices.

Whether you are sending a 720p or 8K video signal from a gaming console or a Bitstream Dolby Atmos Audio signal from an Ultra Blu-ray player to an AV receiver, HDMI will serve your needs.

There are other additional HDMI features such as HEC which stands for HDMI Ethernet Channel that enables you to share an internet connection between internet-enabled devices in your home theater or media room.

HDMI also comes with CEC which is an acronym for Consumer Electronics Control which is a feature that enables users to control up to 15 HDMI CEC-enabled devices using one remote controller.

All these are done through 3 or 4 data channels with varying bitrates in different HDMI cable versions by conducting electrical signals and 19 pins at each head of the cable that is responsible for different digital bits of information.

How HDMI cables transmit video and video information

All HDMI cables work under the same principle using bits of 1s and 0s to send signals from one point to another.

From the source/transmitter, the HDMI cable takes these bits (from 100101) and rearranges them (to 111000) for a faster transmission after which the receiver takes these bits, puts them in the correct format, and decodes the information contained within them.

This is not the only way HDMI cables send information. They also send two data sets that are out of phase using multiple small copper wires. Once the receiver gets the data it puts the signal in phase to match how it was originally intended to be and eliminated noise from the signal.

This is done using the TMDS protocol which stands for Transitional-Minimized Differential Signaling. The Transitional Minimized (TM) is where the rearranging of the bits takes place and the Differential Signaling (DS) is where the out of phase signal packets are involved.

Both Audio and Video signals are transmitted using this TMDS protocol at different clock rates in different HDMI cables.

HDMI 1.0 cables have the lowest clock rates at a maximum of 165 MHz while HDMI 2.1 cables have the highest clock rates which are currently unknown.

What about HDMI Ethernet Channels?

This is a feature that was added with the creation of HDMI 1.4 in 2009 designed to help HDMI users share an internet connection between devices that are in the same HDMI chain.

HEC eliminated the need of having to use an ethernet cable for each of your internet devices or using a Wi-Fi connection which is slower when compared to an ethernet connection.

Internet speeds using an HDMI Ethernet Channel can reach up to 100 megabits per second which is a reliable and super-fast connection.

With this you can enjoy faster download and streaming speeds on your internet devices whether you are gaming online, watching a 4K movie, or even connecting to your home media server. At the same time, you can reduce cable clutter with a reduced number of ethernet cables.

HDMI CEC (Consumer Electronics Control)

CEC is a feature that has been around since HDMI 1.0 and was updated with the later HDMI version. It was designed so users can control up to 15 CEC-compliant devices using one remote.

This eliminated the need of having a remote for each of your devices in your entertainment system.

HDMI CEC uses a separate protocol from the Video and Audio Signal. This is the same link that is used by HEC and the signals are carried using the 17th pin which is also used by the Audio Return Channel.

Audio Return Channel (HDMI ARC)

HDMI is a feature that was introduced with HDMI 1.4. This feature allows audio signals to be sent to and from the source.

An example of where this feature would be useful is you use your TV for video and audio streaming but also have a receiver and speaker system for an immersive sound experience. In this case, you would connect all your other sources such as a console to the receiver and send video signals to the TV via HDMI ARC but audio signals from the TV can also be sent to the receiver for your surround system.

This eliminates the need of having to use a separate cable to send audio from the TV to the receiver while enjoying the same benefits that you would have had with a separate audio run.

However, for this to work both the receiver and TV need to have an HDMI ARC connector.

What is HDMI eARC?

HDMI eARC stands for enhanced Audio Return Channel and was introduced with the unveiling of HDMI 2.1.

It has a higher bandwidth than ARC at 37 Mbps compared to 1 Mbps found in ARC meaning that it can transmit hi-res audio codecs such as DTS-X at a higher bitrate to a maximum of 24 bits at a frequency of 192 kHz.

Types of HDMI cables

Different HDMI versions have been introduced since the early 2000s namely: HDMI 1.0, HDMI 1.1, HDMI 1.2, HDMI 1.2a, HDMI 1.3, HDMI 1.3a, HDMI 1.4, HDMI 1.4a, HDMI 1.4b, HDMI 2.0, HDMI 2.0a, HDMI 2.0b, and finally HDMI 2.1.

These HDMI versions are backward-compatible meaning that you can use HDMI 2.1 cables on HDMI 1.4 devices or HDMI 1.4 cables with HDMI 2.1 devices but with limitations in resolution and bit rates in general.

You also do not get some of the advanced HDMI features such as ARC on some of the earlier HDMI cables such as HDMI 1.2.

However, for the sake of this discussion, I am only going to look at HDMI 1.4 to the latest HDMI 2.1 version as they are the most relevant with today’s content and quality standards.

HDMI 1.4

HDMI 1.4 was introduced in 2009 but had the same bandwidth of 10.2 Gigabits per second as the previous HDMI version but with extra features such as ARC, HEC, and support for 3D TV.

It can be used to play 4K content at a refresh rate of 30 Hertz, 1440p at a maximum of 75 Hz, and even 1080p at 144 Hz maximum.

However, an HDMI 1.4 was released in 2010 and was known as HDMI 1.4a and came with two 3D formats. This was then followed up by HDMI 1.4b in 2011 that improved the refresh rate at which different resolutions could be played at.

HDMI 2.0

HDMI 2.0 was first brought to us in 2013 with a higher bandwidth of 18 Gigabits per second.

This version of HDMI can support 4K60Hz, 1440p144Hz, and 1080p240Hz due to the higher bandwidth. It also came with support for up to 32 audio channels at a maximum frequency of 1536 kHz and support for an added aspect ratio of 21:9.

HDMI 2.0a then followed in 2015 and this HDMI version had added support for HDR (High Dynamic Range). In 2016, HDMI 2.0b was introduced with added support for HDR 10.

HDMI 2.1

HDMI 2.1 was released in 2017 with more interesting upgrades such as higher bandwidth of up to 48 Gigabits per second and support for higher resolutions and refresh rates.

With HDMI 2.1 you get support for 8K resolution at 120 Hz refresh rate and even 4K at 120 Hz. There is also an additional eARC feature which is an upgrade from ARC and supports hi-res surround-sound codecs such as Dolby Atmos and DTS-X.

Lag is also eliminated or reduced with Variable Refresh Rate (VRR), eliminates delays in fast-paced content such as games with Quick Media Switching (QMS), and latency reduction with Quick Frame Transport (QFT).

And with the unveiling of Xbox X and PS5, having HDMI 2.1 can come in handy, especially for gaming in 8K.

What is the difference between HDMI CAT 1, CAT 2, and CAT 3?

Cat in HDMI stands for category i.e. Category 1, Category 2, and Category 3.

  • Cat 1 HDMI cables– These cables are also known as standard cables and have 3 data channels. Cat 1 HDMI cables are tested at 75 MHz and can transmit data at 742 Mbps per channels or 2.2 Gbps for the three channels.
  • Cat 2 HDMI cables– These cables are known as high-speed cables, are tested at 340 MHz, and also have 3 data channels that can transmit data at 3.4 Gbps for a total of 10.2 Gbps for the three channels.
  • Cat 3 HDMI cables– These are Ultra-High-Speed HDMI cables that come with 4 channels and are tested at transfer rates of 48 Gbps.

How to choose a “quality” HDMI cable

Although the quality of an HDMI cables does not affect the video and audio quality as much, there are some essential considerations that you should make when choosing a cable. Some of these considerations include;

1.      Transfer speeds

HDMI cable versions do make much of a difference as far as the maximum transfer speeds of the cables do. Transfer speeds are also known as bandwidth.

There are main categories as far as HDMI cables speeds are concerned;

  • Standard cables- Have a bandwidth of 4.95 Gbps and does not support 4K signal transmission. Finding a standard HDMI cable can be hard as only a small number of people use these cables as they are slow.
  • High-Speed Cables- Have a maximum bandwidth of 10.2 Gbps and are the most common HDMI cables that you will find in online and physical electronics stores. They can be used to transfer 4K content and HDR content at 30 Frames per Second or less.
  • Premium High-Speed Cables- Have a maximum bandwidth of 18Gps and can be used for 4K content at 60 FPS and 4:4:4 chroma subsampling (8-12 components). They are also able of transferring 8K content at lower frame rates.
  • Ultra-High-Speed cables- Have maximum bandwidth of 48Gbps and are can transfer content of up to 8K at 120 Frames per Second.

Getting a premium High speed or Ultra-High-speed cable will come in handy when future-proofing a home theater or media room. You can confirm if the HDMI cable you are about to buy is any of this by looking at the certification badge on the packaging or scanning the QR code next to the speed label.

HDMI cable length and thickness

For shorter cable runs you should never have a problem with any HDMI cable but for longer runs, especially for transferring 4K content, you will need a thicker cable that should be well shielded for in-wall or in-ceiling cabling.

HDMI cable thickness is measured in AWG (American Wire Gauge) and the lower the gauge number is, the thicker the cable will be. For example, a 20-gauge HDMI cable is thicker when compared to a 26-gauge cable as will, therefore, be better for longer runs due as it reduces resistance within the cable.

As a general rule of thumb, 28 AWG HDMI cables and thinner should not be used for runs that are longer than 20 feet.

Passive vs Active HDMI cables

Passive cables are better suited for shorter 2-way cable runs while active cables are only suited for one-directional and longer runs.

So, you are sending signals in one direction to something like a ceiling-mounted and long-throw projector that requires longer HDMI cable runs where you may need an active cable, use the standard HDMI cable as it will be better suited for most needs.

HDCP-compliance

HDCP stands for High-bandwidth Digital Content Protection and is an HDMI feature that copy-protects UHD content.

If you are playing HDCP content and have an HDCP display and source, you will also need a cable that is HDCP compliant to avoid getting an error or an empty display.

Does HDMI cable quality matter? Final verdict

I stand by my remarks that HDMI does not affect picture or sound quality in any entertainment system.

You can only experience quality-loss if you are using a faulty HDMI cable where you may have artifacts or sparkles on your displayed image or audio drop-offs.

This is because HDMI carries digital signals that carry bits if either 0 or 1. If you have a faulty HDMI cable, it may change a 1 to a 0, and this will only affect a pixel and fill up the rest of the image for a single frame which in many cases, may go unnoticed but if the damage is huge, numerous bits may lose large amounts of data that they were supposed to transmit which will give you more snow/sparkles on your display.

Getting another cable should solve the problem but if it persists, the problem may lay with either your display or your source.

Apart from this, you should not notice any difference in audio or image quality on the same source, display, and speaker system.

Split HDMI signals to multiple TVs (HDMI splitter guide)

How do HDMI Splitters work (1)

To set up multiple displays from a single source, an HDMI splitter is what you need.

HDMI splitters take an HDMI signal from a single source and split it into 2 or more outputs and displays. The output signals should be bit-identical to the input signal with minimal signal loss.

What’s more HDMI splitters are different from HDMI switches. An HDMI switch accepts different source inputs and feeds them to a single output removing the need for manual switching.

Scroll on to learn more.

How HDMI Splitters work

A splitter duplicates an HDMI input signal and sends the duplicate signals to multiple displays. As such, a single cable is required from the source to the splitter and multiple cables to the various displays.

For this to work seamlessly, the content resolution, splitter resolution, display resolution, and cable type should be similar. If one of the displays has a lower native resolution, all the displays will be set to this resolution.

The display should be able to tell the source its capabilities by sharing EDID data (Extended Display Identification Data). EDID is sort of a digital handshake. It includes information about;

  • The display’s resolution
  • Color characteristics
  • Sync Data, etc

All this information has to pass through the splitter to the source. Here, conflict could occur due to incompatibility resulting in issues such as image loss or a black screen if the source is unable to read the EDID data. Such issues can be avoided by using an HDMI downscaler between the splitter and display with a lower resolution. The downscaler tricks the splitter and source into thinking the display is of a higher resolution allowing the other displays to play at a higher resolution.

To send copy-protected HDCP 4K signals you need a compatible HDCP splitter. Each component along the chain should be HDCP-certified including the source output, HDMI cables, and the displays’ inputs.

For 4K content, the splitter requires HDMI 1.4 inputs/outputs or above. If any component on the chain is not compatible with 4K, you may get errors or the resolution may be lowered. A 4k chain is backward compatible and works for 1080p content or lower.

Types of splitters

There are 3 main types of HDMI splitter, namely;

  • Passive HDMI splitters draw their power from an HDMI source and don’t require a power source of their own. They are great for dual-display setups for runs not longer than 2 meters (5 ft) due to signal loss (attenuation). I would not recommend a passive splitter as it may cause static or image loss due to attenuation.
  • Powered/Active splitters require an external power source. It splits and amplifies the signals, reduces drop-offs, and can be used for longer HDMI runs (up to 50ft). Active splitters are suitable for 2 or more displays but are costlier.
  • HDMI Matrixes combine both HDMI switches and HDMI splitters in one. They have multiple HDMI inputs for 2 or more sources with at least 2 outputs for the displays. The number of inputs and outputs are labeled with figures such as 3×2 (3 inputs, 2 outputs), 2×5 (2 inputs, 5 outputs), 8×8 (8 inputs, 8 outputs), and so on. However, this hybrid combination is costlier than a powered splitter.
6 by 2 HDMI matrix
6 by 2 HDMI matrix

Buying an HDMI splitter

When choosing an HDMI splitter, take into account the number of outputs and displays. 4 outputs will be enough for most use cases.

To connect multiple sources to your splitter, use an HDMI matrix. In this case, consider both the number of inputs and outputs. For instance, to connect 3 sources to the device, ensure the splitter/switch has at least 3 inputs.

Compatibility is also important. The HDMI splitter should be compatible with the source and the displays. A 4k compatible chain with HDCP support (HDMI 2.0 or higher) will be your best bet as it will be backward compatible in most cases. This chain includes the cables.

Some splitters support ARC/eARC, HDMI CEC, and HEC;

  • ARC (Audio Return Channel) is a feature that enables audio signals to be sent back to the source, usually a receiver, preamp, or soundbar for audio playback.
  • HDMI CEC (Consumer Electronics Control) allows a user to control compatible devices with a single remote. For example, when using a receiver as the source for your splitter with CEC support, one remote can be used for both the display and the receiver.
  • HEC (HDMI Ethernet Channel) supports shared internet access across supported HDMI devices without requiring separate ethernet cables. Only one ethernet cable is required.

For 3D content, you will require a splitter with support for 3D.

Do HDMI splitters reduce quality?

Some splitters may suffer signal quality reduction or lag issues if not well designed. Not all splitters will be affected.

High-quality active HDMI splitters have little to no signal quality reduction.

HDMI signals are digital signals sent in encoded bits (1s and 0s) that are decoded on reaching the splitter’s processor/chip. Another chip then splits, amplifies (Boosts), and re-encodes the signals before being output. These bits can be split without drop-offs but you may have bit errors where a 1 flips to a 0 or vice versa with negligible effects.

A passive splitter also splits the voltage but can introduce lag or artifacts. Passive splitters may not board well with high-resolution displays.

How to use an HDMI splitter

  1. Power off your displays and source.
  2. Plug in one HDMI cable on the splitter’s input and connect it to the output (HDMI out) on your source.
  3. On the splitter’s output ports, connect your HDMI cables and run them to the HDMI inputs (HDMI in) on your displays.
  4. If you are using a passive HDMI splitter, you will only need to turn on your displays and source for it to work.
  5. An active splitter will need to be connected to an external power source and powered on. You can then power on your displays and source.
  6. On your display devices, select the respective HDMI input. Enable CEC if it is available.
  7. This should complete the connection. Play something on your source to test how well the splitter works.

If one or both of your displays does not receive a feed, it may be due to compatibility issues. For example, if you are sending 4K signals, your HDMI cables or splitter may not be 4K-compatible or copy-protected.

If only one of your displays is 4K and the other is 1080p, you will only receive a 1080p signal on both displays as the splitter cannot split the signals to 4k and 1080p.

DTS Vs Dolby Digital (5.1 formats Comparison)

DTS-vs-Dolby-Digital

Digital audio can be complicated as there are several audio formats and encoding systems that enhance the sound experience in our homes. However, in this guide, we will be comparing DTS and Dolby Digital, 2 popular audio systems that have been around for more than 2 decades now for cinema and home use, and how they deliver 5.1 surround sound for movies, games, and so on.

Scroll on,

DTS and Dolby Digital (AC-3) are lossy/compressed audio systems generically known as ‘5.1’ systems as they both support 6 independent audio channels that include a band-limited LFE channel (the .1 channel) for low-frequency sound enhancement. The LFE channel is given a 10 dB boost compared to the speaker channels.

Both systems are encoded with information our ears are most sensitive to and thus use a fraction of the bandwidth that would be used by PCM or linear PCM (LPCM).

DTS is less compressed compared to DD and is encoded at a higher bit rate of up to 1.5 Mbps and thus uses more bandwidth and storage. Meanwhile, Dolby Digital has a maximum bandwidth of 640 Kbps but is said to have a more efficient encoding system.

The bit-depth for DTS tracks can be as high as 24 bits but Dolby Digital tracks are usually encoded at 16 bits. Every bit will give you a dynamic range of 6 dB and thus 24 bits will give an effective dynamic range of 144 decibels. DTS digital tracks thus offer more fidelity and should theoretically deliver a higher quality playback.

Both DTS and Dolby Digital use sampling rates of 32, 44.1, and 48 kHz. The sampling rate for DTS tracks can be as high as 96 kHz for 5.1 channels. However, 48 kHz is the most commonly used sampling frequency for DTS and Dolby Digital tracks meant for home use. The sampling rate is the frequency at which audio signals are represented.

Both systems include the codec (algorithm) and are supported as audio formats on most current and legacy A/V devices. This includes gaming consoles, soundbars, Streaming boxes, and platforms such as Netflix and Amazon Prime Video.

Here is a further dive into each audio system.

Dolby Digital

Dolby digital is a multi-channel 5.1 standard for home theater surround, cinema, and multichannel broadcast. The format relies on the Audio Compression 3 (AC-3) algorithm to encode audio signals. AC-3 employs psychoacoustic algorithms to compress the PCM/LPCM signals by removing parts that are deemed redundant and that our ears are insensitive to.

Dolby Digital tracks are compressed at a compression ratio of as high as 12:1 but 6:1 and 4:1 compression ratios are more common. Compression reduces the size of the audio program for bandwidth-limited operations and less storage requirement without altering the quality of sound output.

Dolby Digital tracks are encoded at a constant bitrate of 640 Kbps on Blu-rays, and 504 Kbps on HD DVDs for 5.1 channel support. This can deliver anywhere from 1 to 6 discrete/independent audio channels. This includes 5 full-bandwidth channels of 3 Hz to 20 kHz and an LFE (low-frequency effects) channel of 3-120 Hz for the sub. The LFE channel uses one-tenth of the bandwidth used by the main speaker channel hence the .1 nomenclature.

During encoding, metadata is added to the Dolby Digital soundtrack. Metadata is additional information created by the audio mixer to give more control over the playback. This information includes;

  • Dynamic range control (loudness control)
  • Level matching (pre-processing)
  • Downmixing information for automatic sound reproduction through fewer speakers. This ensures that the listener can faithfully reproduce the audio on a mono, stereo, or 5.1 speaker configuration thus Dolby Digital should sound great on any audio device.

Any device with an AC-3 decoder can unpack Dolby Digital content to retrieve the PCM/LPCM data for further processing by a DAC as specified by the codec and metadata parameters. This will include devices such as a receiver, a BD/DVD player, a gaming console, a TV, and so on.

When playing DD content on a mono or stereo speaker configuration, the Dolby Digital signals are downmixed to mono or stereo.

The downmixed stereo track can either be Lt/Rt or Lo/Ro. Lt/Rt (total Left/total Right) contains a Center and Surround (CS) channel matrixed into the main left and right (LR) channels. The CS is extracted during decoding, The center channel is reproduced by a center channel speaker while the surround channel is played back by one or two surround speakers for 5.1 channel playback.

Lo/Ro (Left only/Right only) contains audio information for the standard left and right stereo playback over 2 speakers or over headphones. The center channel is downmixed into the left and right channels.

Dolby Digital bitstreams can be transmitted using an optical or HDMI connection.

Later DD iterations include an extension substream to the core for additional channels, resolution, and frequency extension. They include;

  • Dolby Digital EX
  • Dolby Digital Plus

Dolby Digital EX

Dolby Digital EX (6.1) has an additional rear surround audio channel matrixed into the left and right surround channels in the 5.1 Dolby Digital soundtrack. This extra channel is therefore not a discrete/independent channel.

Any AC-3 decoder can unpack Dolby Digital EX data to produce 6 audio channels. The extra surround channel is played back by one or 2 surround speakers.

On a 5.1 speaker system, a phantom center back surround is created.

Dolby Digital vs Dolby Digital Plus

Dolby Digital Plus uses the E-AC-3 (Enhanced Audio coding 3) compression system at a maximum bitrate of 6 Mbps for support of up to 16 discrete audio channels. For now, DD+ is limited to 7.1 uncompressed channels on Blu-ray and other digital media but can be used to deliver lossy Dolby Atmos content.

At 640 kbps, DD and DD+ sound indistinguishable. Bitrates beyond 640 kbps allow for more audio channel support with more bit depth at higher sample rates.

Dolby Digital Plus is an optional format used on streaming services such as Netflix and on Blu-rays.

Dolby Digital + bitstreams require an E-AC-3 decoder to unpack the LPCM data. However, the core Dolby Digital track is played back in its absence. This is because Dolby Digital Plus is built upon the 5.1 AC-3 system for compatibility with current and legacy devices.

For transmission of DD+ bitstreams, an HDMI 1.3 cable connection or higher is required. With an optical connection, the Dolby Digital bitstreams are transmitted instead.

DTS digital surround

Previously known as DTS encore, DTS Digital Surround is the original DTS encoding and decoding format and is used as the core for any DTS soundtrack. DTS Digital surround tracks are encoded using the Coherent acoustic (CA) compression algorithm.

The Coherent Acoustic uses a combination of signal-redundancy coding (ADPCM) compression to reduce the bandwidth of the sampled frequencies and perceptual coding to increase the resolution of the coded audio signals

Like Dolby Digital, It supports up to 6 discrete/independent audio channels at a sampling frequency of up to 48 kHz and a bit-depth of 24 bits for home use. 5 channels are reserved for the main speakers while the one channel is reserved for the LFE channel.

But unlike Dolby Digital, DTS supports higher bit rates and is less compressed. DTS content can be encoded at as high as 1.5 Mbps on Blu-rays. And as higher bitrates codecs require fewer calculations for encoding and decoding, DTS is less CPU intensive for the production of higher fidelity audio with more dynamic range. It also offers fairly low latency real-time encoding making DTS suitable for real-time applications such as gaming.

DTS digital sound is mandatory on Blu-rays. This audio format can be decoded by most current and legacy audio/visual gear such as a gaming console to output LPCM data to a DAC for processing.

On a smaller speaker configuration, the DTS data is downmixed to stereo or mono.

To transmit 5.1 DTS digital bitstreams, you will require an optical or HDMI connection. Only an HDMI connection will support the transmission of decoded LPCM data.

DTS digital extensions

The lossy DTS digital surround core can be expanded with the addition of matrixed and discrete channels and higher sampling rates. The core substream can be decoded independently for 5.1 channel playback but some decoders can decode the 5.1 substreams followed by the extension substream that includes lossless audio signals. The decoder then combines the reconstructed lossy core and lossless extension components before output.

DTS ES matrix

DTS ES (Digital Theater Sound Extended Surround) is a 6.1 format that uses as an additional rear channel (rear central) added to the DTS digital core. It enables the encoding of LPCM audio signals at up to 24 bits per sample at a sampling rate of up to 96 kHz. It also uses less compression than Dolby Digital EX.

DTS ES creates a total of 6.1 channels from a 5.1 source encoded with DTS-ES. The encoder adds a matrixed surround back channel to the 5.1 core that can be played back by one or 2 rear surround speakers.

There are 2 DTS ES variants namely;

  • DTS ES Matrix– In the DTS ES matrix the back surround channel is multiplexed with the discrete surround left and right channels which can be extracted by a DTS decoder. Provides 5.1 independent channels with a matrixed center back surround to compliment the left and right surround channels. You can use 1 or 2 surround speakers to playback.
  • DTS ES discrete– In DTS ES discrete, a discrete/independent back surround channel (XCh) is added for a total of 6.1 discrete channels (non-matrixed). It is compressed in the same technology as the 5.1 core. The additional channel is positioned directly behind the listener and is denoted as the center-surround channel. It can be played back by one or 2 rear surround speakers playing in mono. During playback in a 5.1 system, the center-surround channel is mixed into the left and right surround with a 3 dB attenuation producing a phantom/virtual center-surround. This makes it possible to downmix DTS ES discrete to the standard 5.1 core configuration. A 6.1 to 5.1 downmix is embedded in the stream. The XCH is appended at the end of the stream.

The extension data is ignored by the 1st generation DTS decoder but can be decoded by 2nd generation decoders.

DTS 96/24

DTS 96/24 is an upscaled version of the standard DTS digital system and is split into the core + extension. The core is encoded at 16/48 or 24/48 depending on the source while the extension is encoded at 96 kHz at 24 bits. The extension data includes information about the differences between 96 kHz and 48 kHz and the bit differences.

The information about the higher sample rates is not carried in the core but as an extension to the core stream. The extension is thus a substream.

At the decoder, the extension data is interpolated/inserted into the core data to increase its fidelity. It produces a 24-bit 96 kHz Bitstream when the reconstructed extension data and the core signals are combined.

It supports up to 5.1 channels of audio at a sampling frequency of 96 kHz instead of the standard 48 kHz and at a resolution of 24 bits for more dynamic range. In a DTS 96/24 decoder, the core + extension data are recombined and decoded resulting in a lossy stream. A lossy stream will not be a bit to bit-perfect with the LPCM data it was pulled from as it is still limited to the 1.5 Mbps bitrate out of which 384 kbps is reserved for the 96/24 extension.

It is fully compatible with DTS digital systems in the absence of a DTS 96/24 decoder.

In a capable 96 kHz decoder, the core + extension are unpacked into core and extension data.

In the 96 kHz decoder, the unpacker first separates the core + extension stream into the core and extension data. The core subband decoder, in the Reconstruct Core Audio Components block, processes the core data and produces the reconstructed core subband samples

When a 48 kHz-only (legacy) decoder is fed the core + extension bitstream the extension data fields are ignored and only the core data is decoded. This results in 48 kHz core LPCM audio output.

With DTS 96/24, you get a higher quality audio playback but it is still lossy as the extension uses the same compression algorithm.

This format is mainly used for encoding and storing multi-channel high-definition music that can also be played back on a stereo configuration.

In conclusion

AC-3 and DTS digital are mandatory multi-channel codecs.

DTS proponents claim it can deliver superior audio quality compared to Dolby Digital systems due to the use of less compression and higher bitrate. However, these 2 cannot be used to determine which surround sound system is better and does not also equate to higher sound quality and this will come down to your hearing perception and your audio system.

This is because both systems used very effective coding systems and compression schemes and no technical or scientific means can be used to determine which will sound better as both systems are based on different technologies.

Despite this, there are times when DTS digital soundtrack may sound better than a competing Dolby Digital version.

The audio system you adopt depends on personal preference and what sounds best to you by ear. It is all subjective.

Do you have a preference, what are your reasons for your choice? Let us know down below.