Recent Posts

Setting Subwoofer Gain, Crossover & Phase (Simple guide)

subwoofer-crossover-gain-phase

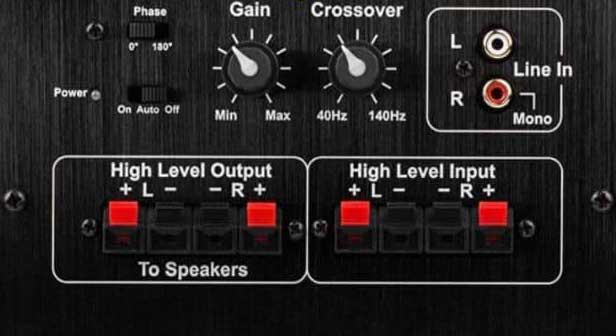
Although it seems complex at first, setting your subwoofer’s gain, crossover, and phase should be fairly easy.

In a nutshell;

  • Gain adjusts the amplitude (loudness) of the low-frequency signal going to an active sub’s input. This increases or decreases the output level/volume.
  • The crossover frequency is the point at which audio signals roll off before being sent to the most capable speaker. A low pass filter routes low-frequency signals (bass + LFE) to a subwoofer while mid and high frequencies are sent to your main speakers.
  • A phase knob time aligns your main speakers to the sub for seamless integration. This can be a 0° or 180° toggle or a variable knob for smaller increments.

For a deeper understanding of the subject matter, let’s look at how to set each parameter in this step-by-step guide.

Sub-Woofer terminologies

Before setting your subwoofer, here are some terms you will find useful as you skim through this guide;

TerminologyMeaning
Low-Frequency Effects (LFE)This is a distinct, low-frequency-only track (0.1 channel) usually sent to a subwoofer. The LFE channel ranges between 3 to 120 hertz and has a 10 dB headroom. Headroom compensates for our ears’ insensitivity to bass frequencies compared to mid-range frequencies.
Low Pass Filter (LPF)This is an AVR subwoofer mode that sends all the bass signals below crossover plus the LFE to an AVR.
High Pass Filter (HPF) A high pass filter blocks low frequencies but allows the mid and higher frequencies to pass through. In this case, the mids and highs are the passband signals while the bass signals are the stopband signals.
Small” speaker settingsWith this setting, only the frequencies above the crossover are sent to the main speakers while all frequencies below are sent to the sub.
Large” speaker settings This setting allows a full audio spectrum to be sent to the main speakers while bass frequencies below the crossover are sent to a sub. This is great 2-channel audio with full-range tower speakers that can go down to 30 Hz or so.
Main + LFEThis is an AVR subwoofer mode that sends all the bass signals below crossover plus the LFE to an AVR.

Note: The Passband is the band of frequencies that pass through a filter. It’s usually one octave from the crossover point. The stopband is a frequency band below which signals are filtered out or significantly attenuated.

Subwoofer gain setting explained

The subwoofer gain knob or high/low-level control adjusts the amplitude of the sub’s input signals. It increases or decreases the bass output level about the input.

Setting the gain should match the subwoofer’s level to the main speakers’ volume level to better integrate them. You can also adjust the sub-level depending on preference and playback material.

Set the gain too high and the bass signals fall at risk of clipping. Meanwhile, setting gain too low, limits the dynamic range and may result in an audible hum and hiss as the noise floor is touched.

What’s more, there is an inverse relationship between gain and crossover. Increasing the gain moves the crossover point forwards and vice versa making the audio boomier. Lowering the crossover or gain will rebalance the system for a smoother response.

How to set subwoofer gain

When setting the gain, use well-placed front speakers and the sub to ease the process. On your AVR, properly set the distance between the speakers and the MLP for time alignment as the output level varies with distance.

Set your speakers to “small” and the crossover at 80 Hz for later adjustment. Then bypass your sub’s internal crossover circuit using a bypass switch or by maxing the crossover frequency.

To set subwoofer gain;

  1. Use an SPL meter set to the 80 dB range, C-weighting, and slow response. An SPL meter app on your Android or iOS device can be used as an alternative.
  2. Place the meter at ear-level on the MLP (main listening position) pointed upwards.
  3. Set the gain at around 0 o’clock (midpoint). It can be set higher or lower by a click or two. Each click adjusts the gain by 5 to 6 decibels.
  4. On your AVR, set the master volume (MV) to 0.0 if it uses a relative reference level.
  5. For an AVR that uses an absolute level (0 to 100), leave it as it is and set the trim level at or below -5 (-6,-7, -8) before running auto-calibration to set the sub’s output at reference level. Take note of the set MV level which may be around 80 dB.
  6. Pull up your AVR’s test tone menu to generate pink noise for the sub and speakers. The pink noise level should be around -18 dBFS/0 dBu.
  7. With everything set, adjust the speakers’ trim level, including the sub, to around 75 dB. 75 dB is the reference level but can later be boosted by about 3 to 5 dB to compensate for our ears’ insensitivity to bass output at lower levels.

As time goes by, adjust the trim level to find the bass level that best works for you. The output level for all speakers can then be adjusted using the AVR’s master volume control.

Trim is inversely proportional to gain. As such, increasing the gain will result in a lower trim level and vice versa at the reference level. Don’t set the trim level higher than 0 as this may clip the bass signals.

Setting the gain level by ear will require you to play a well-balanced track. Set the trim level to around -6 and the MV to 0.0. Then adjust the gain until it’s too hot before turning it down to an acceptable level where the sub balances with the main speakers.

Subwoofer gain vs volume

Since both subwoofer gain and volume controls affect the absolute volume level (dB SPL), they are often used interchangeably.

However, they are different in that gain increases or decreases the amplitude of the bass signal that the receiver outputs to the sub’s input (before amplification). Meanwhile, volume increases or decreases the amplitude of the bass signals relative to the output (after amplification).

Subwoofer crossover settings

The subwoofer crossover frequency is the frequency where the main speakers roll off for the sub to take over the Low-Frequency sounds (Bass and sub-bass). It’s a point 3 to 6 dB lower than the passband before the response steeply falls into the stopband depending on the slope.

Once set, bass from the speaker channels below the crossover is extracted and combined with the dedicated LFE channel (up to 120 Hz) to a mono output and routed to one or more subs.

Usually, this happens on a low-pass filter. A low pass filter is not an ON/OFF switch. Instead, it gently fades over an octave or two for a seamless transition.

In mathematical terms, an octave is the doubling or halving of frequencies. If the crossover frequency is 3dB down at 80 Hz, an octave higher or lower will be 160 Hz and 40 Hz respectively. Thus, the sub still outputs some localizable sound at 160 Hz or higher.

The main speakers and sub’s output should then acoustically blend (acoustic summation) to deliver a near-flat response similar to the original audio signal.

When the crossover frequency is set, the sub shouldn’t be easily localizable.

If the crossover is set too high or if the crossover slope is too gentle, the sub output’s some directional audio making it easier to localize. Localization also occurs on a ported sub that is chuffing at higher frequencies due to port tuning errors.

The speakers and subwoofer should have the right amount of overlap. If the overlap is too large, the sound output will be disjointed while too little overlap makes the bass output overbearing (boomy), mudding the response.

How to set the crossover frequency

Depending on your setup, the crossover can be set on the AVRs or subwoofer’s filter.

However, the receiver’s filter is preferred. As such, the sub’s crossover circuit is bypassed using a switch or setting the sub’s LPF to max (~150 Hz). This prevents cascading crossovers that can lower the bass output quality.

To use the sub’s low pass filter, use its stereo line-level RCA or speaker-level inputs from the receiver’s respective outputs. This bypasses the AVR’s/pre’s crossover.

Set the crossover frequency between 30Hz and 120 Hz depending on the speakers’ capabilities for a smooth response. An 80 Hz crossover is preferred as frequencies below 100 Hz are less directional. With more capable main speakers, the crossover can be set lower to 60 Hz or so and higher at 100 Hz or so for less capable speakers.

At low frequencies, soundwaves travel from the source uniformly in all directions but becomes more directional at higher frequencies.

Choose the crossover frequency that nets you the best overall response.

Key points for setting the crossover;

  • THX recommends a crossover frequency of 80 Hz. This is great for THX systems but is not a fit for all.
  • The Low pass filter should be set at not less than 10 Hz higher than the main speaker’s lower response. For example, a speaker with a 70Hz to 20 kHz range should roll off at 80 Hz or higher.
  • For surround speakers with different responses, set different crossover frequencies for them depending on the capabilities.

Some audio sinks use electronic DSP crossover circuits with slope adjustments. Slope control changes the rate of signal attenuation. It’s recommended to use a 3rd order (18dB/octave) or 4th order (24 dB/octave) slope. An 18dB/octave slope is gentler (less steep). The higher the decibel (dB) number, the steeper the slope.

Testing the crossover response

Once you set the crossover, the main speakers to subwoofer transition should be smooth.

Set up RoomEqWizard (REW) and use a frequency sweep to test the acoustic response. You will also need a computer with stereo input and output plus an SPL meter. If you are unfamiliar with REW, here’s a guide to help you get started.

If there is a peak at the crossover point that makes the playback muddy, lower the crossover frequency or gain. If there is a dip increase the cutoff point.

Subwoofer/speaker crossover frequency chart

Speaker typeCrossover frequency
Tower speakers (4-6″ woofers)60 Hz
Tower speakers (8-10″ woofers)40 Hz
Small-sized center, surround, bookshelf100 to 120 Hz
Mid-sized center, surround, bookshelf80 to 100 Hz
Large-sized center, surround, bookshelf60 to 80 Hz
Extra-large-sized center, surround, bookshelf40 to 60 Hz
Tiny, on-wall speakers150 to 200 Hz

Subwoofer Phase (ϕ) settings explained

Think of phase as the timing of the audio signals arriving at your ear. Different distances of the main speakers and subwoofer to the MLP will result in phase differences. Additionally, every crossover filter alters the phase to some extent.

The phase relationship can never be perfect as it varies with frequency. Your sub and speakers may be in phase at the crossover but out of phase at a higher frequency. The phase also depends on the sitting position.

However, for phase coherency, the arrival of audio from the speaker and the sub at the crossover should be optimized as phase differences are more perceptible at lower frequencies. When out of phase, the bass output will be thin and lacking.

Here is what you should know;

  • When the outputs are in phase (0°), the signals are summed resulting in a boost of around 6dB due to constructive interference.
  • A 90° phase difference (quarter cycle) increases output by 3dB.
  • At 120°out of phase, the output from the woofer and subwoofer don’t affect the overall output. If the phase difference is more than 120° degrees, the outputs cancel each other out lowering the level.
  • When 150° out of phase, the resultant output is lowered by 3dB.
  • When the acoustic outputs are 180° out of phase (half wavelength), output drops by 6 dB due to destructive interference.

Setting phase

The phase can be set with a simple 2-way switch of 0 or 180° or a variable knob for smaller adjustments. This allows you to add electrical delay time-aligning the sub and main speakers’ bass outputs.

Ideally, the phase control should be left at 0°. Reversing the phase from 0 to 180° adds electrical delay to the bass signals by half a cycle and may not yield much of a difference.

However to set the phase, use a band-limited bass track at the crossover range and let someone else flip the phase switch back and forth. This changes the volume level. Select the loudest option.

To Sum up

Optimizing these settings should yield a seamless speaker-to-subwoofer transition.

Though it may seem complicated at first, with some basic knowledge and experimentation, you should end up with settings that best suit you. You can also run auto-calibration such as Audyssey to set everything for you.

FAQ

What is the LFE on a Subwoofer?

LFE (Low-Frequency Effect) is a dedicated band-limited bass channel typically found on movie soundtracks. It ranges from 3 to 120 Hz. These effects are usually played back by a subwoofer.

Most receivers have an LFE output or two which may also be labeled as sub out to feed to the sub’s LFE input. The bass from the receiver’s sub-output is derived from the main channels and combined with the LFE before being routed to a mono LFE input on the sub.

Subwoofer crossover 80hz or 120hz

80 Hz is the standard crossover frequency for most home theaters. However, the crossover can also be set higher such as 120 Hz for smaller speakers, or lowered to around 60 Hz for larger bass-capable tower speakers. The choice between 80 and 120 Hz will depend on your main and surround speaker capabilities.

subwoofer phase 0 or 180

0° is the default phase setting on most subs while 180° reverses the phase by half a cycle and adds electrical delay to the bass output.

What should I set my LFE crossover to?

LFE is a dedicated bass channel that is independent of the speakers’ channels with a range of 3 to 120 Hz. As such, set the LFE crossover at 120 Hz or higher for all LFE signals to be sent to the sub for playback. Setting the LFE crossover to a value lower than 120 Hz will result in the loss of some LFE information.

This should not be confused with the other crossover frequency that extracts low-frequency signals from the speaker channels and routes them to the sub.

When set to LFE+Main, your receiver routes both LFE and bass information from the speaker channels to a subwoofer that is most capable of bass playback.

Soundbar placement options- Where to place a soundbar

Soundbar placement

In many media rooms and basic home theater setups, a soundbar is used in place of an expensive and installation-heavy surround sound speaker system.

A soundbar is a great way to get better audio from your TV without having to spend much. You don’t have to depend on TV speakers for audio as they have become smaller with TVs getting thinner.

But for an immersive experience, you need to nail the placement. So where should you place your soundbar?

The best soundbar placement is horizontally below the TV with the soundbar’s speakers at ear level in a sitting position. With an upward-firing soundbar (for 3D sound), no signals should be blocked after placement.

There are also other options for soundbar placements such as;

  • Placing the soundbar above the TV
  • Hiding the soundbar in the cabinet
  • Placing the soundbar behind the TV
  • Vertical placement at the sides of the TV

We are going to look at each of these options in more detail with the perks and drawbacks of each option.

1.      Soundbar below TV

Depending on the type of soundbar that you have, placing the soundbar below the TV is the best option you can go for. This can be done by placing the soundbar on top of a cabinet but for a wall-mounted TV with no cabinet, wall-mount your soundbar too.

This will ensure that the highly directional mids and highs directly reach your listening position.

No sound obstacles should stand between you and the soundbar. Obstacles can reduce sound quality due to absorption, reflection, and refraction of some of the sound waves and can even block the soundbar remote sensors.

However, there are exceptions to this as not all soundbars or rooms, for that matter, are designed the same. But the general rule for soundbar placement is ensuring that it is front-facing and directed to the ears.

You should also consider your setup and wiring when planning your placement.

Placement tips

  • The soundbar should not interfere with TV visibility. Consider the height of the soundbar before shopping.
  • This soundbar should also not block the TV remote sensor.
  • The soundbar should be placed at the front of the stand, table, or cabinet.
  • If your cabinet, table, or stand is made of glass, place a vibration absorbent under the soundbar such flat rubber surface.

2.      Soundbar above the TV

In some cases, placing your soundbar above the TV may be better.  This can be more pleasing and even prevent you from blocking the TV sensors if they are placed in a cabinet.

But for this option, the soundbar will need to be mounted to the wall. However, not all soundbars are wall-mountable.

Also, ensure that the soundbar’s drivers (mid-range woofer and tweeters) are angled towards your sitting position.

Just like the case for a soundbar below the TV, the soundbar should be front-facing.

This is not something I would recommend anyone does, but if it fits your taste and style of your entertainment room, why not?

3.      Soundbar behind the TV

This is another not-so-great soundbar placement option (avoid it at all costs).

Placing your soundbar behind the TV will by all means obstruct the sound waves lowering the sound quality. Any obstacles (including a TV) in front of the soundbar will drastically do a disservice to your experience.

Most people may do this due to limited space but should not be done. However, if you can find a way to put the soundbar behind the TV without obstructing the sound waves from the soundbar, go for it and let us know in the comment section below.

4.      Vertical soundbar placement at the sides of the TV

For vertical soundbar placement, you need vertical soundbars or a soundbar that can be split into two vertical speakers such as the Samsung’s HW-E550.

Most of these soundbars will also have a sub-woofer for a 2.1-channel setup and are usually connected wirelessly via Wi-Fi.

The vertical soundbar can be placed on the cabinet if there is enough space or mounted for a cleaner look.

5.      Soundbar inside your cabinet

Hiding a soundbar inside a cabinet is a common soundbar placement mistake.

By placing the soundbar inside a cabinet, you obstruct the soundwaves and increase the air resistance that the cones need to overcome to playback sound.

Generally, all enclosed spaces are not an option when it comes to the placement of soundbars or other audio playback devices.

Soundbar subwoofer placement

If your soundbar comes with a subwoofer or you added one, you will need to make sure that they are both correctly placed for the best sound experience.

The soundbar will need to be placed in a front-facing position at ear level with no obstruction to the front and sides. On the other hand, the sub-woofer will need to be placed in the most convenient position and should be balanced with the soundbar.

The low frequencies (bass) from the sub should blend in with the sound from the soundbar (the sub should “disappear“).

In most cases, the subs are placed at the front of the room. I would recommend placing it away from the wall for the clearest and deepest bass and to avoid phase cancellation.

Test different positions starting from the position where the bass is closest to you until you find the placement where the bass sounds best based on your preference.

You could also use the crawling method to find the sweet spot by placing the subwoofer at your sitting position and crawling around the soundstage to find the spot where the sub sounds best. Once you have found the spot place the sub-woofer at or close to it.

The sub needs enough space for the higher-wavelength sound waves and should not be enclosed.

Surround sound soundbar placement

Some soundbars may have surround speakers and may support 3D codecs such as Dolby Atmos. This will mean having upward-firing speakers for that height element and usually satellite speakers for the surrounds.

All these speakers should sufficiently interact with your room.

If this is the case for you, I would recommend placing the soundbar on a cabinet a few inches away from the wall with no obstruction to the upward-firing speakers.

For a 5.1 surround setup, the 2 extra satellite speakers will need to be placed 90 degrees off your listening position to the left and the right just above ear level. You can use speaker stands for this placement.

For a 7.1 surround soundbar, the left and right speakers need to be pushed slightly to the front and the two rear surrounds placed at the back above ear level.

Not all surround sound soundbars, will use extra satellite speakers to create an immersive surround sound experience. Other soundbars can create a virtual surround sound by bouncing sound waves off the wall.

With this, you may need to tweak your sitting position by moving it either to the front or the back to find your sweet spot.

To Sum up

When looking for a soundbar, you should consider the placement of the soundbar and any additional components that may come with the soundbar.

The best soundbar placement option is below the TV about 4 inches from the bottom of the TV and front-facing at an ear level. This is the placement option you want to be using for your setup.

HDMI vs Optical for a Soundbar compared

connect a soundbar to a tv hdmi vs optical

A soundbar is a great investment for a basic sound system but you may find yourself wondering whether to use an HDMI or optical cable to connect it.

So, which is better between the two?

HDMI and optical cables can transmit surround sound signals from a media source to a soundbar for playback. However, only HDMI supports hi-res codecs such as DTS-X and Dolby Atmos while optical can only handle audio signals of up to 6 channels (5.1 surround) making HDMI a better option.

But there are other reasons why using an HDMI connection is a great idea as you will see below as I make a case for both options.

Optical Vs HDMI- An overview

There are several ways to connect a Tv to your soundbar that include;

  • HDMI
  • Optical
  • Wirelessly (Bluetooth or Wi-Fi)
  • Aux cables
  • RCA cables

HDMI and Optical are arguably two of the best connections for an immersive experience but there are differences between these cables you should consider.

Optical cables

Optical digital cables also known as TOSLINK cables are a great way to send audio between devices in your home theater.

They can transmit sound signals consistently and reliably. In some cases, they are said to have better “sound quality” than HDMI cables since they don’t suffer from interference.

The way TOSLINK connections work is by pulsing waves of light in which the sound signals are modulated. However, they can only transmit audio signals for up to 5.1 channel audio. This will be great if the soundbar comes with 2 extra satellite speakers for the surround and a sub for the sub-bass effects.

The biggest problem with optical cables is that they only transmit audio signals which means that you will need additional cables for the video signals.

How to connect your TV to your soundbar using an optical cable

The optical port on the soundbar is labeled as D.IN, Digital IN, or Digital Audio IN and Optical Out on the TV’s ports.

Plug one end of the optical cable to the Optical Out port on the TV then connect the other end to the D.IN port on the soundbar.

Once connected, set your soundbar to D.IN by pressing the source/input button.

Digital coaxial vs digital optical

Coaxial cables have circular plugs while optical cables use a square plug.

Optical cables work by converting the electrical audio signals to light signals and converting them back to electrical signals on reaching the other end.

Both of these cables are capable of sending high-quality digital audio signals.

Most TVs will have an optical jack but not all will have coaxial connector jacks. Check your device’s I/O before purchasing or check for the device’s specs online to see the port selections offered.

HDMI cables

HDMI cables or High-Definition Multimedia Interface cables are very common nowadays.

These cables can transmit both audio and digital signals between devices. They also transmit high-resolution codecs such as DTS HD Master Audio, Dolby TrueHD, and so on. Optical cables cannot pass these high-res formats.

HDMI cables are also easy to use.

How to connect a TV to a soundbar using HDMI cables

Before setting up your soundbar and TV you need to know that this connection will work best with HDMI ARC inputs. ARC stands for Audio Return Channel and not only transmits video signals but also transmits audio signals to and from your TV and soundbar.

With HDMI ARC, you can hook up other components such as consoles, Blu-ray players, TV boxes, etc. to your soundbar and send signals to the TV using an HDMI cable. When doing this you will need a soundbar with 2 or more HDMI ports for your players and TV.

For this connection, hook up the cable to the HDMI Out/HDMI ARC on your soundbar (not all soundbars come with an HDMI arc port).

The second option is connecting your components to your TV and using a regular HDMI connection to send audio signals to the soundbar. Select the HDMI input by pressing the source button on the soundbar’s remote and you are good to go.

Your TV should recognize this connection and turn off its speakers.

You can also control both your TV and soundbar using one remote with HDMI CEC. However, both the TV and the soundbar need to be HDMI CEC compliant, in which case you can use a universal remote.

What is HDMI eARC?

Other than just HDMI ARC, newer devices including TVs and soundbars will have an HDMI eARC connector.

HDMI eARC stands for “enhanced Audio Return Channel” and is designed to transmit uncompressed and high-quality audio. It also addresses sync issues between your soundbar’s audio and the TV’s video. For this “enhanced” feature to work, both your soundbar and TV should have eARC.

What cable do I need for Dolby Digital sound?

Both optical cables and HDMI cables can relay Dolby digital signals but if you are looking for DTS-HD and True HD audio you will need “a high-quality HDMI cable“. Optical cables cannot pass high-res audio formats.

5 Specs to consider when choosing HDMI or Optical

1.       Soundbar placement

One of the reasons that most people use soundbars is to minimize cable footprint for clean aesthetics.

With optical cables, you will also need cables for video signals. On the other hand, HDMI cables transmit both audio and video signals, great for minimalism. You only need one cable to connect the TV and soundbar.

2.       Inputs/outputs (I/O)

You should consider the port selection your devices offer. Others may only have HDMI ports while others may not have a single HDMI port.

In case any of your devices do not support HDMI, purchase video cables and digital optical cables for audio.

3.       Cable length

This may seem like an obvious spec but is not that important to everyone.

You may or may not require long cables but for custom home theater systems, long cables may be needed.

With longer HDMI or Optical cables, you may end up with signal attenuation. It is, therefore, recommended that you only use shorter cables if possible (10 meters for optical and 5 meters for HDMI).

4.       Sound quality

Optical cables will get the job done for most systems for up to 5.1 channels. However, for 7.1 channel surround sound, optical cables will not cut it.

Optical cables are quite limited when it comes to bandwidth. In this case, use an HDMI connection.

HDMI 2.1 (high standard from HDMI) can support almost all if not all of the audio formats such as DTX-X, Aura 3D, and high-resolution video including 8K.

5.       Video quality

Different types of HDMI cables will not offer the same video quality. HDMI 2.0 can relay 4K video but you will be limited to 60 fps. However, HDMI 2.1 will offer your 4K video and 120 fps (frames per second).

And if it is not clear by now, optical cables cannot relay video signals and will not be an option when it comes to images. You will need video cables for this.

Final take

There is no doubt that HDMI is better than optical. Before making a purchase, you should ensure that the Soundbar you are about to buy has HDMI ports and at least one HDMI ARC port.