For those unfamiliar with Dolby Atmos, it’s a popular object-based audio format that envelops a listening area with a spherical sound bubble for “atmospheric” immersion putting you right in the action.
Dolby Atmos soundtracks have 128 audio objects independent of traditional channels. The size and position of these objects in a 3D sound field are defined by spatial coordinates (metadata) allowing audio to pan the listening area on 3 axes, left/right, front/rear, and up/down.
Atmos uses height elements to add a vertical sense of space by placing sounds above you. In addition to conventional ear-level speakers, at least 2 height/in-ceiling/elevation speakers are required to reproduce overhead sound objects but 4 are recommended.
If you intend to build an Atmos system, we’ll go through how to best do it whether it’s from scratch or with an existing surround system.
Types of Atmos speakers
Atmos supports up to 34 channels (24-bed and 10 overhead channels). But it’s scalable and not limited by the number of speakers in your system. Thus, playback is supported by various speaker configurations (Stereo/surround).
For most individuals, only 5 or 7 ear-level speakers and a sub are attainable in a 5.1 or 7.1 setup respectively.
Height speakers are integral for optimal Atmos playback. Without them, you only get a faux horizontal 3D effect that should be convincing enough but not optimal.
Adding 2 height speakers to a 5.1 system will give you a 5.1.2 system. 5 denotes the core ear-level speakers, 1 is the sub while 2 is the number of height speakers. In this regard, 4-height speakers in a 7.1 system give you a 7.1.4 configuration.
The number and type of speakers will depend on your room’s layout and the size of the listening area. Wider listening areas require more speakers for uniform and adequate spatial coverage.
These overhead speakers can be;
- Height speakers (on-ceiling/on-wall)
- In-ceiling speakers.
- Upward firing/Atmos-enabled/elevation speakers
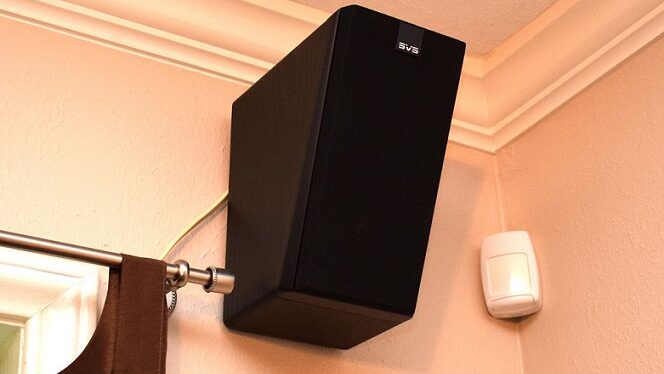
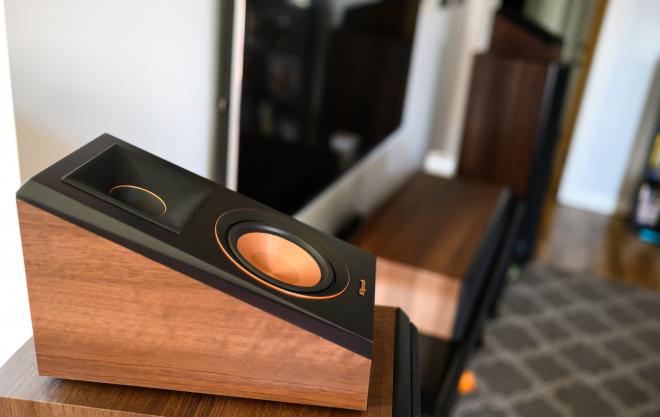
Height speakers
Height speakers are overhead speakers with smaller elevation angles that can be mounted on the wall or ceiling. They are ideal for playback of overhead objects in larger rooms.
Most height speakers are 2-way with a mid-range woofer and a high-frequency tweeter essential for the accurate localization of objects in a 3D sound bubble. Usually, these drivers give the speakers an effective frequency range of about 200 Hz to 20 kHz.
You can use a new or repurposed bookshelf, globe, or thin-style speakers with pre-angled front baffles that can be mounted as front, rear or side height speakers.
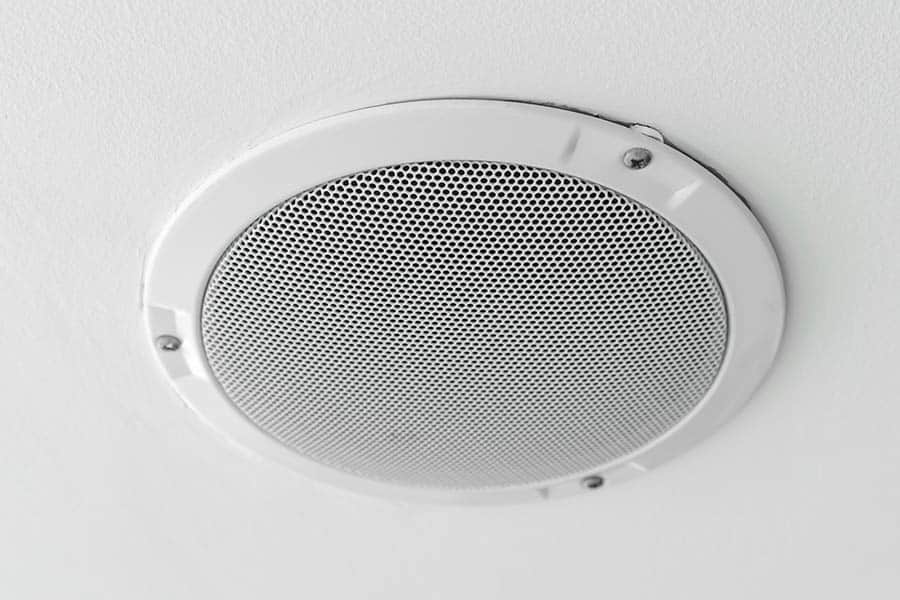
In-ceiling speakers
Usually, in-ceiling speakers are 2-way coaxial designs with the woofer and tweeter mounted on the same axis to cover the entire audio range. They are different from height speakers where the drivers are component split (different axes).
In-ceiling speakers are best suited for high ceilings as they are relatively easy to localize on low ceilings.
These speakers should be flush mounted to the ceiling facing downwards which involves making holes in the ceiling for installation and cabling.
For even spatial cover from left to right and front to back, in-ceiling speakers have a wide dispersion pattern. Some may be pre-angled to radiate sound to the listening area.
Conversely, you will need at least 2 in-ceiling speakers but for optimal performance use 4 speakers. Larger listening areas require more speakers.
If you use in-ceiling speakers for your main listening needs, repurpose them for height effects and get bed channel speakers to replace them.
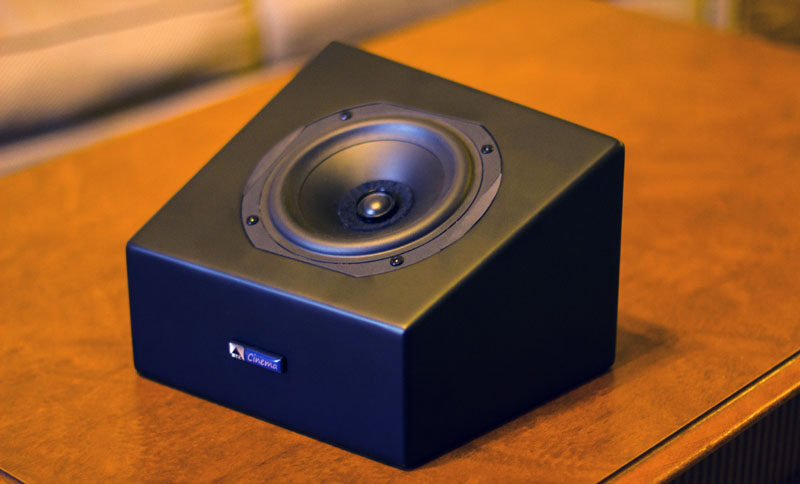
Atmos-enabled speakers/modules
If wall or ceiling installation isn’t an option, Atmos-enabled or elevation speakers are a convenient and cost-effective alternative for creating a virtual sound bubble (illusion of height).
Atmos-enabled speakers reflect sound to the listening area using an up-firing driver pointed to the ceiling at an angle of ~20°.
These speakers can be placed on your main front and/or rear channel bookshelf/floor-standing speakers slightly above ear level to prevent direct radiation to the listening area. Meanwhile, some are integrated into floor standing or bookshelf speakers with 2 sets of speaker connections (binding posts) for the direct-firing and elevation drivers.
These speakers’ performance depends on their placement, ceiling material, and ceiling height as rooms differ in shape and acoustic properties. Up-firing speakers perform best on low, flat, and reflective ceilings made of materials such as concrete, sheetrock, drywall, or wood.
The ceiling should be 8 to 10 ft high. This is because the overhead sounds degrade/diffuse with increased distance to the ceiling. Additionally, vaulted or acoustically absorbent ceilings are sub-optimal for up-firing speakers.
Adding hard and non-absorptive materials such as foam boards on the ceiling’s reflection points can improve immersion.
Adjusting the vertical reflection angle depending on placement height can also improve performance.
Buying height speakers for home
All speakers in an Atmos setup should be added in pairs as Dolby recommends.
Overhead speakers should complement the tonal performance, frequency response, output, and power handling capabilities of the ear-level speakers. This ensures there is no disconnect between the listener level and overhead sound for uniform spatial resolution in the listening area.
So, here’s what to look for when buying height speakers;
Sound quality
Although sound quality is subjective, the speakers in your Atmos system should be sonically balanced.
Timbre match (tonally match) the height effect speakers as closely as possible to your main speakers. The same goes for all speakers with exception of the sub which doesn’t playback localizable audio.
With this, audio objects can pan the sound field smoothly and seamlessly regardless of their position. Mismatched speakers don’t provide consistent transitions and will feel detached.
Using the same family of speakers (same brand and series) will yield the best results. These speakers have similar crossovers and drivers which contribute to a speaker’s tonal performance. Additionally, different speaker lines of the same brand may not be sonically identical.
However, this rule is not carved in stone. Feel free to experiment with different speakers to get a feel of what works best for you.
SPL output (loudness)
The maximum SPL output (SPLmax) denoted as dB (decibels) specifies a speaker’s perceived loudness. SPL is affected by variables such as the speaker’s capabilities, other speakers in the room, amplification, and the room itself.
Speakers with similar output level capabilities above the crossover points preserve dynamic range across the entire listening area for precise placement and scaling of audio objects. The same is true of overhead speakers.
Usually, manufacturers provide details on maximum continuous output but the sensitivity rating can also be used to estimate a speaker’s loudness when supplied with 1 watt of power at one meter.
As most speakers are passive (amplified externally by an AVR or amp), pay attention to the ohm rating to ensure the amp can handle the load.
Further fine-tuning of the height speaker levels is done during calibration.
Frequency response
Atmos tracks cover the entire audible frequency range. But height speakers should be full range down to 150 Hz or so.
Below this, bass frequencies which are omnidirectional and not localizable, are reproduced by your main speakers and sub. Localization is a function of the higher frequencies as heard by the listener.
The ideal frequency response for overhead speakers would be 100 Hz to 18 kHz, ±3 dB (flat response within +/-3dB between 100 Hz and 16 kHz.
Number of speakers
The number of overhead speakers in your room is a function of the listening area dimensions (horizontal length and width). If possible, the number of overhead speakers should match the number of side surround speakers to maintain the sound image.
One pair of speakers should be adequate for Atmos, but 4 are ideal (2 fronts and 2 rears). You don’t lose height effect information with 2 speakers.
You can add an extra set of height speakers if 2 pairs are not adequate for a large listening area for a total of 6 speakers.
Simply put, adapt the number of speakers to the size of your listening area.
Dispersion pattern
Dispersion/coverage pattern describes how sound is spread out by a speaker both horizontally and vertically.
Think of a speaker’s cone as a unidirectional sound source that expands outwards from the speaker. When facing the speaker’s acoustic center on-axis, the sound will beam to you at the highest SPL. As you move off-axis, the sound intensity decreases, and the tonal characteristics change.
Atmos speakers with a wide dispersion pattern are preferred for uniform coverage, especially for a wide listening area.
The dispersion limits are often specced as a -6dB drop off-axis based on a single frequency test tone. An example of a wide dispersion spec is 90° x 60° (horizontal x vertical) @ 1 kHz. In this case, the SPL drops by 3 dB at 45° on the horizontal axis and 30° on the vertical axis.
The overhead speaker should have a coverage angle of at least 50° or 3 dB down @ 25° off-axis.
Budget
There is an assortment of height speakers at different price options to choose from depending on your budget. There are cheap, mid-range, and high-end options depending on the build quality with compromises being made for cheaper products.
On average, a decent pair of Atmos speakers cost around $500. Some can go as low as $100 or as high as $1000+ per pair.
For great performance buy, mid-range or high-end speakers. Avoid fancy speakers if the cost can’t justify the gains.
Dipole vs Bi-pole speakers for Atmos
Most height speakers are direct radiating (monopole speakers) that are aimed at the listening area. Monopole speakers are ideal for larger theater rooms (over 5000m3).
On the flip side, focused overhead audio can be distracting in a smaller room. Here, you can opt for dipole (bi-directional out of phase) or bipole (bi-directional in phase) speakers to diffuse the sound for uniform SPL coverage.
Bipole speakers are omnidirectional with 2 driver arrays pointed in opposite directions but wired in phase. They also spread the sound information into the listening area and are great as Atmos speakers for smaller rooms with lower ceilings.
Meanwhile, dipole speakers have 2 driver arrays wired out of phase but are unsuitable for Atmos playback as they don’t provide uniform coverage. They have a null zone (cancellation zone) which does not support localization. At the null zone, the sound pressure level (SPL) drops by a significant 8 to 10 decibels due to interference.
Dolby Atmos speaker placement
Speaker placement has the biggest impact on Atmos’ performance and should be optimized for accurate playback as intended by the mixer.
Let’s face it, some rooms are better suited for Atmos than others. Your room may neither be ideal nor proportional thus, you should adapt speaker placement to the room’s proportions.
The guidelines provided by Dolby for Atmos placement are intended for a single seating position and may not be practical if you have multiple seats or for practical reasons such as doors, windows and fire pits and so on that may inhibit optimal placement.
With this in mind, I will explain how to adapt placement to your specific needs.
General placement guidelines;
- Don’t be close to any of the speakers which can make it a louder dominant source and shift the soundstage.
- The seating area should be evenly covered by the speakers for the tonal balance of objects as they move in the sound field.
- If possible, all the speakers should be aimed at the seating area.
- The speaker’s placement position should not conflict with its suggested direction. Rear speakers should not be perceived in the front nor should right speakers be perceived to the left.
- During placement, don’t ignore the entire listening area’s shape (area containing the listeners’ heads). Have a clear line of sight from all speakers to all listening positions.
- For adequate angular separation think of placement in terms of angles.
Before mounting/placing the height effects speakers, ensure the base-level speakers are well placed.
Front speakers
The front speakers (LCR) are used as the reference point for the placement of surround and height speakers.
Place the center channel speaker (C) on your screen’s centerline (center front reference). The center front reference is an imaginary line in the middle of your screen and cuts through the main listening position.
The front left and right speakers (LR) should be as close as possible to the screen edges.
Additionally, the horizontal audio angle for the front left and right channels (LR) to the MLP should match the viewing angle to achieve audio/visual coherence. Simply place the speakers as close as possible to your screen’s edges. The audio angle can be wider but not overly so.
The front left and right channels should be equidistant to the MLP at an angle of 22° to 30° off the center front reference.
Surround speakers
For a wider soundstage, surrounds are added to the sides and behind the listening area with adequate spatial separation between the front and surround speakers.
Point your surround speakers inwards on the same horizontal plane as your front speakers for good coverage in the seating area. The listening plane can be tilted to the front of the surround speakers are elevated in raised multi-row home theaters or for practical reasons. You should be able to draw a line from your screen’s acoustic center to the rear surrounds.
Pairs of surround speakers (e.g., L & R rear surrounds) should be at a uniform height at or slightly above ear level.
Put the surrounds as low as possible with a clear line of sight for all listeners. This reduces auditory occlusion which can affect tonal balance and localization while maintaining separation with the overhead channels.
When raised above ear level, surround speakers should be no more than 1.2x the height of the main speakers from the floor so the audio is not significantly above the head. For most individuals, this will be about 1 ft (30cm) of elevation per riser in a multi-row environment.
Side surround speakers should be placed at approximately 90° to 120° off center depending on your configuration while the rear surrounds should be at 130 to 150° off-center in a 7.1 system. The angle between 2 adjacent surrounds should not exceed 60°.
Overhead speaker placement
The placement of overhead speakers should create a spherical sound bubble that envelops all listeners. For 4-height speakers, this is achieved by centering them to the listening area left to right and front to back. Front height effects should not be perceived in the rear or vice versa.
For 2-height channels, mount them in front of the center aperture formed by the surround speakers but angle them to the listening area.
To get adequate coverage, mount speakers with a narrower dispersion (under 90°) angled to the listening area. Point speakers with a wider coverage (over 90°) downwards.
I would suggest using a pan and tilt mount to aim non-angled height speakers to the listening area. The front-to-back and left-to-right angular spacing from the MLP should not exceed 90°. For more than 2 pairs of ceiling speakers, the angle between 2 adjacent speakers should not exceed 90° from the MLP.
Place the height speakers at a height 2-3 times the ear-level height for up/down angular separation while maintaining a coherent 3D soundstage.
If the base-channel speakers are elevated, overhead speakers’ placement should change to achieve adequate vertical separation. The optimal vertical angular separation of height channels from ear level is about 45°. This can be adjusted between 30° and 55° but shouldn’t exceed 60°.
For low ceilings, mount height speakers as high as possible on the wall or ceiling.
Dolby Atmos calibration
The audio from each loudspeaker should reach the listener without phase, level, or delay differences.
All ear-level speakers should be equidistant to the listener’s position for matched speaker levels and even spatial audio. If this is not possible, use distance compensation to time-align arrivals of sound to the listener. Level matching can be done manually or using auto-calibration.
You need an SPL meter set to c-weighting (how our ears perceive sound). All speakers should read 75 dB at the main listening position (75 dB is the THX reference level for home theaters). This reference level can be pretty loud and can peak at 105 dB and should not be exceeded by much.
Using a tripod stand, place the meter at the MLP at ear level with the microphone pointed up. Set the master volume to 0dB (relative volume scale) and navigate the settings to find a tone generator that outputs pink noise to each of your speakers.
The receiver will automatically compensate for any time delay. Do further fine-tuning by ear.
You can also manually adjust the level until the SPL meter reads 75 dB for each speaker including the height speakers.
Consequently, bass management (crossover point) should correspond to the overhead speakers’ low-frequency extension. This is usually set to between 120 Hz and 150 Hz.
To sum up
Atmos and other 3D sound formats such as DTS-X and Auro 3D have made truly immersive audio a reality.
While setting up an Atmos system may seem daunting at first, consider and adapt to your room’s layout and size for the best results.
All in all, the way you build your system comes down to preference in aesthetics, set up, and future-proofing.
I hope you found this guide helpful but feel free to tinker around to see what works best for you then put more butter on that popcorn.
