Recent Posts

AV Receiver buyer’s guide- When to upragde

Upgrading a home theater receiver

An AV receiver is the central plexus (borg language) or the brain for most home theaters.

Still, buying an AVR can be complex considering how many features they are packed with today. Upgrading can be even trickier as you will also need to balance cost vs performance considering what you already own.

Ideally, you will require a receiver with your preferred specs leaving some room for future expansion.

For better-informed buying decisions, this guide will walk you through the features to look out for when buying an AV receiver.

What is an AV receiver?

As mentioned above, an AV receiver (Audio/Visual receiver) is a piece of home theater equipment used as the audio and video hub.

Usually, sources are connected to the receiver inputs to streamline switching between them during playback. Video and audio signals are then output to a display(s) and your speakers respectively.

To do this, a receiver requires the following internal components;

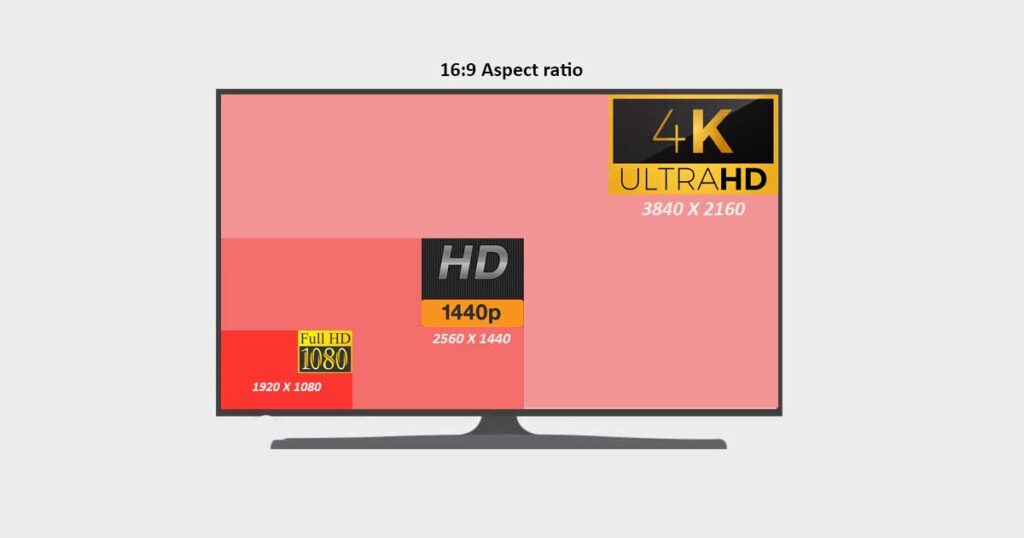
  • Video processor– This is where video signals are processed before being transmitted to a display depending on the source and display’s resolution (8k, 4k, 1080p…). Some receivers allow video signals to pass through unprocessed to the display video processor.
  • A pre-amp stage– At the pre-amplification stage (preamp), weak audio signals for each channel are amplified to line-level signals for the power amplification stage.
  • The amplification stage– AVRs amplifiers for each channel to power the speakers depending on the number of channels the receiver can support (5.1, 7.1, and so on).
  • An AM/FM tuner– This allows you to tune in to your favorite radio broadcasts.

Stereo receivers are mainly used by music lovers as they only support 2-channel audio (front left and right) with an additional output for the sub. They also don’t process or upscale video signals.

When shopping for an AV receiver in the new/used markets, here are the features to consider;

  • The number of channels
  • The number and types of inputs and outputs (I/O)
  • Watts per channel (Amplifier stage wattage)
  • Supported surround sound codecs and audio formats
  • Video support (Processing, upconversion, and upscaling)
  • Room correction software
  • Streaming and Wireless connectivity
  • Other features (On-screen display, remote control, streaming, etc)
  • The build quality and cost
  • Warranty

AVR audio channels

An audio channel is a representation of sound from a single source. This can be a front, rear, left, or right.

AV receivers support different types of audio channels such as 5.1, 7.1, 9.2.4, and so on. The number of channels your receiver needs to support will depend on the kind of surround sound system you intend to build.

Stereo has 2 channels (front left and right channels). An additional LFE channel for the Low-frequency effects makes it a 2.1 channel system. The .1 channel is reproduced by a subwoofer.

A 5.1-channel receiver has 6 channels. These are the front left, center, and right channels with left and right surrounds. A 7.1 AVR has 2 extra rear channels (left and right) to improve ambiance (spatial reality).

Some AVRs support 11 channels with 2 discrete sub-channels and 9 channels that can be configured to your liking for a 5.2.4, 7.2.2, or 9.2 system.

In the case of the 5.2.4 system, the 4 stands for height channels used to create a 3D sound field. Height effects can be reproduced by in-ceiling, height, or up-firing speakers.

The idea here is to get a receiver with as many channels as you need now and in the future.

receiver audio channels
Home-theater-surround-sound

AV receiver Inputs and outputs

The inputs and outputs on your AVR will depend on what AV gear you own and what additions you plan to make.

Audio Inputs

For analog audio sources such as older CD players, VCRs, turntables, etc, the AVR should have analog inputs to accommodate these sources. For most stereo sources, you will need RCA inputs and a phono input for a turntable without a line-level output (has no built-in phono preamp).

An optical input is useful for optical sources such as TVs. Optical connections can support audio signals of up to 5.1 channels.

HDMI connections are used for both audio and video transmission. As for audio, some HDMI sockets (version 1.4 and above) will support ARC or “audio return channel” and/or eARC or “enhanced audio return channel.”

ARC allows you to transmit audio signals to and from a compliant ARC device usually a TV. This means that you can use your tv/projector as the source without requiring an extra cable to transmit audio signals to your AV receiver.

Meanwhile, eARC is similar to ARC but supports uncompressed (hi-res) and 3D audio formats of higher bandwidth.

Video inputs

If you intend to connect your video sources to your AVR other than to the display, here is what you should know.

Analog video sources such as older DVDs and VCRs need analog inputs such as component or composite inputs.

For most digital sources, HDMI has become universal as it supports high-bandwidth video and audio signals. Most receivers, including entry-level ones, will have HDMI sockets.

What’s more, there are different HDMI versions as seen in the table below;

HDMI categorySpecificationResolution @refresh rate
(max)
Audio supportMax bandwidth
Standard Cat 1HDMI 1.01080p @60 Hz8 audio channels4.95 Gb/s
Cat 1 with CECHDMI 1.1-1.21440p @30 HzOne-bit and DVD audio4.95 Gb/s
Standard Cat 2
(High Speed)
HDMI 1.31440p @60 HzAudio/video sync
DTS master audio
& Dolby TrueHD
10.2 Gb/s
Cat 2 with ethernet (HEC)HDMI 1.44k @30 HzAudio return channel (ARC)10.2 Gb/s
Standard Cat 3 (4K)HDMI 2.04K @60 Hz with HDR32 audio channels18 Gb/s
Standard Cat 3
(8K)
HDMI 2.14k @120 Hz
8K @60 Hz with
dynamic HDR
eARC
Hi-Res audio formats e.g DTS-X & Dolby Atmos
48 Gb/s

HDMI 2.2 or HDCP (High-bandwidth Digital Content Protection) is the latest HDMI version designed to prevent illegal copying of Ultra HD content (4k copy protection).

By today’s standards, a receiver should have several HDMI 2.1 inputs and outputs. HDMI 2.0 should be the lowest spec on the AVR’s sockets. HDMI is backward compatible, meaning an HDMI 2.1 input can work with an HDMI 1.4 source.

Ensure the receiver has enough HDMI inputs for your sources with at least one extra input for future upgrades. Consequently, you will require at least one HDMI output for your display (projector, tv, etc).

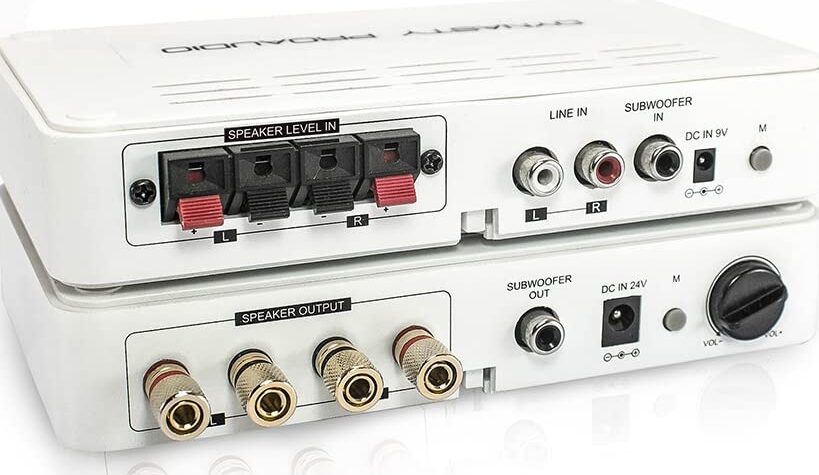
Receiver Audio Outputs

Powered speaker outputs are the most important on a receiver. This will depend on the number of speakers you have keeping in mind any future upgrades.

You will need a receiver with at least 5 powered speaker channels for a standard surround sound system. This receiver should have at least 3 speaker preouts for the front channels to allow for future expansion.

You will also require a sub preout (LFE channel) for one subwoofer or more.

Here are some of the common preouts and their uses;

  • Sub-woofer preouts– Are used for low-frequency signals that are sent to a powered sub(s). Though there is only one LFE channel, your receiver may have 2 or more sub-preouts.
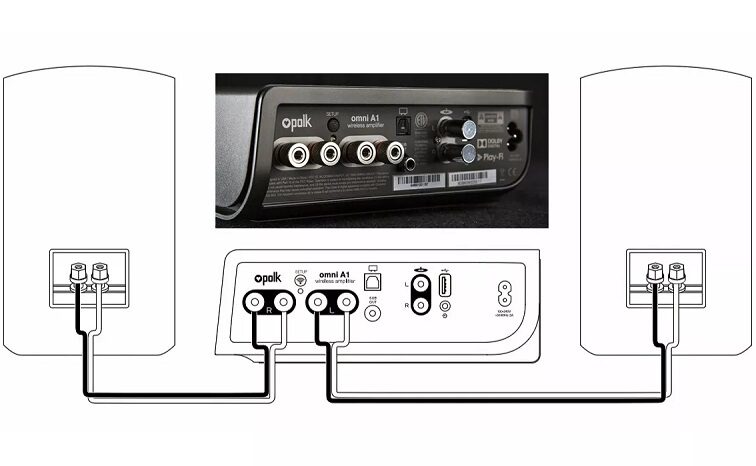
  • Front left and right preouts (FL, FR)– These preouts are connected to an external stereo amp or powered speakers reducing power draw on the receiver.
  • Center preouts (C)– Sends signals to an amp or a powered center channel speaker.
  • Surround preouts (SR and SL) and surround back (SBR and SBL)– Are reproduced surround sound speakers.
  • Zone 2 and zone 3 preouts (multi-zone)– These preouts allow you to send audio signals to an extra room or more.

Video outputs

As with all other outputs and inputs, the video outputs you require will depend on the display you currently own.

HDMI also reigns here but some displays may have older inputs such as a component that is an analog input.

inputs and outputs on a receiver
The back of a typical AV receiver

Receiver watts per channel

The watts per channel (W/Ch) you require will depend on your speakers’ power requirements and your listening habits.

80-100 W/ch (RMS/continuous power) should suffice for most surround sound systems with more efficient speakers drawing less power and vice versa.

For a better idea of what an AVR is capable of, the power rating should be with all channels driven on an 8-ohm load at less than 1% distortion.

I am assuming you will use a powered sub or a separate amplifier for your to reduce stress on the receiver.

The receiver should handle heavy load peaks effortlessly without audible distortion hence the need for “headroom.” This is why some home theater enthusiasts prefer receivers that can deliver more power than they need.

Adding an external amp for the front left and right channels to the respective preouts can help a receiver that is running out of steam at the peaks sound better as the power demands are lowered.

Supported audio formats

Receivers support several audio formats that include hi-res stereo, Dolby codecs, DTS codecs, and so on.

Dolby and DTS surround sound formats will be supported by most AVRs including inexpensive models.

These will include lossless formats such as DTS-HD Master Audio and Dolby True HD and lossy counterparts such as DTS-HD and Dolby Digital Plus.

Other sound formats to watch out for are Dolby Atmos and DTS-X which are object-based formats. Atmos consists of 128 audio objects mixed in a 3D sound field.

Dolby Atmos and DTS:X codecs will require at least 2 up-firing or ceiling-mounted speakers to place audio objects overhead and to make them feel like they are moving around us.

These surround sound formats are complex but I explain them in this DTS vs Dolby Digital guide.

Video support

Most TVs and projectors do a fine job of scaling and processing video signals at their native resolutions.

What’s more, video support on an AV receiver is not a requirement. However, most modern AVRs will allow you to switch and pass-through video signals. The ability of the receiver to pass through 4k and HDR formats such as HDR 10, HDR 10+, Dolby Vision, and HLG will be critical.

HDMI connections of version 2.0a or later will support 4k and HDR10 passthrough

Some receivers may also offer some sort of picture adjustments but you are better off using your display for image and color adjustments. Upscaling and up-conversion may also be supported by others.

Upconversion or transcoding is where video signals are upconverted from one format to another. Component video to HDMI up-conversion is a great example. This reduces the need to switch between video inputs at the display.

On the other hand, upscaling is a feature that allows receivers to enhance low-resolution signals to high-resolution signals. A 1080p input can be upscaled to 4k or 720p upscaled to 1080p.

If you are a gamer, gaming features such as Variable Refresh Rate (VRR), Auto Low Latency Mode (ALLM), and Quick Frame Transport (QFT) will come in handy on an AVR.

Auto-calibration software

Auto calibration or room-correction software on an AVR takes measurements from different points using a set-up mic and test-tone to set up the distance and volume levels for your surround sound speakers.

Some technologies allow you to smooth out the in-room response with compensatory EQ curves. Bass management (bass equalization) may also be supported by the AV receiver’s calibration software. This creates the best possible image about how the speaker interacts with your room.

Calibration technologies range in quality with Audyssey and Dirac leading the pack. There are also other proprietary technologies such as Anthem Room Correction (ARC) found on Anthem AVRs.

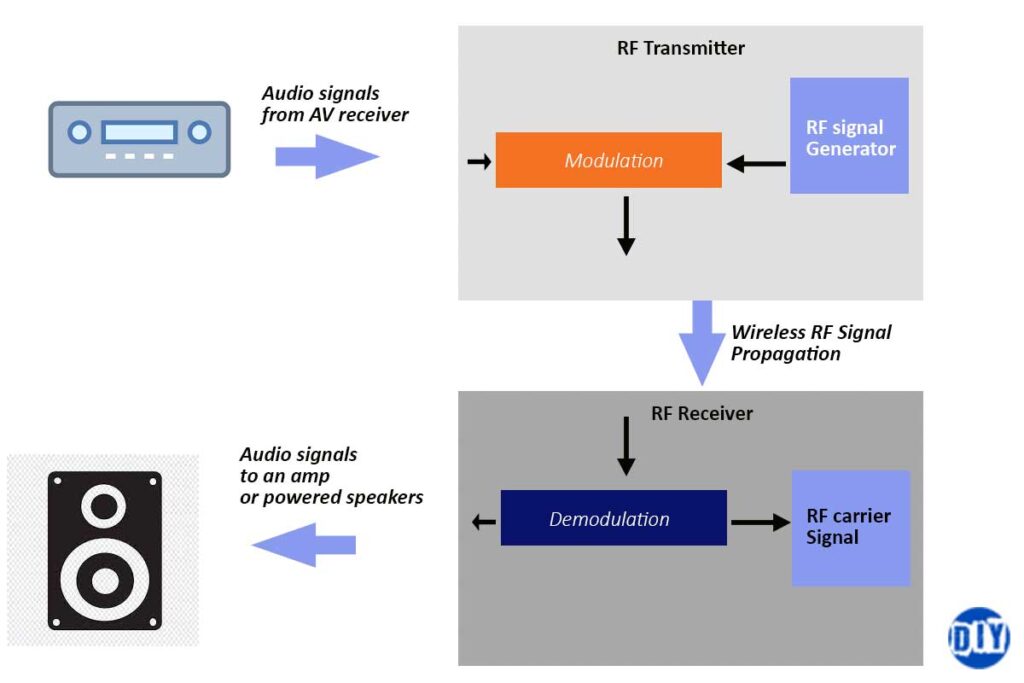
Streaming and wireless connectivity

An AVR that can connect to your home network over Wi-Fi or a wired Ethernet connection is a huge plus. As such, most of these receivers have streaming capabilities over services such as Spotify, Netflix, Tidal, Amazon prime, Tunein Radio, and the like.

Wireless connectivity has become crucial as it also allows us to push music from our mobile devices to the AVR. Apple AirPlay, Chromecast, Wi-Fi, and Bluetooth connections have become imperative.

Remote control

Receivers can be tricky to operate but having a way to remotely control them and a friendly user interface and an on-screen display is a big plus.

Today, most AVR manufacturers offer an app in addition to the traditional remote to control the receiver from anywhere over your home network. Operations such as switching between sources and adjusting your volume are much easier over an app.

Some models also come with voice control features such as Alexa and Google Assistant to power the AVR on/off, control music playback, and so on.

Also, look for a receiver with HDMI CEC support to use one remote for other CEC devices connected to the receiver.

AV receiver Cost

The cost of a receiver will depend on;

  • Build -quality
  • Number of features

Entry levels receivers from reputable brands can cost as low as $300 to as high as $4000 for high-end products.

Most people will do just fine with mid-range AVRs costing between $600 and $1000.

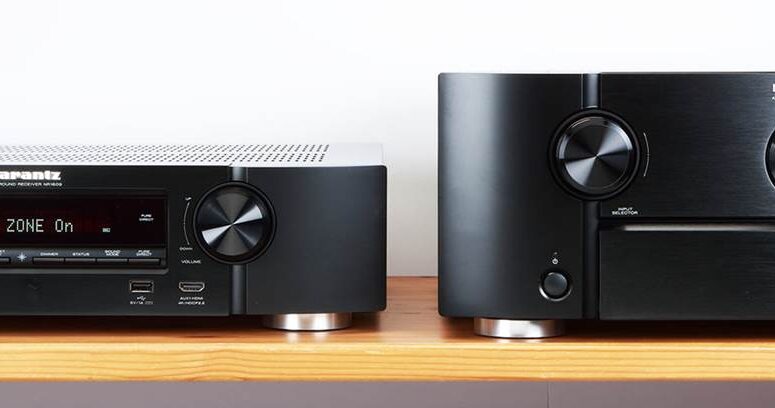
Some popular brands to look out for include Denon, Marantz, Yamaha, Onkyo, and Sony. Other brands are NAD, Arcam, Anthem, and Border Control.

AVR model
Features
Denon X2700HMarantz NR1711Onkyo TX-RZ50Yamaha RX-V6a
Cost $1100$1000$1400$700
W/ch (watts)15050120100
Powered channels7
7.2 or 5.2.2 layouts
7
7.2 or 5.2.2 layouts
9
5.2.4 or 7.2.2 layouts
7
Audio formatsDolby Atmos, DTS-XDolby Atmos, DTS-XDolby Atmos, DTS-XDolby Atmos and DTS-X
Sub2 sub preouts 2 sub preouts2 sub preouts2 sub preouts
Resolution4k @120 Hz
8k @60 Hz
4 @120 Hz
8k @60 Hz
4 @120 Hz
8k @60 Hz
4k @120 Hz
8k @60 Hz
ARC supporteARCeARCeARCeARC
HDMI connections6 inputs, 2 outputs2 inputs, 1 output6 inputs, 3 outputs7 inputs, 2 outputs
Phono inputYesYesYesYes
Room correctionAudyssey MultEQ XTAudyssey MultEQDirac LiveYPAO 

Warranty

An authorized dealer will provide you with a full warranty from the manufacturer in addition to phone and email support for at least 12 months

When to upgrade an AV receiver

Buying a new AV receiver is not a guarantee of better performance. Only upgrade when you have to.

This can be for more inputs and outputs, more power depending on your listening habits, or when you can benefit from the features on the latest AVRs.

You should optimize your receiver’s performance by investing in better speakers or optimizing your current speaker placement.

Don’t just upgrade because new products with newer or more features have been released. This is unless the receiver will serve your features vs performance needs.

Bluetooth stuttering Fixed (Speaker audio cutting in & out)

Bluetooth-speakers-headphones stuttering

In many ways, Bluetooth revolutionized audio connections by replacing those pesky cables that cause clutter. But this isn’t a perfect technology as audio sometimes cut in and out (stuttering).

This is because Bluetooth was not originally developed for audio. Audio support was added later and is still being refined.

Audio stuttering during Bluetooth streaming is caused by the interference of BT signals between the transmitter (phone…) and the receiver (headphones, AirPods, etc.) or due to an unstable connection. This makes the Bluetooth audio playback choppy.

If you experienced this inconvenience, here are some possible causes and solutions.

Causes of Bluetooth stutter

Before we look at the causes of Bluetooth cutting in and out, here are some quick troubleshooting steps;

  • Restart your devices
  • Check for updates
  • Ensure your device is charged
  • Test the connection with another device
  • Have a clear line of sight between the transmitter and receiver

Your source such as a Windows PC may have a Bluetooth troubleshooter. Use to find the root of the problem and follow the instructions to solve it. In some cases, resetting your Bluetooth module may work.

Here are some causes of Bluetooth stutter that may cause audio to skip.

Interference

Bluetooth devices transmit data using radio frequencies with each device having a specific transmission range.

Streaming audio over Bluetooth requires a constant stable connection that if not achieved will make it choppy. Interference can destabilize this connection.

Bluetooth connection operates at the 2.4 GHz ISM frequency band (2.4-2.48GHz). This is the same band for other consumer electronics such as a router, baby monitors, and so on.

The ISM band is easily crowded and as devices compete for bandwidth, momentary interference occurs causing stuttering. This is because the Bluetooth connection Bluetooth hops between different frequency channels to allow only synced receivers to access the transmitted data packets (audio in this case).

During hopping, the Bluetooth Radio waves may overlap with those from another RF emitting source. This can be a microwave, fluorescent lamp, router, and so on.

Weak Bluetooth connection

The quality of real-time audio transfer over Bluetooth worsens as the connection weakens. A week BT signal will cause stutter.

The connection can be worsened if the line of sight between the transmitter and receiver is obstructed by materials such as metal, water and so on which RF signals struggle to traverse.

Even placing your hands in the same pocket as your phone will degrade the signal quality as our bodies are also composed of water.

Most Bluetooth devices use class 2 Bluetooth chips with a max range of 33ft or 10m. But the effective range for optimal performance is usually 5m or 16 ft. Beyond this, the signal gets significantly weaker and completely cuts out or disconnects as they get farther out of range.

Other obstructions that can absorb and reflect Bluetooth signals are walls, furniture, and interference.

Low charge your headphones/Airpods

Stuttering may be a sign of low power on your earbuds/headphones. Charge your Bluetooth playback device to resolve the choppy audio if it’s the root of the problem.

For headphones whose battery health has gone down, you may need a battery replacement or upgrade.

Mismatched Bluetooth codecs

A codec defines how the audio signals are compressed and uncompressed during the transfer from the Bluetooth source to the receiver (headphones…). This allows audio signals to be sent over the limited bandwidth.

There are different Bluetooth versions and profiles. Although stuttering due to profile mismatches is rare, audio codec mismatch can affect transmission rate.

For example, for streaming high bit-rate (hi-res) music or surround sound codecs from your handheld device to headphones, the audio may cut in and out.  This is because the files are huge and devour bandwidth.

For example, the latest Bluetooth version (version 5.2) has a bandwidth of 2 Mbs which is more than enough for streaming hi-res audio.

Despite this, the max transfer speed of audio over BT is 990 kbps which isn’t enough for high-bit-rate audio.

What’s more, most smartphones default to 660 kbps and will struggle to stream hi-res audio as some data packets drop out. These missing files cause those annoying audio skips.

For devices with earlier Bt versions (3.0 or earlier), the bandwidth may be inadequate for a stable connection.

It’s unnecessary to stream hi-res audio (CD quality) over Bluetooth as it will constantly skip due to limited bandwidth.

Clutter at the audio source

If your Bluetooth device is simultaneously trying to connect multiple devices, issues may arise.

Turn Bluetooth OFF on devices you are not.

How to fix choppy Bluetooth audio

1. Restart your Bluetooth devices

Sometimes simply unpairing and pairing your source and speaker can resolve audio stuttering issues. This ensures that devices are paired correctly.

Also, try connecting different Bluetooth devices to see if the choppy audio goes away. It will also help to pinpoint the source of the problem.

2. Clear the Bluetooth cache

Clearing the Bluetooth cache will clear any corruption that causes your audio to skip.

You can also reset the Bluetooth on your speakers/earbuds/headphones by pressing and holding the power button.

Most speakers have an LED that flashes to let you know the device has been reset. An app may also be available to reset your device.

On Windows devices, ensure Bluetooth Support Service is working smoothly. If not restart the service.

3. Get the devices within range

Check your paired devices’ effective range to find the sweet spot for a stable connection.

Since obstructions can interfere with Bluetooth signals, ensure there is a clear line of sight between the transmitter and receiver.

Stay away from electrical wiring and areas crowded with RF signals at the 2.4 GHz band to reduce interference. Also, cross-body interference can be reduced by moving your phone/player to a different position.

Removing barriers between the transmitter and the receiver makes the signal stronger and may fix crackling audio.

4. Match Bluetooth profiles

For paired devices to work seamlessly, their Bluetooth profiles should be compatible.

Audio devices mainly use Advanced Audio Distribution Profile (A2DP) and Handsfree Profiles. If the profiles don’t match, you will experience choppy audio.

Reconfiguring Bluetooth profiles is difficult but the manufacturer may do it through a firmware update.   

A mismatch can also occur if the BT receiver and transmitter use different Bluetooth versions such as pairing a phone with Bluetooth 2.1 with Bluetooth 5.0 headphones.

5. Update the Bluetooth firmware

A simple firmware update can get rid of choppy audio as patched bugs in some Bluetooth managers may affect your connection.

On Windows devices, update Bluetooth and audio drivers.

Some playback devices may have available firmware updates to fix bugs in the module. Check if there are any updates available online or by contacting customer care.

6. Change the Wi-Fi channel

As mentioned earlier, Wi-Fi and Bluetooth use the same 2.4 GHz, frequency band. However, some routers support more than one channel at the 2.4 or 5 GHz band.

To change the channel, log in to your router’s interface using its IP address. The user manual or online manual should have instructions on how you can access and change your channel.

Ensure you select the channel with the least traffic as a crowded channel makes your Wi-Fi slower.

7. Uninstall WIDCOMM on Windows

Some users have expressed that uninstalling WIDCOMM on their Windows devices seemed to resolve to stutter.

To uninstall WIDCOMM hit the Windows button- Device manager- View- Show hidden devices- and Expand Bluetooth tab to find the WIDCOMM protocol.

Uninstalling the RFCOMM Bluetooth protocol or disabling Windows Sonic also seems to do the trick for others.

Try this and see if it works for you.

To Sum Up

If nothing above or online resolves your issue, contact customer care or get your device checked by a professional for any possible Bluetooth hardware or software issues.

I would also recommend using devices from the same brands as some have developed proprietary technology that works best for the devices. This is usually done for refinement to ensure the audio experience is smooth.

It may also be time to get a new set of cans or earbuds if the ones you currently own feel outed.

1080p vs 1440p vs 4k: Which is better?

1080p vs 1440p vs 4k

Resolution is the measure of the number of pixels on a given display. This gives you figures such as 1080p, 1440p, 4K, and so on.

A 1080p display (1920 by 1080) has 2,073,600 pixels, a 1440p display (2560 by 1440) has 3,686,400 pixels and a 4K display (3840 by 2160) has 8,294,400 pixels. This is a 44% pixel count difference between 1080p and 1440p, a 4x difference between 1080p and 4k, and a 2.25x difference between 1440p and 4K.

With each increase in the number of pixels, the clarity, and detail level increases depending on the screen size and aspect ratio. You will only have a noticeable difference when using a bigger display.

Although you should not base your buying decisions based on resolution alone, it’s essential to understand their differences by reading this comparison guide.

1080p, 1440p & 4k- An overview

1080p

In 1080p resolution or 1920 by 1080 pixels, the 1080 height pixels are used to represent this resolution on a display with an aspect ratio of 16:9.

This resolution is also known as Full HD, FHD, or Full High Definition and is most commonly found on TVs, projectors, and computer monitors.

Full HD displays have double pixel count as 720p devices. 1080p is now considered the standard HD resolution. Unless you are on a limited budget, getting a 1080p monitor, projector, or TV may not be the best idea as display tech rapidly improves.

1440p

1440p or 2560 by 1440 pixels is also known as QHD, Quad High Definition, or WQHD.

This resolution is mainly found on computer monitors and laptop screens and is considered the sweet spot between 1080p and 4k. 1440p is mostly used for pc gaming but can also be found in gaming consoles such as the Xbox One S and PS4 pro.

If your budget is limited for a high-quality 4K monitor, a 1440p monitor or laptop should be your next logical alternative.

4K resolution

Usually, 4K is used to represent 3840 by 2160 pixels (UHD/Ultra High definition) and is the most common 4K resolution on displays found in today’s market. However, it can also be used on displays with 4096 by 2160 resolution (True 4K/Cinema 4K) and is 256 pixels wider which adds up to a 13% difference.

UHD can be found on TVs, projectors, monitors, and laptops while True 4K is mainly found on projectors, especially those used in cinemas.

Now would be a great time to make a switch to 4K as it has become increasingly popular with more content being released in 4K. The release of the PS5 and Xbox X consoles capable of up to 8K have popularized 4K gaming.

1080p-vs-1440p-vs-4K-resolution
1080p vs 1440p vs 4K

1080p/1440p vs 1080i/1440i

The difference between 1080p and 1080i or 1440p and 1440i is the “P” which stands for progressive and the “I” for interlaced. Both of them have the same resolution but it comes down to how the image is displayed.

On an interlaced display, the images are displayed by rapidly switching back and forth between odd and even pixels while progressive displays scan and draw each pixel multiple times a second.

Progressive displays produce more stable and higher-quality images when compared to interlaced displays that are prone to flickering.

How to choose

There are several things such as budget and viewing habits you should consider when choosing a display device. Don’t base your buying decisions on resolution alone.

Although each resolution has its benefits and drawbacks, a higher pixel count doesn’t always mean better. With an increase in resolution, more power is drawn by the display to create images at the same frame rate.

But here is what to consider before making a purchase;

1.      Screen size and pixel density

Having more pixels on a display will not make a huge difference if the screen is small. Screen size affects pixel density, PPI (pixel per inch), or DPI (dots per inch).

An example of this would be a 27” 1440p monitor with a pixel density of 108 which when compared to a similar-sized 1080p monitor with a PPI of 81, will be clearer and more detailed.

With a 27-inch 4K monitor, the PPI is 163 which is more detailed but can be overkill at this viewing distance and screen size. This is due to our eye limitations. To take advantage of a 4K resolution, a larger monitor will give you a better experience.

Real estate is another important consideration at different screen sizes. The higher the resolution, the more space you will have to work with on a monitor.

When comparing our 27-inch 4K monitor to a similar-sized 1080p monitor, the 4K display will have 4 times the space to work with. Multitasking will be much easier as you can fit more windows in the space.

However, the downside is that at 27 inches, more real estate will diminish the value size of your content and can make text virtually unreadable at some points. You can scale your values for better readability in your display settings.

It’s important to strike a balance between resolution and screen size, especially for monitors and TVs.

2.      Refresh rate

Refresh rate denoted as Hz (hertz) is the number of times an image is regenerated on screen per second. For example, with a 144Hz refresh rate, the image is regenerated 144 times a second.

When combined with a proper resolution, a higher refresh rate will give you a smoother experience, especially as a gamer.

Although the refreshing happens so fast at all refresh rates, our eyes are good at picking up significant jumps in refresh rates (eg 60 to 120 Hz), especially for high FPS games such as Rocket League.

So how does refresh rate affect resolution?

Increasing resolution tends to lower refresh rates. This means that you can find a reasonably priced 1440p display with a higher refresh rate such as 144Hz but a costlier 4K display with a refresh rate of 60Hz at 4K.

Using a UHD monitor with a low refresh rate will not be great if you are experiencing stutter causing you to miss shots. You would rather get a 1440p monitor at 144Hz.

However, it also comes down to what you use the display for. For example, for movies, a higher resolution will be better than a high refresh rate since movies are usually made at 24 or 30 FPS (frames per second).

3.      Display device use

Whether you are a competitive eSport gamer, a graphic/motion designer, or a movie buff, you will need a display with a resolution and refresh rate tailored to your needs.

To a non-competitive gamer that mainly plays games such as Rise of the Tomb Raider for fun, a 4K monitor will be more important than a 240Hz refresh rate. Here the visuals and color accuracy will matter more than the refresh rate. The same applies to a movie lover or a graphic designer.

However, for a competitive gamer where each microsecond matters, a 240Hz monitor at 1440p will be better than 60 Hz at 4K.

4.      Your Budget (cost)

Budget is the biggest determinant when it comes to choosing between 1080p, 1440p, or 4K displays.

Balancing cost with value is crucial while trying to keep up with display tech. You will not only need to look at the resolution and refresh rate but other features such as build quality. However, it is important to note that higher-resolution displays have gotten increasingly affordable.

With that said, I would recommend getting a display with a 4K resolution, especially for TVs or projectors, and at least 1440p for a monitor if you are within budget (all factors considered).

For a monitor with a higher resolution (4k), a more powerful graphics card, CPU, and power supply unit will be required increasing the overall cost.

Which is better?

Depending on what you plan to do, your personal preference, and most importantly your budget, ensuring that you get the right display for your needs will be of utmost importance.

Not one resolution can be a fit-all for everyone, but there are different products with varying qualities to meet your needs. Using this guide as a start, you can start your journey in search of the “perfect display” for you.

Convert wired speakers to wireless (Simple DIY Guide)

How to Make regular speakers wireless

Wired connections are reliable for audio signal transmissions but you may be compelled to look for a wireless solution to remove the constraints of physical interconnects. Usually, this is done using a wireless RF (radio frequency) speaker kit.

A wireless speaker kit consists of an audio transmitter (TX) for connection to an AVR and an RF receiver (RX) connected to a stereo amp or pair of speakers. With this kit, audio signals are transmitted using RF signals on a specific channel in the 2.4 or 5 GHz band.

Additionally, a Bluetooth transceiver (Bluetooth adapter) can add Bluetooth streaming capabilities to an older receiver.

But as you will see below, there are drawbacks to using a wireless kit, especially if it’s not of the right quality.

How wireless speaker kits work

RF speaker kits use frequency-modulated electromagnetic waves to extend your speaker connection into the wireless domain. The emitted waves contain the audio signals that are blended (modulated) into an RF carrier signal of a higher frequency by the transmitter.

Modulated signals have propagation characteristics and can overcome physical obstructions such as walls and furniture to transmit audio over long distances.

These waves are emitted by the transmitter’s antenna that resonates at the 2.4 or 5 GHz frequency band for signal propagation wirelessly at the speed of light.

The transmitter may feature RCA and/or aux audio inputs for connection to an AVR’s line-level outputs (left and right preouts). This can also be done with a Y-spit cable (RCA to aux) or speaker cables for units with speaker-level inputs.

When paired at the same frequency channel, the modulated signals are sent to an RF receiver. Here, the audio-bearing signals are extracted from the carrier wave into usable line-level signals. This is known as demodulation.

Using RCA outputs, the signals are sent to an external amp or powered speakers for playback.

Some RF receivers have onboard amps and can output powered audio signals to a set of passive speakers, usually at no more than 80 watts per channel.

Most powered RF receiver units output 30 to 50 watts per channel, just enough to power a set of speakers at reasonable sound pressure levels.

How-wireless-speaker-kits-work,-infographic
How-wireless-speaker-kits-work

Pros and cons of wireless speaker kits

Pros;

One advantage of an RF speaker kit is that it does not require a clear line of sight between the TX and RX units for operations.

This is because these signals can pass through obstacles such as furniture, walls, or our bodies with ease. You can have the transmitter and receiver in different adjacent rooms.

However, an obstructed line of sight between the units attenuates the signal to some degree lowering the practical transmission range. Some obstacles can cause significant attenuation of the signals.

Always try to keep a clear line of sight between the RF transmitter and receiver.

Cons;

This is not a perfect solution as it is prone to electromagnetic interference (EMI). These are electrical signals that interfere with the wireless transmission introducing errors which manifested in the sound as artifacts, drop-offs, or cutting out of the connection.

The interference can be self-generated in case of a poor circuit design or come from an external source.

There are several home appliances that generate interference such as routers, baby monitors, a microwave, fluorescent lights, and so on. Usually, the biggest culprits are RF devices that operate within the same frequency band as the kit such as Wi-Fi, Zigbee, or Bluetooth devices.

It’s important the Wi-Fi and transmitter frequency channels don’t match. Also, avoid placing any RF devices close to the wireless units.

Additionally, these kits don’t make your setup fully wireless but reduce the number of wire runs. Strategically placed power outlets will be required to power the RF and amp units.

Latency is another big concern with these kits and can delay the audio by several milliseconds can causing lip-sync errors.

Steps to make wired speakers wireless

In most cases, a wireless speaker kit will only transmit stereo signals (2 audio channels) to a pair of surround speakers. This is can be the side and rear surrounds. The front speakers are usually close enough to the receiver for a wired connection.

Nonetheless, here are simple steps for the conversion;

  1. Buy a wireless conversion kit
  2. Connect the transmitter to an audio and power source
  3. Connect and power the RF receiver
  4. Pair the RF transmitter to the receiver

1.      Buy a Wireless speaker conversion kit

When looking for a wireless speaker conversion kit, here are several things to consider;

  • Supported channels and frequency range
  • Inputs and outputs
  • The range
  • Latency/delay
  • Amplification
  • Cost

Frequency range and audio channels;

Check to ensure the speaker kit can transmit full-range audio signals between 20 Hz and 20 kHz +-3dB at CD quality. CD quality is 16-bit, 44.1kHz, or 24-bit/48 kHz.

Most units will support stereo audio (2 channels) for use by two speakers. Others may support an extra subwoofer (LFE) channel.

To make 2 pairs of speakers wireless, you need 2 wireless speaker kits.

It’s also an added advantage to have a kit that allows you to change the frequency channel or that supports frequency hopping during transmission to keep interference at bay.

Inputs and outputs;

Below are some of the inputs and outputs you can expect on the units;

  • A DC input– For connection to a power source.
  • Left and Right line-in inputs (L/R on transmitter)– For connection to the Left and right preamp outputs.
  • Left and Right line-level outputs (L/R on the receiver)- For connection to an external amp or powered speakers.
  • Subwoofer in and out (LFE)– To make the active subwoofer wireless.
  • Speaker level inputs (L/R speaker in)– For connection to the left and right speaker outputs on a receiver.
  • Speaker level outputs (L/R speaker out)– Found on kits with built-in amplifiers for connection to a pair of passive speakers.
  • Aux in (3.5 mm)– For connection to a 3.5 mm cable.

Depending on the port selection on your audio sink (AV receiver), get a unit with compatible input for a reliable connection.

Range;

On average, most speaker kits will have a range of around 70 feet (21 meters) with a direct line of sight. This is adequate for most home theater or media rooms.

The range reduces if the propagated signals encounter obstructions which attenuates them.

A higher range is required for speakers that are to be placed far from the source. The range rating can be 70 ft up to 300 ft on the higher performance units.

Latency;

All wireless speaker kits introduce some delay during transmission. It’s crucial that the latency is low to prevent the audio from being significantly delayed.

A latency rating of 15 milliseconds or lower would be ideal.

Amplification;

Most speaker kits have line-level outputs and lack built-in amplifiers. These will external amplification to power the speakers. If you have an old receiver with line-level inputs, it can be repurposed as a power amp.

However, some RF kits have powered outputs that can be fed to a pair of passive speakers.

Ensure the amps are powerful enough for the speakers’ load. The output should also be powerful enough for your speakers depending on the impedance. 70 watts/channel will be better than 30 watts/channel.

wireless-speaker-kit-with-an-onboard-amplifier
Wireless-speaker-kit-with-an-onboard-amplifier

Cost;

On average, a high-quality wireless speaker kit will cost around $180 with a midrange price of around $150.

Kits with onboard stereo amps and better build will cost more.

2.      Connect the transmitter to a power and audio source

The transmitter will have a DC input (usually ~5V) for connection to an external power source with the provided power cable and adapter.

The audio connection will depend on the AVRs and transmitters’ port selection. For a receiver with RCA preouts and a transmitter with RCA inputs, use RCA cables for the respective left and right connections. You may be required to “amp assign” the speaker channels on some receivers for them to be recognized.

For transmitters with one 3.5 mm auxiliary input, use a Y-split RCA to aux cable/adapter to complete the connection. This input can also be fed by an audio source with a 3.5 mm pinout.

For a transmitter with speaker level input (speaker level in), use speaker wires to feed them from the respective AVR outputs. Ensure you match the polarity by connecting the +tive to +tive and -tive to -tive terminal.

You might also be required to attach an antenna to the transmitter and receiver if they are not pre-attached.

How to Make regular speakers wireless
The connection between a 2-channel wireless RF receiver and 2 speakers

3.      Connect and power the RF receiver

Most RF receivers have RCA line-level preouts that feed an amp or powered speakers. The left and right outputs go to the respective left and right inputs.

From an external amp or a receiver with a built-in amplifier, use speaker wires to feed to a pair of passive speakers. Ensuring the polarities are matched, (+tive to +tive and -tive to -tive terminals).

The receiver will also have a DC power input and an LED indicator that will light once the device is powered.

4.      Pair the RF transmitter to the receiver

The transmitter and receiver need to be paired to make the transmission possible.

Usually, the transmitter and receiver have solid color LEDs that light red when the units are powered and blue when paired.

To pair the wireless units, press and hold the connect/pair button on the transmitter for 2 seconds. The blue LED will flash indicating the transmitter is ready for a connection (standby mode). Do the same for the receiver unit within 30 seconds.

Rapid blinking of the LED will indicate that the connection process is ongoing but should last no more than 30 seconds.

After connection, play a test soundtrack to ensure each of the connected speaker’s outputs. You will also need to recalibrate your receiver for even output across all channels.

If any of the units is unresponsive it may be faulty.

How to make a subwoofer wireless

The wireless subwoofer conversion process is similar to the speaker conversion. But in this case, a subwoofer (LFE) input and output are required.

The input is fed by the AVR’s sub-output while the output feeds the RCA input on an active subwoofer or amp that powers a passive sub.

The wireless unit may have stereo support with one of the channels doubling as a subwoofer channel.

How to add Bluetooth to a receiver

A Bluetooth adapter (transceiver) mainly adds streaming capabilities to an older preamp or AV receiver. This will not be necessary for a processor with Bluetooth support.

The transceiver combines a transmitter and a receiver. Some adapters are only transmitters or receivers.

In the case of the receiver, the adapter serves to stream audio from a Bluetooth source such as your phone. The source acts as the modulator and transmits audio signals to the adapter for demodulation to extract audio signals that feed the audio sink.

For Bluetooth transmissions from the processor, the transmitter is connected to the AVR’s audio output. This is a useful feature for connecting to wireless headphones or speakers.

Adapters with support for the latest Bluetooth technologies such as aptX and Bluetooth 5.0 offer more bandwidth at higher speeds.

To recap

Using a wireless speaker kit is not the perfect solution to making a speaker and/or subwoofer wireless. However, in some instances, it may be a great option.

As the technology improves, it may become possible to add wireless capabilities with more versatility,

But all factors considered a wired connection is will triumph over a wireless one any day.

If you have any questions or concerns, feel free to air them in the comment section below. Thanks.

Projector image flickering (Causes & Fixes)

Flickering projector

Image flickering is the visible change of a projector’s brightness as it goes through its refresh cycles. This is a common problem on DLP projectors that use bulbs that wear out with use.

A projector may flicker for various reasons that include;

  • Unstable power supply
  • The bulb reaching its end cycle
  • Dust builds up on the color wheel
  • A low refresh rate
  • Resolution issues

If this is a problem you have experienced, here’s how to diagnose it.

1. Unstable power supply

When using eco-mode on your projector, less voltage is applied to the lamp causing the image to flicker. This is because the photons don’t get enough power to keep them excited.

If using eco mode is causing your projector to flicker, switch to a different mode and use it for a couple of hours to see if the issue is resolved.

2. A dying projector bulb

Most bulbs are built to withstand between 1,500 and 3,000 hours of use with some lasting for as many as 30,000 hours.

With continuous use, the anode and cathode on the projector’s bulb wear out. Also, the bulb may develop defects due to poor power supply filtering or issues with the magnetic field required for bulb operations. These defects may be expressed as flickering.

Usually, this is a sign of a dying lamp.

Most projectors have a red/yellow indicator that flashes when the bulb is dying. Physical damage or burns may also be visible.

Granted, you can check if a projector has reached or exceeded its life expectancy in the menu under the lamp life option.

If your projector is under warranty, the manufacturer should replace the lamp for you.

Consequently, if you are out of warranty, can get a replacement lamp, and are technically skilled, you could replace it yourself. The lamp consists of a bulb and plastic housing to hold it in place.

How to replace a projector bulb

  • Purchase a compatible OEM or OEM equivalent lamp. An OEM equivalent uses an original bulb with generic housing.
  • Before disassembling the projector, unplug it from the power source and let it cool off.
  • Locate the lamp compartment using your user manual or online guides.
  • Unscrew the compartment cover to reveal the screw holding the lamp.
  • Use a soft non-abrasive cloth to gently lift the lamp, unplug the cables that run to it and place it to the side.
  • Clean the compartment using a microfiber cloth to get rid of dust and dirt.
  • Put the replacement lamp into the compartment in the correct orientation and re-connect the cables before you lodge it back in.
  • Screw the lamp and compartment cover to the projector and reset the lamp timer to zero.

If the bulb was the root of the problem, lamp replacement should solve the problem.

projector bulb
A projector bulb

3. Ground loops

Flickering on a projector can be a visual symptom of signal noise in the ground circuit (ground loop).

Ground loops occur when there is more than one conductive path between the ground terminals of the projector and other equipment forming a close conductive loop. This could be a loop between your source and the projector.

You can use a cheater plug (2-prong) to bypass the projector’s ground to see if the flicker goes away. This is a temporary solution that should only be used for troubleshooting.

By connecting your projector and your source (receiver, Blu-ray player, etc) to a single ground point. You could do this by connecting your AV equipment to a single outlet using a surge protector power strip.

4. Loose connections

If you are experiencing flickering, you should ensure that you have no loose video or power connections.

A faulty cable may also cause issues for you. In this case, swap out the video cable.

I would also recommend using a high-speed HDMI cable (if possible) for the projector other than VGA or DVI cable.

5. Faulty video source

A problem with the video source could cause a projector to flicker. This could be a fault with the source’s power supply unit or video card.

Flickering could also occur if there is a mismatch of video formats between the source and the projector. For example, if the output on your source is WXGA select WXGA on your projector’s menu options.

Why is my projector noisy? Projector noise reduction tips

Noisy projector solutions

One of the biggest challenges projector owners face is fan noises. These are mainly caused by the need to cool projector lamps prone to overheating. This can be a bigger problem, especially if you are using an older projector.

Newer and high-end projectors have better cooling mechanisms and can dissipate heat better and are less noisy.

That aside, there are several reasons why your projector may be so noisy;

  • Poor ventilation and placement
  • Low-quality projector
  • Faulty cooling fan
  • Using your projector for extended periods
  • Dust build-up in the projector’s cooling channel and fan
  • Using high power settings on the projector
  • Loud projector iris clicking noises

Causes of a noisy projector

1.      Poor placement and ventilation

Both poor ventilation and poor placement are the two most common culprits of a noisy projector.

Projectors need to be well ventilated to pull in cold air and push out hot air for cooling the internals and general temperature regulation within the projector. If the airflow is blocked by any means, the fans have to spin much faster for cooling, especially where the lamp is concerned.

If you can correctly place/mount your projector, you will tremendously improve the airflow and reduce fan noise.

When placing your projector, ensure that it is not too close to you as fans have to run faster at some point. The closer the projector is to you, the louder the noises will be.

2.     Use of a low-quality projector

High-end projectors are well built and are more efficient at cooling their internals and are significantly quieter.

The same cannot be said for most entry-level and mid-range projectors that are prone to overheating due to compromises made to save on cost during manufacturing.

However, it is worth noting that high-end super-silent projectors are way costlier.

3.      Faulty cooling fans

A faulty or worn-out fan can be causing issues with overheating which makes it inefficient at cooling resulting in it having to run at high RPMs.

Faulty fans can also vibrate as they run to suck the air out.

4.      Using your projector for extended periods

Are you using your projector for long hours on end? If yes, then this may be the reason it is noisy due to overheating.

This commonly happens when you have taken a day or two off and decide to binge-watch your favorite show or some Blu-ray movies you had in store. As you do this, the internal components heat up and the fans get louder with time.

Cut back on the number of hours that you use the projector and turn it off when not using it or in between breaks to allow it to cool off.

5.      Dust and oil build-up in the fans and cooling channels

Most home theater projector users do not clean their projector’s filters and fans. Because of this, dust and airborne fibers accumulate within the projector impacting airflow and temperature regulation.

The fans thus have to work harder to let cold air and hot air out.

This not only makes the projector louder but can also damage the circuitry and other components with increased heat retention.

6.      High-power settings

There are several image and power settings that can be used on a projector. These settings and modes include brightness, image modes such as dynamic and cinema, and power-saving modes such as eco mode.

Depending on which mode or setting is in use, the projector may need to draw more power. Most of this power is converted into heat hence the need for more heat dissipation making the fans run faster and louder.

Tweaking the setting and using lower settings may slightly reduce the image quality and brightness but it will go a long way in reducing fan noises as the projector does not heat up as quickly.

7.      Loud iris clicking noises

The fan is not always responsible for projector noises, the iris can also be the root of the problem. This is because it has to shift when in use producing audible clicking noises.

Some projectors will have the option of enabling the iris to run at normal or high speeds but others will only have the option of turning auto-iris on or off.

If you can get your home theater or media room dark enough for better black levels on the projected image, I would recommend turning the auto iris off to reduce any noise that may be coming from it having to shift. But as a general recommendation, you are probably better off with auto iris off.

Projector noise reduction solutions & tips

1.      Improve air circulation

Mount or place your projector without blocking the projector’s air vents. This will allow the projector to “breathe” better for more efficient temperature regulation and quieter operation.

A great way to achieve this is ceiling mounting the projector away from the wall and with separation from the ceiling.

If ceiling mounting is not an option for you, you can place it on a hard and firm surface with enough clearance to the top of the projector. You can also turn the projector upside down if the fans are located at the bottom and if the top of the projector is sturdy enough to hold its weight after which you can then flip the image.

Avoid placing the projector in a closed space as the fans will have trouble sucking air in and out.

The room where the projector is placed should also be reasonably cooled or air-conditioned. This will help reduce stress on the internal temperature regulation mechanism for the fans to run smoothly.

2.      Clean & dust your projector

For better temperature regulation you will need to regularly clean and clear the air vents, air filters, and fans of any dust or dirt. The area around the projector will also need to be cleaned regularly as the dirt can easily get from the surroundings to the projector.

Cleaning the vent and the area surrounding the projector will be easy as you can dust or use a damp cloth to wipe clean but the fans and air filter will not be as straightforward.

Here is how you can clean the air filter;

  • Turn off your projector, allow it to cool, and unplug the projector from the power outlet.
  • Open the panel covering the air filter by sliding the latch.
  • Pull the air filters out to remove them.
  • Dust the air filters by gently taping it about 5 times on a clean surface or dust using a soft brush.
  • Vacuum the filters to get rid of any dust that may be remaining using compressed air or an air blower.
  • Clean the air filter cover.
  • Gently push the filter back in place into the projector.
  • Reattach the cover.

You may need to replace the air filter if it is damaged or too difficult to clean. Also, ensure that the air filter does not come into contact with water.

How to clean the projector fans;

Cleaning the fans may be a bit tricky since it will involve opening up the projector which may also make you lose your warranty. But if you intend to clean the fans here is how to do it;

  • Power off and disconnect the projector from the power source.
  • Unscrew the bottom or top panel depending on the projector you are using ensuring that you carefully disconnect any cable that may be attached to the keypads on the covers.
  • Unplug the power supply and carefully slide it out and place it to the side safely.
  • Unscrew the fan housing and slide out the fan disconnecting it from the control board on the projector.
  • Blow the fan using an air blower or compressed air.
  • Dust the interior of the projector using a soft brush and gently blow the dust out.
  • Reconnect the fan to the board before screwing it in.
  • Reattach the power supply and reconnect the 3 plugs.
  • Screw the covering panel back on the projector. Ensure that you reconnect any cables that you may have disconnected in the beginning.

This process may differ slightly depending on the model of the projector you are using. So, you should use the user manual or online videos/manual to guide you on how you can remove the fan for vacuuming.

3.      Replace the fan

If the fan is damaged or worn out, you can get a professional to replace it or you can replace it yourself. This will also apply to a low-cost projector whose fan may not be as good and efficient in heat dissipation.

  • You should get a high-quality fan that can fit into your projector’s fan housing and one that can blow out large amounts of hot air. This will cost you around $40.
  • After that, you can remove the old fan using the steps I used above for fan cleaning or by using the user manual.
  • Cut the connectors from both the old and new fans and strip the wire that goes to the new fan. Also, ensure that you leave about 1 inch or more of wire on the old fan’s connector.
  • Solder the connector from the old fan to the new fan.
  • The connection may differ depending on the fan you buy with the black wire on the fan being soldered to the black wire that goes to the connector (gnd) and the red wire on the connector should be connected to the red or yellow wire on the new fan for the 12 volt-power.
  • Apply insulating tape to the point of connection before installing the new fan.
  • When installing the fan, ensure that you place it correctly to suck the air out. Reconnect the fan to the board.
  • Before screwing in the projector cover, test to see if the fans are working fine.

4.      Proper placement

You will be able to greatly reduce the noises reaching you to a few decibels the farther it is from you.

However, you may be limited to how much space you can have between you and your projector as you may be limited by the space in the home theater room size and because you need the projector to face the projection surface.

If that is the case, you can also place your projector on a high-quality cooling pad to remove some of the cooling stress from the fans.

Hush box for projector

Placing your projector in any closed space including a hush box may reduce noise but will impede temperature regulation and performance.

This is because most hot air will be retained inside the box and this will do significant damage to the internal components.

However, if putting your projector inside a box is the best solution to silencing it, you should do it with air circulation in mind.

You can get better air circulation by leaving enough clearance inside the box and using fans. Dual fans will do a better job sucking air in and out.

Cut a hole at the rear-bottom of the hush box and at the front top to fit the dual fans. This is because hot air is less dense and will rise to the top of the box allowing the fan to suck the air out more effectively.

You should also remember to cut a hole in the projector’s lens. From there you can screw in the box on your wall or to a ceiling mount strong enough to hold its weight.

I would recommend getting the AC infinity Airplate cooling fans as they also come with a thermostat regulator that allows you to set the temperature at which you want the external fans to kick in and will also allow you to monitor the temperature within the box. This fan kit will cost you between $70 and $120.

With a well-built box with proper and efficient air circulation, you will not only reduce projector noises but will also reduce stress on the projector’s fan.

Final take

Using the tips I laid out to you above you should be able to make your projector much quieter.

However, if the noises sound like they are coming from other parts other than the fan and you have auto iris turned off, get the projector checked out.

Also, if you are using an old and loud projector, you should probably start saving up for a better and quieter one.

However, it is worth noting that high-end projectors that are advertised as super-quiet can cost thousands of dollars. You do not need to invest in a super quiet projector as the noise levels are usually around 30db even for mid-range projectors which can be reduced further through proper ventilation.