When installing a surround sound speaker system there are 2 options common with most people, 5.1 or 7.1. However, there is no clear-cut winner between 5.1 or 7.1 setups as it depends on preference and other factors that may come into play.
The difference between a 5.1 and a 7.1 surround speaker system is the number of speakers in the home theater. A 5.1 surround has 6 channels, 5 speakers, and one or subwoofers (LFE channel) while a 7.1 setup has 8 channels consisting of 7 speakers and one or more subs. Simply put, a 7.1 surround is a 5.1 surround speaker set up with 2 extra speakers for the rear surround.
When choosing between a 5.1 vs 7.1 setups, there are 3 main factors to consider.
3 factors to consider when choosing between a 5.1 or 7.1 surround
- The size of your room– Bigger home theater rooms (typically, more than 350 ft²) needs more speakers to fill up the extra space. However, having many speakers in a smaller room (less than 350 ft²) will not only make the sound louder but also muddy.
- Your listening position– It would make sense to put the 2 extra back surround speakers if you have a lot of space behind your listening position. However, if your seating position is close to the back wall a 7.1 setup would not be of much use.
- Budget– It goes without saying that a 7.1 surround will be costlier than a 5.1 surround for the same type and brand of speakers. High-end 5.1 speakers can cost you over $6000 and for the 2 extra high-end speakers of the same brand, it will cost you up to $1000 extra. However, there are cheaper entry-level surround speakers that run for under $1000.
5.1 vs 7.1 comparison table
| Surround setup | 5.1 | 7.1 |
| Number of channels | 6 channels (5 standard speaker channels + 1 LFE channel) | 8 channels (7 standard speaker channels + 1 LFE channel) |
| Suitability | Small to medium-sized rooms | Larger rooms |
| Cost | Cheaper | Costlier |
| Audio quality | Standard surround audio | Deeper and more precise audio |
| Formats | DTS, Dolby digital | DTS-HD Master Audio, Dolby TrueHD |
| Supported devices | Blu-rays, DVDs, Video games, HDTV | Most Blu-rays, Xbox One, PS3, PS4, PS5 |
How to set up a surround system
Setting up your surround sound speakers will involve correctly placing your speakers and fine-tuning the setting on the receiver/pre/pro to get a better and well-balanced sound.
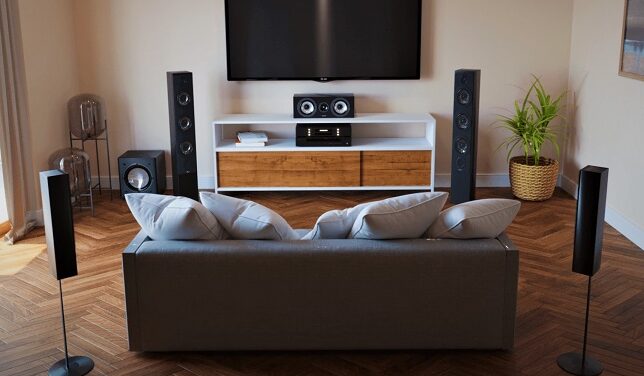
A 5.1 surround speaker system consists of a center channel speaker, 2 front speakers (left and right), 2 surround speakers (left and right), and one or more subwoofers. This is the standard surround system for most home theaters and is easier to set up.
A 7.1 surround will consist of one center speaker, 2 front speakers (left and right), 2 surround speakers (left and right), 2 back surround speakers (left and right), and 1 or more subwoofers. When set up correctly, a 7.1 surround will help fill up the backspace, add depth, and provide you with incredible audio. However, if done incorrectly, a 7.1 system will sound muffled.
You should also keep in mind that setting up a 7.1 surround is not as easy as a 5.1 system. It is also worth noting that the .1 stands for the LFE channel and not the number of subs, but most manufacturers will use it to mean the number of subwoofers. You can have more than one sub in the .1 LFE channel.
Some owners add in-ceiling or height speakers to the surround system for a fuller object-based sound. If you decide to add 2 height speakers to the system it becomes 5.1.2 or 7.1.2, if you add 4 height speakers it becomes 5.1.4 or 7.1.4, and so on.
Speaker placement
Speaker placement will make a big difference in how the system sounds. Place everything properly and you get an incredible home theater sound experience but do the opposite and the speakers will not sound as good as they should.
You don’t want to spend money, time, and effort and get a bad sounding system due to the wrong placement.
1. Center channel speaker placement
The center channel is essential for every surround speaker set up. This channel is dedicated to the reproduction of vocals and dialogue whether is it in a song, movie, or game.
When choosing the right position for this speaker, we want to create the illusion of the dialogue coming from the display device (projector screen or Tv). To accomplish this, the channel speaker should be placed in the center of the TV or Projector relative to the listening position, below or above the display.
It is recommended that the speaker is placed horizontally below the display but this will depend on the position and height of the display device. Just make sure that the center speaker is at the ear level of your main listening position.
However, if you cannot position the center speaker below the display at ear level, you can place it above the display device at an angle facing the main listening position. This is because most of the signals coming from this channel will be more directional high frequencies.
2. Front speaker placement (left and right)
Both the 7.1 and 5.1 systems will have both the left and right front speakers.
The left and right front channel speakers handle most of the sound effects in your home theater but sometimes also reproduce some of the dialogue/conversations.
When positioning the left and right speakers, they should be placed at an angle facing the main listening area. The distance from the left and right speakers to the display should be equal. The distance of these speakers to the listening position should also be equal.
These front speakers should also be placed slightly in front of the center channel line, at the sides. The front speakers should form more of an isosceles triangle with the center of the listening position.
If you can imagine an isosceles triangle, the equal sides should angle between 22 to 30 degrees off-axis from the listening position to the left and right. The other side of the triangle will be the line behind which you will place your center channel speaker. The line from the center channel to the main listening position (the axis) will divide the triangle into two right-angled triangles.
The angle is just a guideline that you can follow to find where the speakers sound best by ear. You should also make sure that the tweeters of the speakers are at ear level when you are seated. Tweeters from tower speakers will easily be at ear level but bookshelf speakers will need stands for the same.
You can also “toe-in” the speakers to point to the listening position. Toe-in is where the speakers are angled inwards pointing towards the listener but the toe-in should be identical for both speakers for a great soundstage. This is will create a more focused and narrower soundstage.
3. Surround speakers (left and right)
Surround speakers help add depth to the sound system and fill up space around you.
For the left and right surround speakers, it is recommended to place the speakers with the tweeters at 1 or 2 ft above ear level, to 90° off the sides of the main listening position, or slightly behind the listening position at an angle of 110° to 120°.
To put this into perspective, if your couch/home theater seat is against the wall, you would put the speakers at 90° off your position to the left and right for a 5.1 surround. However, if you have space behind your seating position, you can place the speakers slightly behind at an angle of 110 to 120 degrees pointing towards the listening position for both 5.1 and 7.1 surrounds.
Toe-in is also an option in this case.
4. Surround speakers (rear/back surround for a 7.1 system)
In the 7.1 surround speaker system, the rare surround speakers should be placed behind the listening position to add more depth. The back-surround speakers can be places at 135° to 150° off the axis. The tweeters should be 1 or 2 feet above the ear level.
5. Subwoofers (for the Low-Frequency Effects or LFE)
Subwoofers are designed to reproduce low-pitched frequencies/low-frequency effects lower than the speakers’ woofers are capable of generating.
Unlike the mids and the high, low bass frequencies are omnidirectional, meaning you can place the subwoofer anywhere provided it does not sound like a separate entity. However, you should avoid placing your sub near walls as this will make it sound muddy.
An active sub should also be placed close to the power source while a passive sub should be placed close to the receiver or amp. This will help minimize the length of cable that you will need to use.
What about Dipole and Bipole surround speakers?
In the surround speaker placement above I have mainly talked about “monopole speakers.”
Monopole speakers have front-facing, direct-radiating speaker drivers and these are the types of speakers most home theater owners are familiar with. The drivers in monopole speakers all face in the same direction. We have already looked at how you can best place monopole surround speakers for the best surround sound.
Bipole or dipole speakers have the cones mounted to the sides of the speaker cabinet. However, Bipole speakers work by pushing air outwards at the same time (are in phase) while in dipole speakers, one side of the speakers pulls air in and the other side pushes air outwards (out of phase).
When placing Bipole or dipole speakers, you will not have to worry about angling them. Bipole speakers can be mounted on the wall, 1 or 2 ft above the ear level in line with or slightly wider off-axis than the front left and right speakers. These speakers can also be placed at 90° to either side of the listening position. On the other hand, Dipole speakers should be placed at 90° off the axis and 1 or 2 feet above the ear level.
You have more placement flexibility with Bipole speakers than with dipole speakers.
Speaker placement guidelines and tips
- Minimize bare walls and floors for the best room acoustics.
- The speakers should have a clear path to the listening position to avoid blocking the sound waves.
- Avoid placing your speakers in corners, close to the floor, wall, or ceiling. These surfaces will reflect the sound waves creating stereo imaging, making the bass boomy and less clear.
- Put your room’s shape into consideration when you are doing speaker placement. Depending on the shape of your room you can experiment with different positions.
Home theater speaker calibration (crossover, level, and distance)
Trying to use the small receiver’s LCD display when calibrating will be a hassle. Therefore, I would recommend using the receiver’s on-screen instructions on your display device.
After connecting the receiver to the display, get familiar with the menu by looking at the user manual and pecking through the receiver’s menu. After this, you can get to the calibration.
Setting the speaker distance (speaker delay or distance)
Speaker distance or distance is the distance between the main listening position and to each speaker. Setting the speaker distance or delay is essential in making sure that the sound from each speaker reaches our ears at the same time.
- Use a tape measure to measure the distance between the speaker and the sweet spot (listening position) and note down the distance. Make sure that you measure the distance without altering the spot on your seating position where you take the measurements.
- After taking all the measurements, head on the to the receiver’s menu and locate the speaker distance/speaker delay settings.
- Enter the distance of each speaker on the menu, respectively for each speaker. The receiver will prompt you to set the distance for each speaker in increments to the nearest .5 or .1 feet.
Distance in inches/12= distance in feet.
Setting the speaker crossover
The Speaker crossover setting is the point or frequency where the speakers roll off and the subwoofer takes over with the bass notes and the low-frequency effects. The crossover settings for each speaker will depend on the ability of the speaker to produce bass.
Most manufacturers will provide you with the speaker’s frequency range, for example between 70 Hz to 20 Hz. In this case, the speaker can play low frequencies of up to 70 Hz. The general rule of thumb is to increase the cross over point by at least 10 Hz, so in our example, I would set the crossover frequency to at least 80 Hz.
Crossover frequencies are a broad topic that would be too much to cover in this guide. However, you can visit our guide to help you understand crossover frequencies better and how to set them.
Setting the speaker level
You will then need to set the level for each speaker as well as the sub by using a decibel meter (SPL meter) or by ear. I would recommend using a decibel meter that can be bought in local electronics stores, online or can be downloaded as an app. However, an app may not be as accurate as a dedicated SPL meter but will get the job done. Your receiver may also come with a calibration microphone.
Sit in your main listening position, turn the decibel meter on, set weighting to C, response to slow, and the dial at between 70 to 80 decibels.
Enable the test tone (white noise) on your receiver on the channel level menu setting to allow the receiver to send the tone to each speaker, speaker by speaker. Place the meter in front of your face pointing towards the ceiling at ear level. You can also place the SPL meter on a tripod at ear level.
Lower the master volume and make sure your room is as silent as possible.
Measure the output from each speaker and move the output level up or down. I would recommend a level of 75 decibels.
For the sub, I would set the level to match my taste but above the speakers’ level.
Once you are done setting the levels for each speaker, re-run the levels to ensure that each channel is even. Also, if you are having problems understanding the dialogue in movies, you can raise the level for the center channel by a few decibels higher than the rest of the speakers.
Finally
Once you are done with all the hard work and the sound is balanced, you can grab some popcorn, sit back, relax, and enjoy.
