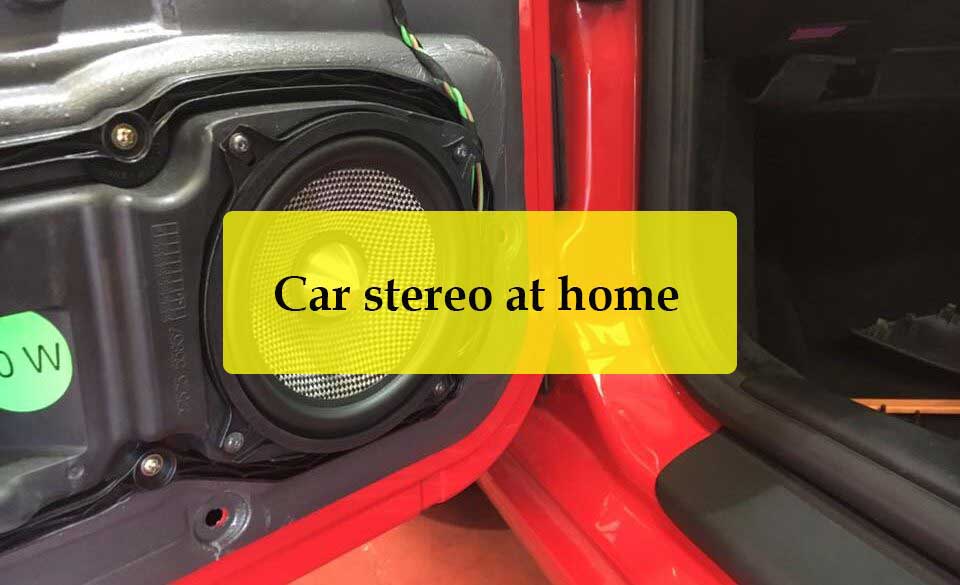
Car speakers can be used as home speakers. However, because they are driven at a lower impedance than conventional HT speakers, they are easier to drive and should be impedance-matched to your AVR/Amp. An enclosure is also required for the speaker drivers.
In theory, this should work but due to their sonic characterisctics, car speakers may fit a home setting. Nonetheless, this is still a great budget alternative for casual listening if done right.
In this guide, I will compare the differences between car and home speakers and explain how to convert car speakers for home use.
Home vs car speakers compared
Although both car and home speakers playback audio there are 2 main differences between them;
- Design
- Impedance rating/Power ratings
Our homes don’t have the same room gain effect as vehicles’ cabins (cabin gain). Thus, speakers designed for a car may not perform that well in a house/garage. This is on account of car cabins being smaller than most rooms.
Car cabins are easier to pressurize when compared to a house meaning the bass in a car is deeper. The smaller the volume, the higher the gain which boosts the perceived bass level (natural bass reinforcement).
Additionally, speaker placement in a car takes into account the seating positions which usually don’t change.
Design
Car speakers are designed to fill smaller and harsher environments with constant temperature fluctuations, moisture, and so on. Thus, quality car speaker cones are often made of polypropylene (PP) resin sheet material that is weather-resistant and has low distortion.
Meanwhile, home theater speakers are not built for rugged conditions.
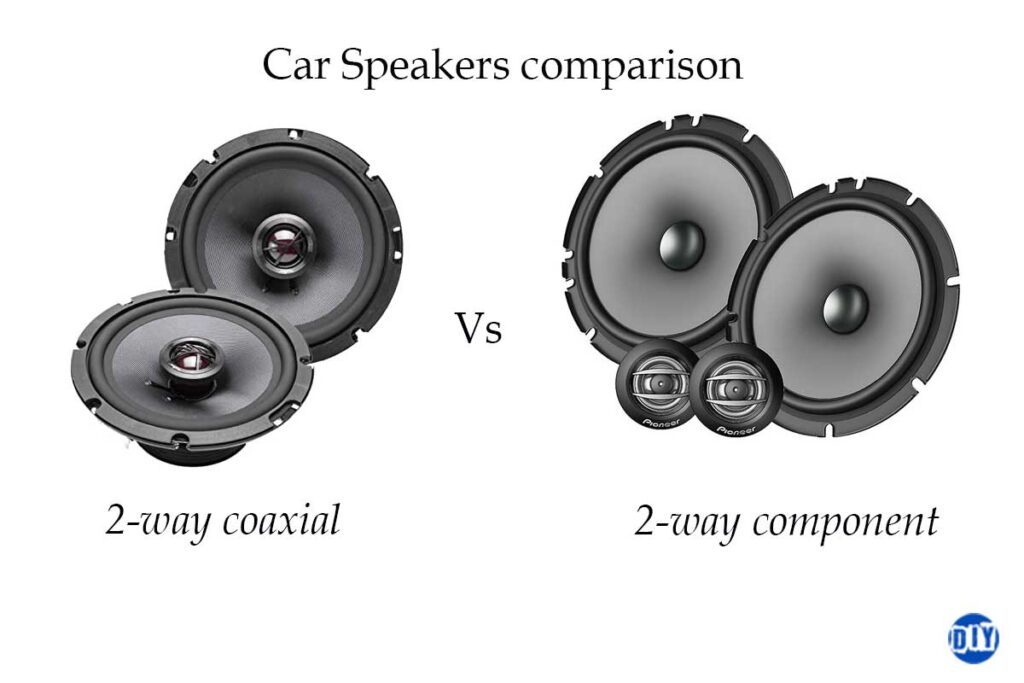
Most car speakers are coaxial/full-range speakers (2-way or 3-way). A 2-way speaker driver has both a woofer and a tweeter. 3-way drivers have a bass and midrange woofer and a tweeter.
Coaxial drivers are not ideal for home sound systems. However, some car speakers are component split and have different drivers for different frequency ranges.
Also, when using car speakers at home you may experience comb filtering which is interference and delay that occurs at the crossover point as audio signals are amplified.
Impedance
Impedance (measured in Ohms) is the resistance to current flow in a speaker circuitry.
Typically, home speakers have an impedance of 6 or 8 ohms while car speakers only handle smaller loads of around 4 ohms.
This is because a car’s battery outputs 12 to 14 volts while most home outlets output ~110 volts. Therefore, a car’s amp draws a lower voltage and outputs a higher current (amperage) hence low-impedance speakers are required.
A home theater’s amp, on the other hand, should take in a higher voltage and output a lower current. In this case, speakers with a higher impedance are required.
The speakers’ impedance should match that of an amplifier. Car stereo amps have a nominal impedance of about 4 ohms to match the speakers.
An amplifier that outputs 60 watts with 8-ohm home speakers, would need to output 80-120 watts on a 4-ohm load with car speakers for the same SPL level (“volume”).
With that in mind, let’s look at how to use car speakers at home.
How to use Car speakers at home
Car stereo systems are fairly inexpensive when compared to home audio equipment of the same quality. With a reasonable budget, you can get a decent-sounding system.
Granted, converting a car system for home use is quite technical but here are basic steps on how to do it.
- Get materials for the build.
- Impedance-match the car speakers to your receiver/amp/integrated amp.
- Get an amp for the car sub(s) and or speakers.
- Connect the amp/head unit to a home outlet.
- Wire the system.
- Buy or build a speaker cabinet/enclosure.
1. Get materials for the build
What you need;
- Car speakers and subwoofer in an enclosure
- A car amp(s)
- A +12V DC power supply unit (PSU).
- Insulation tape/Heat shrink
- Wire stripper
- Speaker wire. 12 or 16-gauge for the speakers and 12 or 14-gauge for the sub. Look for the manufacturer’s recommendations.
- A car amplifier and RCA cables.
- A Bluetooth to RCA adapter or 3.5 mm to RCA adapter
- A switch
- Spade or ring terminal
- A crimping tool
2. Match the impedance
As mentioned earlier, your speakers’ nominal impedance should match or exceed the output impedance of a receiver, integrated, or amplifier to maximize power output.
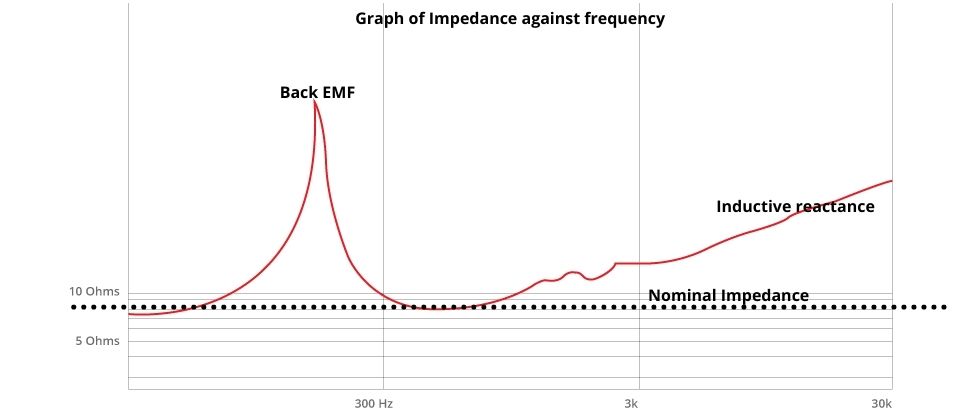
Speakers don’t have a flat impedance. The impedance value changes with the frequency and is highest at the driver’s resonant or the highest frequencies. For example, a speaker with a nominal impedance of 4 ohms could reach as high as 40 Ohms at the speaker’s resonant frequency. It could also drop to as low as 2.5 ohms.
Nominal impedance is an average of where the impedance value will mostly sit at.
Failing to match the impedance may damage your amplification gear. Alternatively, you could use a head unit with a built-in amp or a car amp rated for the speakers.
You can also match the impedance by connecting the speakers in series. For a receiver or amplifier rated for an 8-ohms load, wire two 4-ohms speakers in series for 8 ohms. To do this, use a speaker wire to connect the positive terminal on one speaker to the positive terminal on the other. Do the same for the negative terminals.
However, this may not give you the highest SPL and sound quality as speakers wired in series draw more power to reach a higher SPL.
Some receivers and integrated amps have an impedance switch to change the impedance (usually, 4 /8 ohms). This is because some home speakers are rated at 4 ohms (nominal impedance).
However, when using a pre-owned receiver, integrated, or amplifier, ensure it can power the speakers.
3. Get a car amplifier
If you are using a stereo head unit without a built-in amp, you will need an amp for the speakers and sub.
This will also apply if your current gear cannot power the speakers depending on their ratings. Most car subs are passive and will need a dedicated amp.
The amp should be powerful enough for the speakers at a lower impedance. More current is drawn as the impedance lowers.
I would recommend a class D amp for the sub and a class AB amplifier for the mids and highs. Class AB amps have better sonic characteristics (will depend) while class D amps are more efficient and cheaper.
4. Connect the car amp to a wall plug
If you are using a car amp to power your system, you will need to connect it to a power source.
Most home power outlets output ~110V AC while car amps require at least +12V DC to turn their circuitries on. You will need a way to convert the AC from your outlet to at least 12V DC. To do this you need a rectifier.
A power supply unit (PSU) is a great example of a rectifier and should be great for this.
If you have an old power supply lying around or plan on buying one, ensure it can power the amp. The PSU should sustain the amp’s current draw.
Since power=Voltage *current (V*I), the current draw will be equal to the amp’s maximum power draw divided by the voltage (power/voltage).
So, if the amp is rated at 400 watts, the PSU should output around 34 amps as 400/12 is 33.33…
This will depend on the class of amp you are using (class A/B or D). A class A/B amp is around 60% efficient meaning 40% of the power drawn is lost as heat. Meanwhile, class D amp can peak at 90% efficiency or more, thus only around 10% of the power is lost as heat.
What’s more, you should account for losses by the amp as a less efficient amp draws more power to reach the same volume level. Class AB amps draw around 1.4 times the rated power while class D amps draw 1.2 times the rated power.
To estimate the maximum power draw, simply multiply the amp power rating by 1.4 for a class AB amp and 1.2 for a class D amp. If both are rated at 400 watts, the class AB amp will draw 560 watts while the class D amp will draw around 480 watts.
From this, we can estimate the current draw by our hypothetical amps. This will be around 47 amps for the A/B amp and 40 amps for the class D amp.
Power supplies vary in rating depending on the manufacturer and type of power supply. Since power supplies usually have more than one voltage rail, we are only interested in the 12v rail.
Most modern power supplies output at least 18 amps on the 12-volt rail which should be enough for casual listening needs. High-end PSUs which are costly can output as much as 34 amps on the 12-volt rail.

How to connect a power supply for a car amp in house
Connecting a power supply to a car amplifier should be fairly easy.
Since most power supplies have several output wires, we will only work with the black and yellow on the PSU. The black wires are used for grounding while the yellow wires supply the 12 volts to the amp.
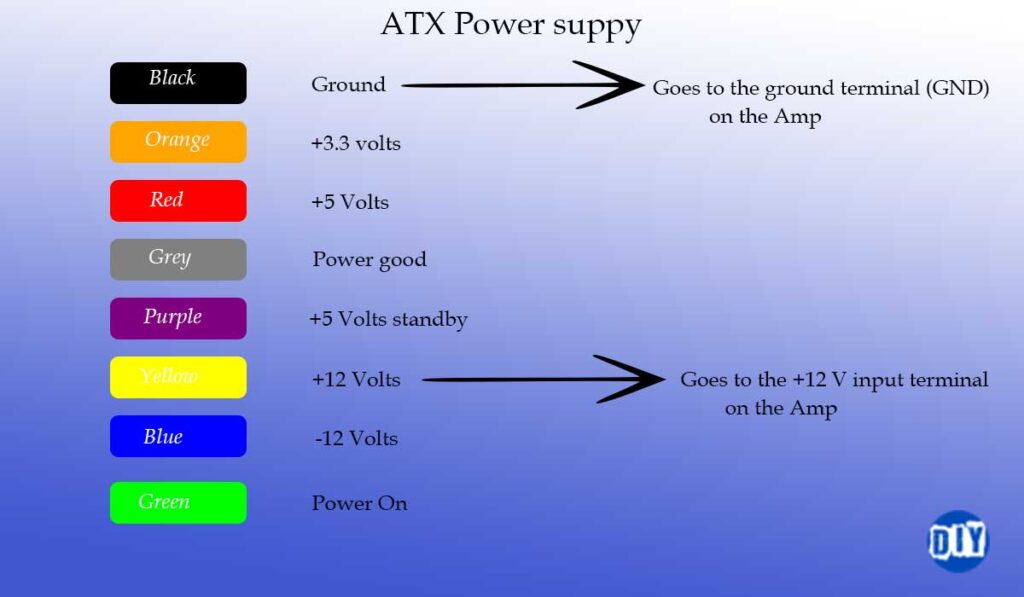
Before doing any connections, ensure the PSU is not connected to a power outlet and that its capacitors have fully discharged to prevent electrocution then follow these steps;
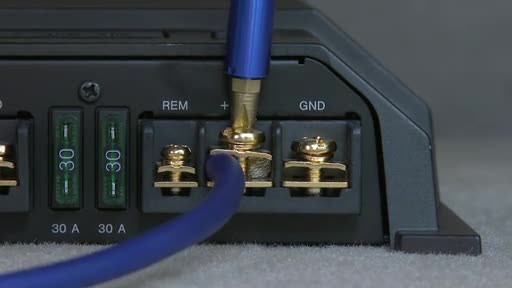
- Unsrew the REM, +12V and ground terminals on your amp.
- Strip the black wires and twist the ends together. Crimp the black wire with a spade or ring terminal. Insulate the terminal connection with insulation tape or heat shrink and hook the terminal to the GND (ground) on the amp.
- Do the same for the yellow wires and connect them to the +12V input on the amp.
- Cut a piece of 2-inch speaker wire and use it to jump the REM (Remote) and +12V terminals. This will allow the amp’s circuitry to automatically turn on when it detects a 12-volt+ input from the power supply.
- You also have the option of wiring a switch between the REM and +12V terminals.
- Plug in the PSU to the power outlet to see if the amp turns on.
X-box power brick for car stereo
As with any power supply, keep in mind the amount of current (amperes/amps) drawn by your amplifier. An X-box power brick will supply around 16 amps.
However, for casual listening, an X-box power supply should power your system.
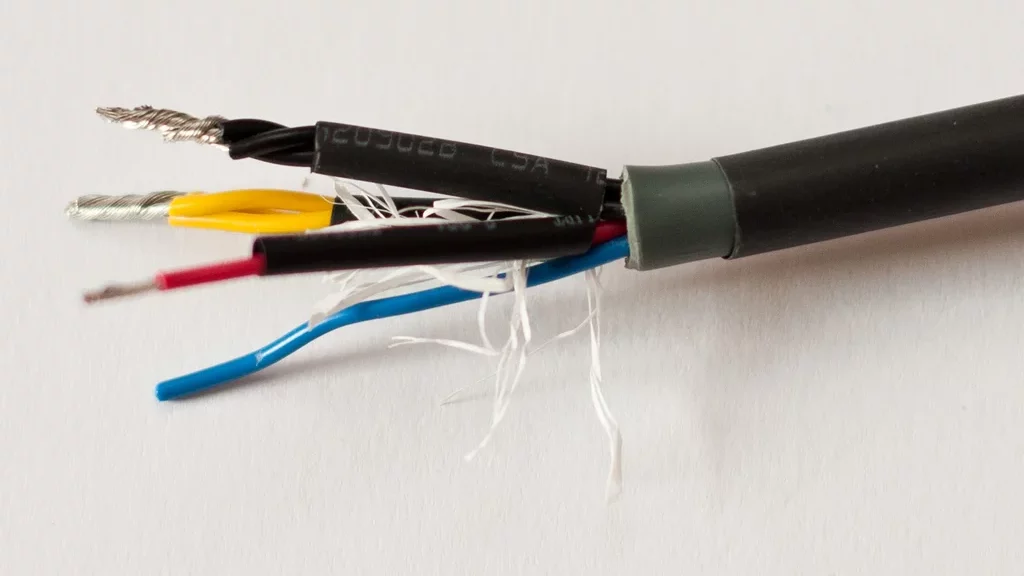
To use an X-box power brick for car audio at home, cut the end of the power brick wire. Cut back the insulation to expose the yellow, black, red, and blue wires. Strip these wires to around 1 inch.
Twist the yellow wires together and do the same to the black wires. If possible add crimp terminals to the ends of these wires.
The yellow wires will run to the +12V input on the amp and the black to the ground. Use a piece of 2-inch wire to jump the REM and +12V terminals.
Short the blue and red wires to ensure the power supply is always turned on (Green LED turns on when connected to a power outlet). Use electrical tape or heat shrink to insulate this connection. You can also add a switch between the connection to manually turn the power brick ON/OFF.
You can then hook up the brick to a power outlet.
5. Wire the system
Speaker and sub wiring
When wiring speakers to a receiver or amplifier, ensure you match the polarity by connecting + to + and – to – outputs and inputs. The subwoofer should be connected to the sub-output on the receiver or amp.
You will need 2 front and 2 rear speakers for a quadraphonic stereo system (4.0 surround sound).
Use the wire gauge specified by the speakers’ manufacturer.
How to connect a car head unit to speakers
When using a head unit as your audio processor, the red wire on it is used as the switch ignition while the yellow wire is a battery lead. Solder them together and connect them to the yellow wire on your 12-volt power supply.
For grounding, strip the black wire and connect it to the black wire on the power supply.
Connect your speakers to the head unit’s speaker outputs using the white and gray wires for the front left and right speakers. The green and purple wires will run to the rear left and right speakers.
Ensure you match the polarity. The wires on the head unit with stripes will be negative while those with a solid color are positive terminals.
Use heat shrink tubing/electrical tape to insulate the soldered wire points.
How to connect a receiver to a car amp
To connect a receiver to a car amp it should have front, rear, and sub preouts. These preouts will then be connected to the respective line-level inputs on the amplifiers using RCA cables.
Some receivers will automatically detect when the preout section is in use but you may need to assign the preouts manually on others.
For a receiver without a preout section, use speakers wire to RCA adapter cables or an RCA converter to connect to your amp’s input.
You will also need to match the gain on the amplifier to that of the receiver’s output.
How to connect a car amp to your phone
There are 2 main ways you can connect your phone/tablet/Pc etc to a car amp;
- Using a Bluetooth to RCA adapter
- Using a headphone jack (3.5mm) to RCA adapter
Both of these should work if the amp does not have a 3.5 input or support Bluetooth.
6. Buy or build a speaker enclosure
An enclosure is essential as it ensures that the rear and front soundwaves don’t interact and cancel each other out as they are out of phase. It also absorbs vibration by the drivers, especially at the lower frequencies.
The enclosure baffle should be made of thick material such as MDF (at least 0.75 inches) to absorb vibrations by the driver.
You are better off buying a prefab enclosure that suits your needs as building one is complex but here are the basics.
There are 2 main enclosure types you can use for car speakers;
- Sealed enclosures
- Ported enclosures
To find out which enclosure type is best suited for your project, calculate the EBP (Efficiency Bandwidth Product). To do this, divide the driver’s free-air resonant frequency (Fs) by its electrical Q (Qes) rating (Fs/Qes). This should give you a number between 0 to 100 plus.
For an EBP value of 50 or less, you need a sealed enclosure, for a value of more than 100, a ported enclosure, and a value of between 50 and 100, either a sealed or ported enclosure.
Sealed/acoustic suspension enclosures
This is the easiest enclosure to build as it gives some room for volume errors.
In a sealed enclosure the air inside the sealed box acts as a spring as it does not escape the box as the cone moves.
The “air spring” helps control cone movement to achieve a great transient response (increased accuracy). A great transient response ensures that the driver starts and stops when it is required to.
To build/buy a sealed enclosure, you need to calculate the net internal volume (Vc) beforehand. For this, you need the driver’s T/S (Thiele/Small) parameters.
T/S parameters
T/S parameters compare a driver’s performance and are used to predict the optimal conditions for the enclosure build. These parameters are manipulated by the speaker manufacturers for customizations depending on the driver’s desired characteristics.
Qts (total Q) used to determine enclosure type and size is the most essential parameter.
Total Q describes the electrical and mechanical parts of the driver. Qts is a sum of mechanical Q (Qms) and Electrical Q (Qes).
Qts= Qes + Qms
Q is used to describe the damping of the driver. Damping helps keep vibrations at the resonant frequency at bay.
Thus, mechanical Q (Qms) is damping by the driver’s suspension (surround and spider) while electrical Q (Qes) is damping by the coil and magnet assembly. The current produced by the movement of the coil in the magnetic circuit gap opposes the movement of the driver (damping).
Meanwhile, Qtc describes total Q. As the volume in the enclosure increases Qtc goes down and as volume decreases Qtc goes up.
Qtc=Qts*(Vas/Vc +1)1/2, where Vas is the compliance of air in the enclosure and Vc is the designed box volume or net volume.
Using an inverse relationship, we can reverse this formula to calculate the net volume (Vc). This net volume is what we are most interested in as it takes into account the air displaced by materials in the box including the driver, bracing, and dampening materials (added to deal with standing waves in the box).
Thus:
Vc = Vas / [(Qtc / Qts)2 -1]
Usually, a Qtc value of 0.707 is desired as this is where the best transients and a flat response will be achieved. There are exceptions of course.
With this Qtc value, you can use it to calculate the net volume of the box. Alternatively, you could use an online calculator to find the volume depending on your desired Qtc value (0.5, 0.707, 1.2, etc).
Here are some examples with subwoofer drivers specs I found online;
- Sub 1=(Fs=34Hz), (Vas=44L), (Qes=0.60), (Qts=0.57), (Xmax=15mm)
- Sub 2=(Fs=26Hz), (Vas=66.24L), (Qes=0.437), (Qts=0.396), (Xmax=12mm)
- Sub 3=(Fs=37Hz), (Vas=29L), (Qes=0.662), (Qts=0.584), (Xmax=12.5mm)
With our desired Qtc of 0.707 we can calculate the sealed enclosures’ net volume (Vc) for the subs above as seen in the image below;
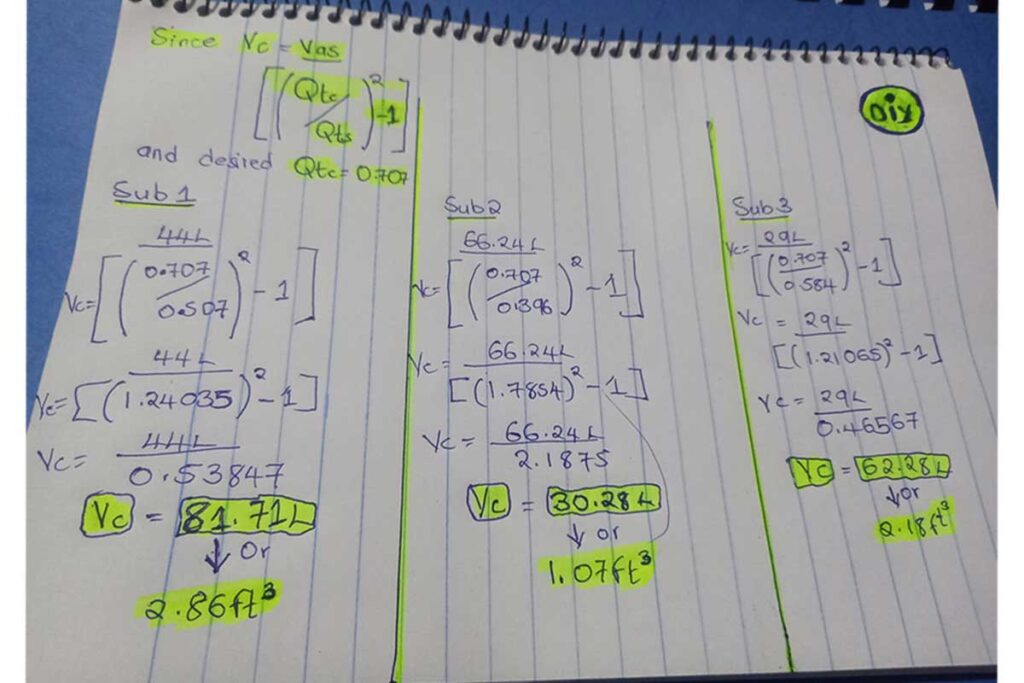
With the net volume, you can determine the internal dimensions and shape of your sealed box depending on the driver’s design.
Ported/Bass reflex enclosures
With an EBP value of 100+ or a driver with a Qts value of 0.4, you need a bass reflex enclosure. Usually, this enclosure is used for bass drivers (woofers and subwoofers).
A Bass reflex enclosure is just like a sealed enclosure but with a vent/port. This vent allows air to circulate in and out of the enclosure. It also allows you to tune the enclosure to a certain frequency (fb).
This vent acts as a Helmholtz resonator meaning that the back soundwaves reverse-phase to stay in phase with the front waves from the speaker. This ensures that the back (through the vent) and front soundwaves do not cancel each other.
However, there is little room for error when designing a ported enclosure.
Adding a port to an enclosure results in a lower bass extension (deeper bass) boosts the SPL at the resonant frequency by about 3db, and makes the driver more efficient above the resonant frequency resulting in less distortion.
The port also brings a host of issues, especially when poorly designed such as chuffing, a steeper roll-off (24db/octave), and less control of the driver below the tuning frequency which can lead to over-excursion and damage the driver.
Tuning a bass reflex, especially for beginners is incredibly complex and beyond the scope of this article. I will thus skip it for this time as there are different types of ported enclosures you can build. There are also several online guides you can learn from if this is something that tickles your fancy. I might also prepare a dedicated article for this, so be on the lookout for it.
To sum up
For quality sound, you are better off using home speakers in your house other than car speakers as it is more difficult getting a great in-room response when using a car stereo at home.
However, high-quality home theater speakers are not cheap but decent car speakers and subwoofers can be used as a budget alternative.
Also, if possible get the speakers in an enclosure as building one can be a hassle if you have not done it before. Alternatively, get a prefab enclosure that will be best suited for your drivers.

